.png)
Printed paper is
output into this tray.
Use this as a substitute
for the soft keyboard displayed on the touch panel. When not being
used, it can be stored under the operation panel.
This automatically
feeds and scans multiple originals. Both sides of 2-sided originals
can be automatically scanned at one time.
Open this cover to
replace the toner cartridge or to remove misfed paper in the paper
pass unit.
Open this cover to
switch the main power switch to "On" or "Off".
This panel hosts
the [Power] button, main power indicator, and touch panel. Use the
touch panel to operate each of these functions.
This is used to connect
a USB device such as a USB memory device to the machine.
For the USB cable, use a shielded cable.
Supports USB 2.0 (Hi-Speed).
Store paper in this
tray. Up to 1200 sheets can be stored.
Store paper in this
tray. Up to 500 sheets can be stored.
Store paper in this
tray. Up to 500 sheets can be stored.
Store paper in this
tray. Up to 800 sheets can be stored.
* Peripheral device.
.png)
This staples and
outputs paper.
This staples and
folds paper.
The status of the
machine is indicated.
As required, paper can be output into the right tray.
Use this tray to
feed paper manually.
When loading paper larger than A4R or 8-1/2" × 11"R, pull
out the extension guide.
This punches and
outputs paper.
Store paper in this
tray. Up to 3500 sheets can be stored.
Store paper in this
tray. Up to 3000 sheets can be stored.
* Peripheral device.
.png)
This punches and
outputs paper.
Covers and insertion
sheets to be inserted into printed sheets can be loaded.
Using the manual finishing function, you can directly
feed paper into the finisher or saddle stitch finisher to staple, punch
or fold the paper.
Use this tray to
feed paper manually.
When loading paper larger than A4R or 8-1/2" × 11"R, pull
out the extension guide.
This trims the excess
of saddle-stitched output.
This folds and outputs
paper.
This feeds paper
to the machine.
Store paper in this
tray. Up to 2500 sheets can be stored in each tray.
* Peripheral device.
.png)
This cartridge contains
toner.
When the toner in a cartridge
runs out, the cartridge of the colour that ran out must be replaced.
Heat is applied here
to fuse the transferred image onto the paper.
Caution
The fusing unit is hot. Take care not to burn yourself when removing a misfeed.Open this cover to
remove a misfeed.
This unit is used
for reversing paper when 2-sided printing is performed. Open this
cover to remove a paper misfeed.
Use this switch to
turn on the power for the machine.
This container collects
excess toner that remains after printing.
REPLACING THE TONER COLLECTION CONTAINER
This belt takes the
image formed with toner off the photoconductive unit and transfers
the image onto paper.
Caution
Do not touch or damage the transfer belt. This may cause a defective image.To remove a paper
misfeed, pull and hold this lever up to open the right side cover.

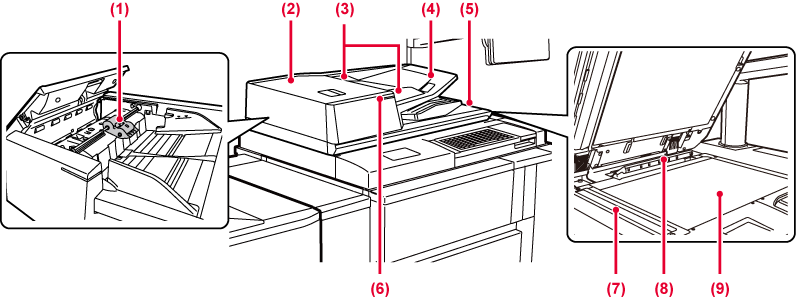
This roller rotates
to automatically feed the original.
Open this cover to
remove an original misfeed.
This cover is also opened to clean the paper feed
roller.
These guides help
ensure that the original is scanned correctly.
Adjust the guides to the width of the original.
Place the original.
Place the original with the print side facing up.
The original is discharged
to this tray after scanning.
This indicator lights when the document is correctly loaded on the document feeder tray.
Originals placed
in the automatic document feeder are scanned here.
This unit detects
the size of an original placed on the document glass.
If you want to scan books or other thick originals that cannot be fed through the automatic document feeder, place them on this glass.
.png)
This is used to connect
a USB device such as a USB memory device to the machine.
Supports USB 2.0 (Hi-Speed) and USB3.0 (SuperSpeed).
Cannot be used.
Connect the LAN cable
to this connector when the machine is used on a network.
Use a shielded LAN cable.
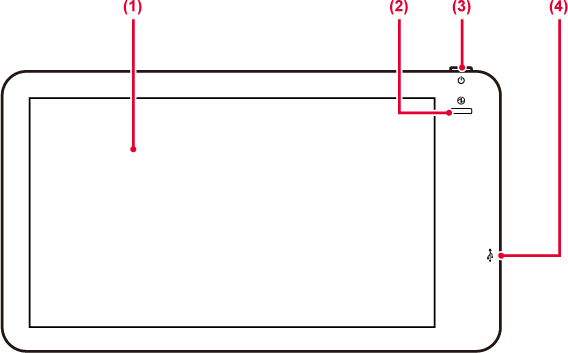
This section describes the names and functions
of the respective parts of the operation panel.

Messages and keys
appear on the touch panel display.
Operate the machine by directly tapping the displayed keys.
This indicator lights
up when the machine's main power switch is in the “
 ” position.
Blinks blue during the time that the [Power] button
does not operate immediately after the main power switch is switched
on.
This indicator will also blink blue when receiving
printer data.
This indicator blinks yellow during Auto Power Shut-Off mode.
Use this button to
turn the machine on and off and to enter the power saving mode.
This is used to connect a USB device such as a USB memory device to the machine.
Supports USB 2.0 (Hi-Speed).

Caution
Version 04a / bp90c80_usr_04a_en