Tips
What settings do I need after installing a printer driver ? (for Mac version) (Tips No.01594)
Introduction
After installing the printer driver, add the MFP in System Preferences. Also, set options to the printer driver so that you can use them in the MFP.
Note
- ●Depending on the product you are using, PS expansion kit may be required. See the Product Lineup for details.
Procedure
- ● The images are operations that explain how to print the test page in the case of Mac OS 11.1. They may be different, depending on the Mac OS version and driver type.
- ● We recommend downloading and using the latest driver from the website instead of using the driver in the CD-ROM bundled in the MFP.
1. Open System Preferences.
Click the Apple mark, and then click "System Preferences ..." in the displayed menu.

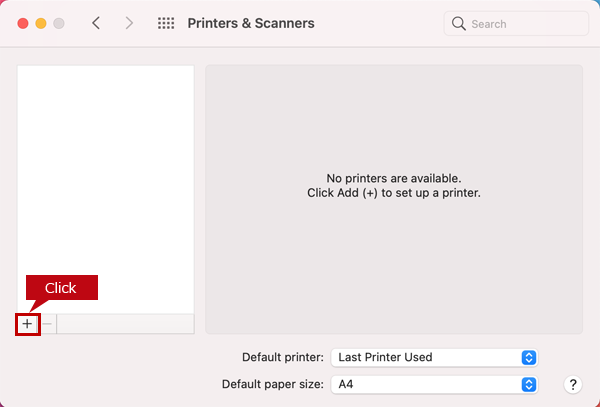
2. Display printers and scanners.
Click Printers & Scanners.

3. Add a MFP.
Click the [+] button.
4. Select the MFP to add.
Click the MFP to be added from the list displayed on the default screen, and check the "Name", "Location", and "Use".
Check if the PPD file of the MFP to add is selected. If there is no problem, click the [Add] button.
The following image shows the setting screen of "MX-4071".

Bonjour connection
- ● If the "Installable Options" screen appears, Go to 7. Set Options.
AppleTalk connections
- ● Since the paper tray and/or finisher installed to the MFP are automatically detected, the "Installable Options" screen does not appear.
Use AirPrint
- ● If you use AirPrint,select the protocol "AirPrint".
When the MFP is not displayed
- ● [Check] Is the power of the MFP turned on?
- ● [Check] Is the MFP and the PC connected to the network?
- ● If there is no problem with the above two points, enter the IP address to add the printer. For details, see "When installing a printer driver, the machine is not found. (for Mac version) ".
5. Display the setting screen such as options.
Click the Options & Supplies ... button.

6. Show options.
Click the [Options] button.

7. Set options.
Check the installation status before selecting the paper tray and/or finisher.

8. Complete the settings.
Click the [OK] button.
