Tips
How can I install "Network Scanner Tool Lite" on my PC? (Standard Installation) (Tips No.01633)
![]()
Network Scanner Tool Lite
The following procedures show how to download the latest version of the software from our homepage.
If you wish to perform the custom installation, please refer to the reference information below.
Reference Information
How can I install "Network Scanner Tool Lite" on my PC? (Custom Installation)
Procedure
1. Select Software to Install.
In "Software Downloads" page: (1) Select country/region. (2) Enter the name of the product. (3) Select the language. Click the [Next] button.
After the OS of you PC will be automatically detected, click the [Next] button.
In the "Downloads" page, click the software you would like to install.
Example:
(1) Select Country/Region: Asia
(2) Enter Product Name: Network Scanner Tool Lite Ver.2.0
(3) Select Language of Driver/Software: UK English
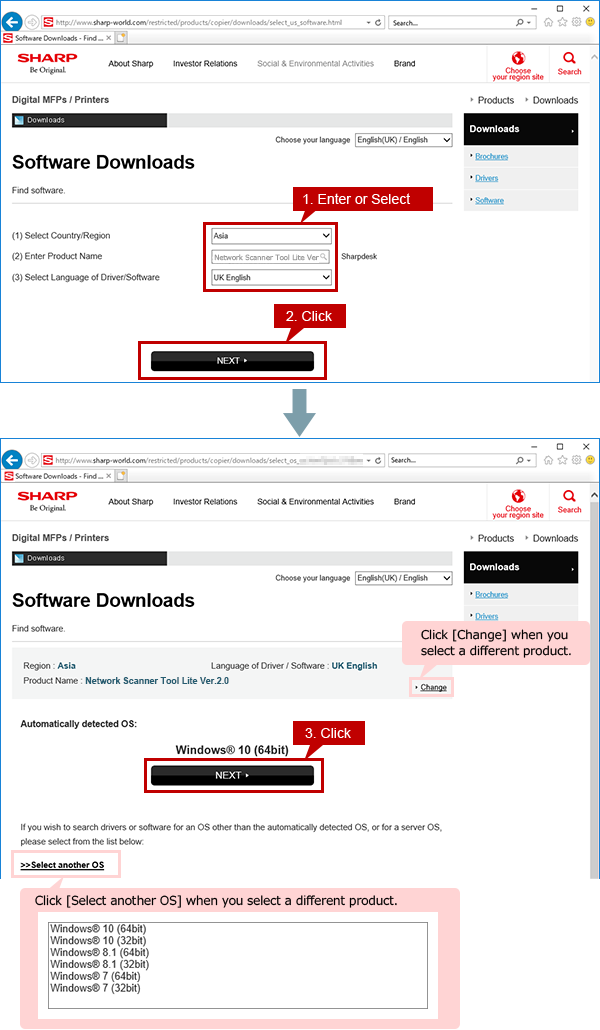
The automatically detected OS for server may differ from the actual OS.
If the detected OS is different from the actual OS, click [>>Select another OS] and select the OS of your PC from the list box.
If the OS cannot be auto-detected.
When a list box appears, please select the OS of your PC from the list.
How to find the OS information of your PC.
To check the OS information of your PC, please refer to "How do I know my PC is 32bit or 64bit?"
If there are more than one software on "Download drivers and software" page.
Please select the software appropriate for your computer environment.
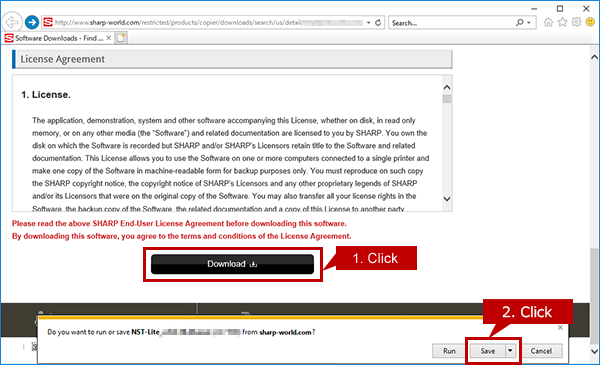
2. Download the Software and Save the Downloaded File.
Click the [Download] button and click the [Save] in the displayed window.
Depending on your PC environment, sometimes the file is saved automatically without opening the window.
3. Execute the Installer.
Right-click on the file and click [Run as administrator].
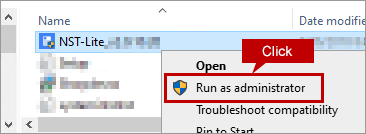
Administrator rights are required to execute the installation.
- Right-click the saved file, then click [Run as administrator] in the menu.
- Enter the administrator password, if required.
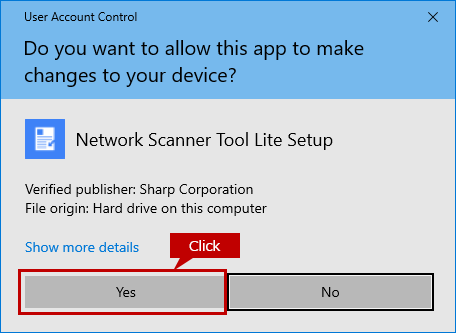
4. User Account Control Window will Open.
1. Click [Yes] when the window appears with a message: "Do you want to allow this app to make changes to your device".
2. When "Confirm Uninstall" window appears, uninstall the old version of Network Scanner Tool Lite. Please refer to the procedure of "How to Uninstall Previously Installed Network Scanner Tool Lite" to uninstall the old version of the software and after the uninstallation is completed, please go on to install the new version of the software.
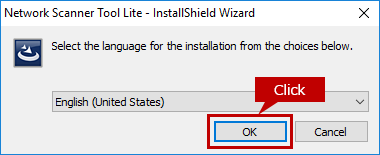
5. Language Selection Window will Appear.
Select a display language for installation and click the [OK] button.
Example: English (United States)
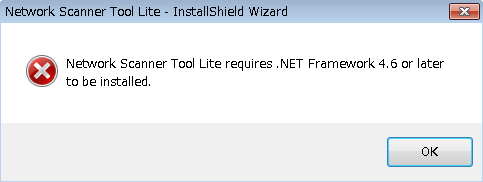
If .NET Framework4.6 or later is not installed.
The window will open with a message: "Network Scanner Tool Lite requires .NET Framework 4.6 or later to be installed." Click [OK] to close the window. For the details, see "When I try to install Network Scanner Tool Lite, a message 'Network Scanner Tool Lite requires .NET Framework 4.6 or later to be installed,' appears.".
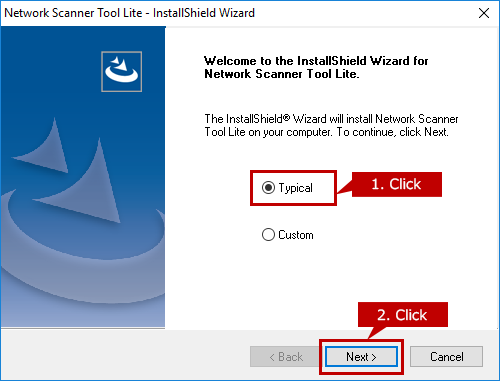
6. Screen of "Welcome to the InstallShield Wizard for Network Scanner Tool Lite." will Appear.
Select "Typical" then click the [Next] button.
7. Screen of "Windows Firewall Unblock Utility" will Appear.
Click the [Allow access] button.
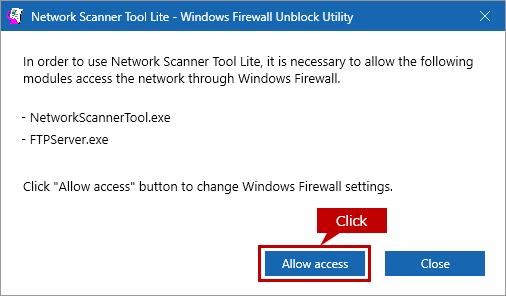
Reference
This screen only appears when Network Scanner Tool Lite is installed for the first time.
8. "Scanner Selection" Screen will Appear.
After a while, the list of the detected network scanners are displayed in the Scanner Selection screen. Select a network scanner to use and click the [Next] button.
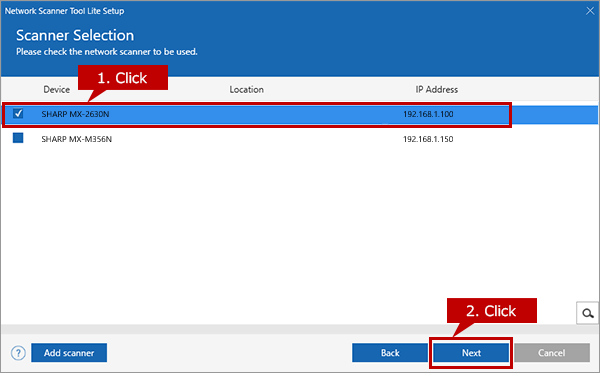
Reference
Please uncheck the network scanner which is not to be used.
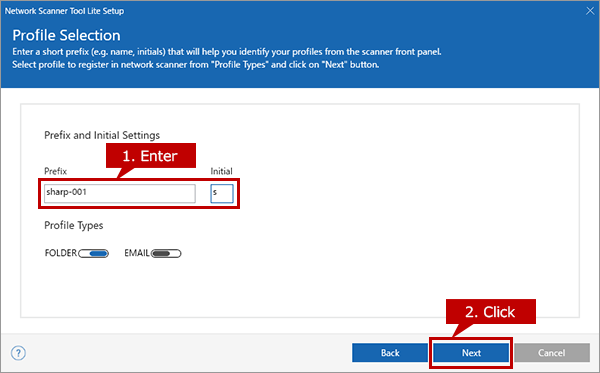
9. "Profile Selection" Screen will Appear.
The screen for profile selection will appear. Enter "Prefix" and "Initial" then click the [Next] button.
- Prefix example: sharp-001
- Initial example: "s"
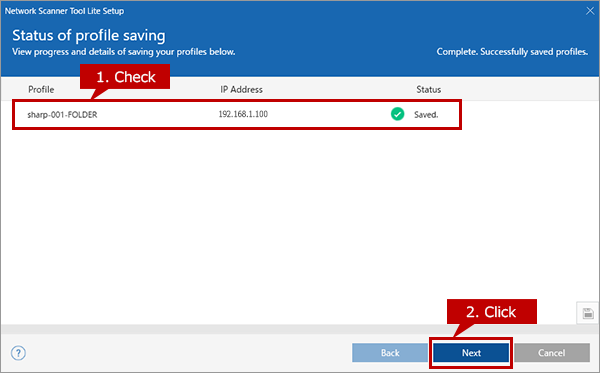
10. "Status of profile saving" Screen will Appear.
The screen which shows the status of profile saving will appear. Check if the profile is properly saved, then click the [Next] button.
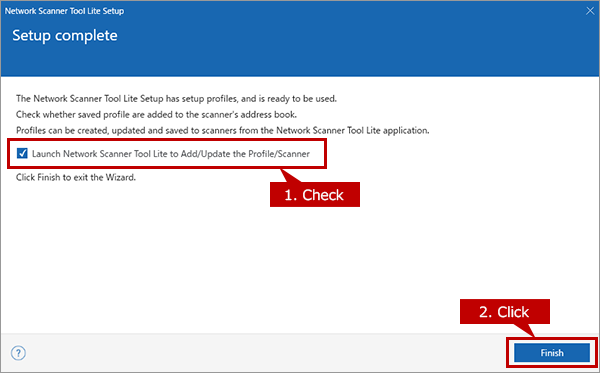
11. Screen of "Setup complete" will appear.
Check the checkbox for "Launch Network Scanner Tool Lite to Add/Update the Profile/Scanner" then click the [Finish] button.
12. Network Scanner Tool Lite will be Activated.
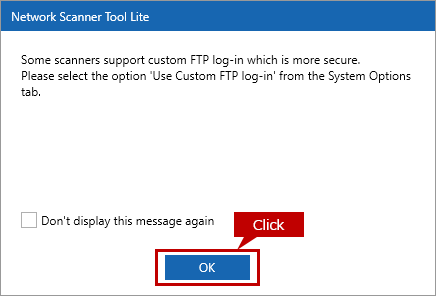
1. Network Scanner Tool Lite will be activated. When a window with "Some scanners support ..." appears, click the [OK] button to close the window.
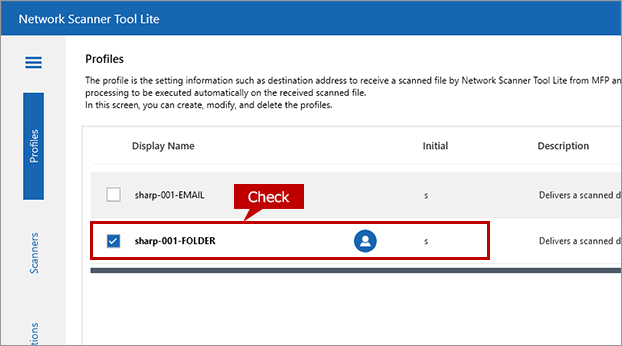
2. The profiles screen of Network Scanner Tool Lite will appear. Check if the profile is properly registered then close the screen.
Now you have installed Network Scanner Tool Lite properly.
Supplement How to Uninstall Previously Installed Network Scanner Tool Lite
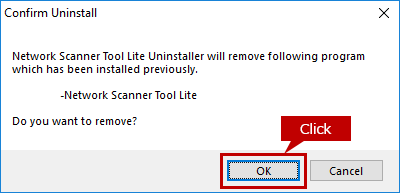
1. Screen of "Confirm Uninstall" will Appear.
Click the [OK] button.
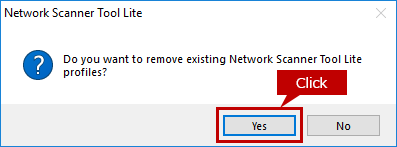
2. Screen of "Do you want to remove existing Network Scanner Tool Lite profiles?" will Appear.
Click the [Yes] button.
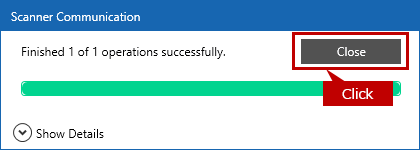
3. "Scanner Communication" Screen will Appear.
When "Finished ... operations successfully" is displayed, click the [Close] button.
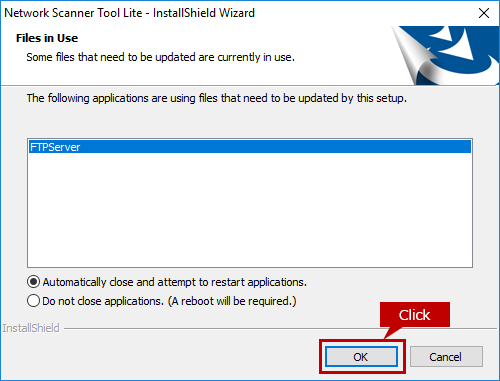
4. Screen of "Files in Use" will Appear.
Just click the [OK] button.
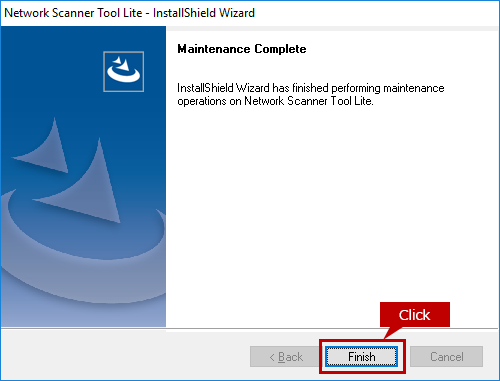
5. Screen of "Maintenance Complete" will Appear.
The screen of "Maintenance Complete" will appear after a while. Click the [Finish] button.
Activate the installer again and execute the installation.