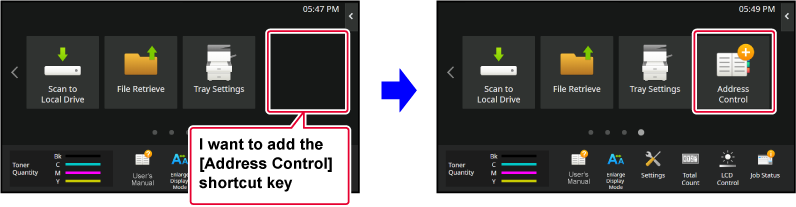
In the home screen, you can change the number of shortcut
keys shown and change shortcut keys.
This includes changing the background and text color,
and changing the background to a custom image.
This section explains how
to add a shortcut key to the home screen.
You can add a shortcut key using the touch panel, or from
the Web page. In the Web page, you can change a shortcut key image
to any custom image.
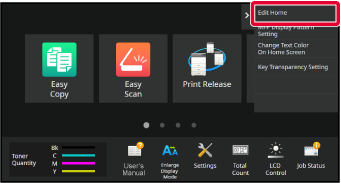
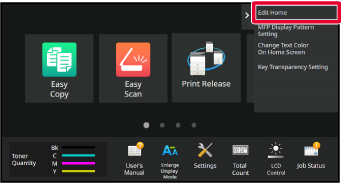
Open the action panel on the home screen, and tap [Edit Home].
The administrator password screen appears. Enter your password.
Enter the administrator password.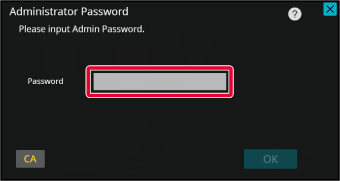
Tap an empty shortcut key location.
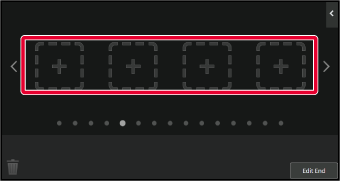
Tap the function you want to add.
The shortcut key will be added to the selected location.
After completing the settings, tap the [Logout] key.
Enter the IP address set in the machine in the address bar of your web browser.
In the factory default state, you must enter your user password after entering the IP address.On the Web page, click the [System Settings] tab → [Home Screen Settings].
Some settings may require that you enter your user password after clicking [Home Screen Settings]. If you did not perform user authentication, you must enter the administrator password.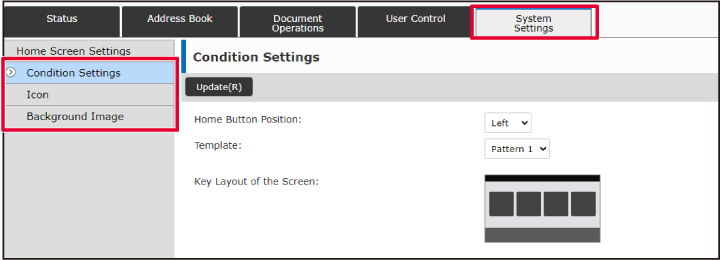
Select the function you want to add.

To change the image of a shortcut key, set the [Use
Custom Image] checkbox
to , and select a previously added image
with [Select File].
, and select a previously added image
with [Select File].
When you have finished configuring the settings, click the [Submit] button.
The settings are saved in the machine and applied.You can add shortcut keys
to the home screen, and delete unneeded shortcut keys.
You can also change the display order of the shortcut keys
and change names and images to make the machine easier
to use.
Open the action panel on the home screen, and tap [Edit Home].
The administrator password screen appears. Enter your password.
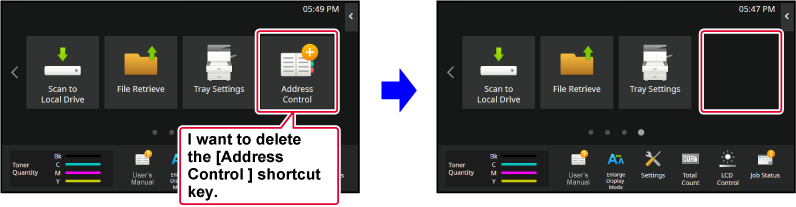
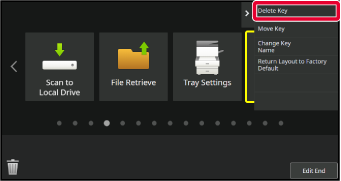
Enter the administrator password.Tap the shortcut key you want to delete, and tap [Delete Key].
A yellow frame appears around the selected shortcut key. With the shortcut key selected, tap .
.
Tap the [Yes] key.
The selected shortcut key will be deleted.
After completing the settings, tap the [Logout] key.
Enter the IP address set in the machine in the address bar of your web browser.
In the factory default state, you must enter your user password after entering the IP address.On the Web page, click the [System Settings] tab → [Home Screen Settings].
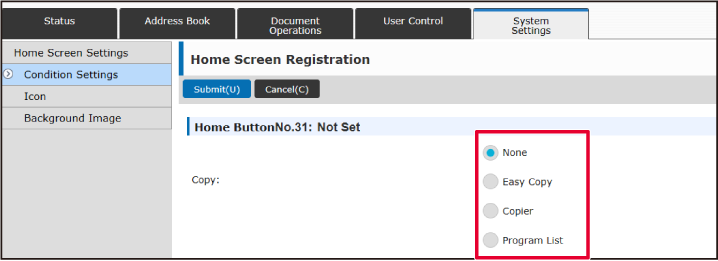
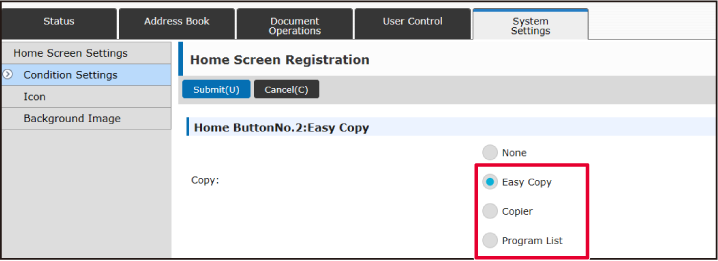
Some settings may require that you enter your user password after clicking [Home Screen Settings]. If you did not perform user authentication, you must enter the administrator password.Click [Condition Settings] and click the shortcut key you want to delete.
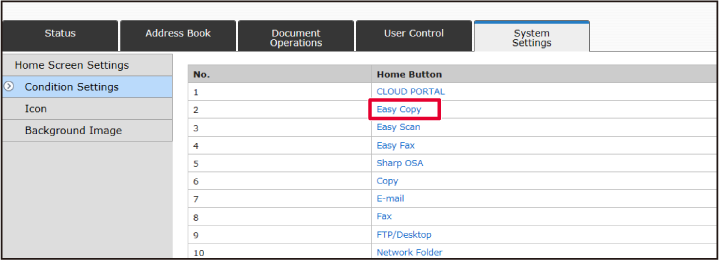
Select [None] and click the [Submit] button.
When you click the [Submit] button, the [Home Screen Registration] screen closes.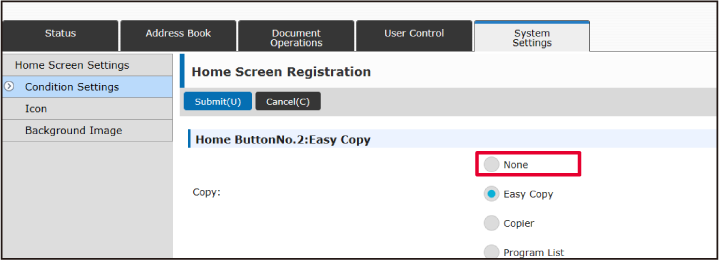
When you have finished configuring the settings, click the [Submit] button.
The settings are saved in the machine and applied.This section explains how
to change a shortcut key in the home screen.
Only the name can be changed from the touch panel. You can
change the icon image from the Web page.
To change a shortcut key from the touch panel, move
the shortcut key in the desired location away from that location,
and then register the new shortcut key in the location that has
been freed. For information about how to move shortcut
keys, see "MOVING A SHORTCUT KEY".
For information about how to add shortcut keys, see "
ADDING SHORTCUT KEYS".
This section explains how to change the name of a shortcut
key.
Open the action panel on the home screen, and tap [Edit Home].
The administrator password screen appears. Enter your password.
Enter the administrator password.A yellow frame appears around the selected shortcut key.
A yellow frame appears around the selected shortcut key.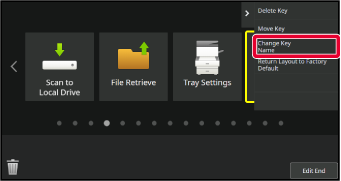
Enter the new name by keyboard.
Enter the name, and tap the [OK] key.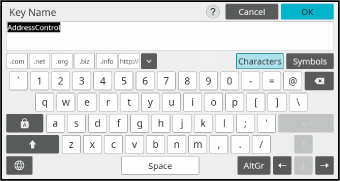
After completing the settings, tap the [Logout] key.
Enter the IP address set in the machine in the address bar of your web browser.
In the factory default state, you must enter your user password after entering the IP address.On the Web page, click the [System Settings] tab → [Home Screen Settings].
Some settings may require that you enter your user password after clicking [Home Screen Settings]. If you did not perform user authentication, you must enter the administrator password.Click [Condition Settings], and click the shortcut key you want to change.
Select the desired function.
To change the icon image, set the [Use Custom Image]
checkbox to
, and
select a previously added image with [Select File].
When you have finished configuring the settings, click the [Submit] button.
The settings are saved in the machine and applied.To change a shortcut key
image to a new image, you must first add the new image.
This section explains how to add an image. Images are added
by using the Web page.
Enter the IP address set in the machine in the address bar of your web browser.
In the factory default state, you must enter your user password after entering the IP address.On the Web page, click the [System Settings] tab → [Home Screen Settings].
Some settings may require that you enter your user password after clicking [Home Screen Settings]. If you did not perform user authentication, you must enter the administrator password.Click [Icon].
Select any item
If you are adding a new image, click "Not Set". If "Not Set" items are all in use, click an unneeded item in the already added items.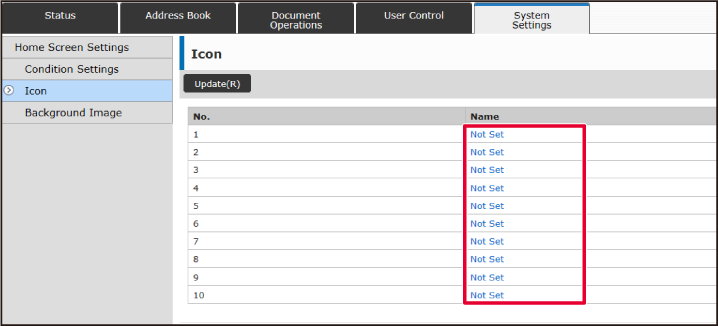
Select the file to be added in "Select File".
Click the [Browse] button, and select the image to be submitted.When you have finished configuring the settings, click the [Submit] button.
The settings are saved in the machine and applied.This section explains how
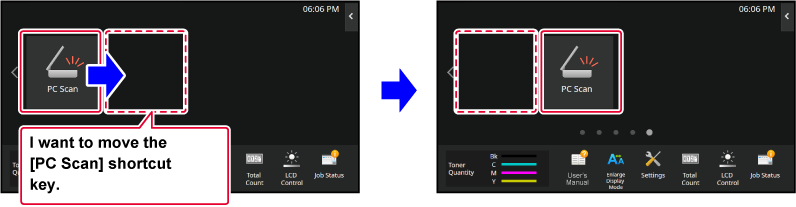
to move a shortcut key in the home screen.
Shortcut keys are moved by using the touch panel.
Open the action panel on the home screen, and tap [Edit Home].
The administrator password screen appears. Enter your password.
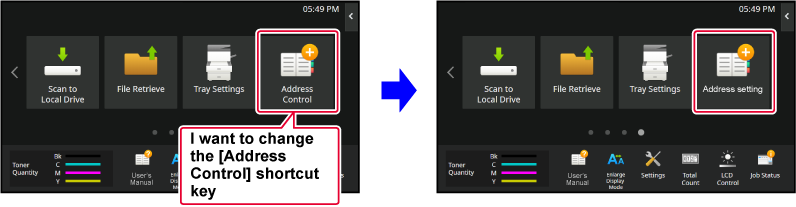
Enter the administrator password.Tap the shortcut key you want to move, and tap [Move Key].
A yellow frame appears around the selected shortcut key.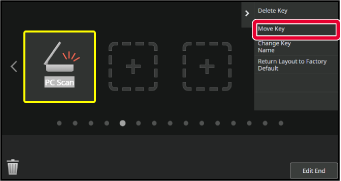
Tap an empty shortcut key location
The shortcut key moves to the tapped location.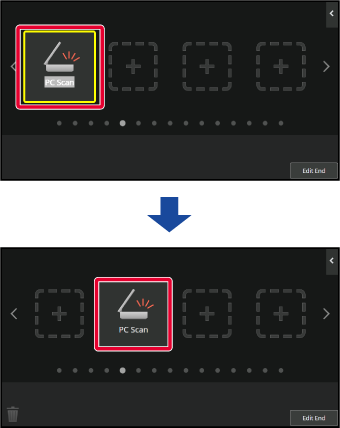
After completing the settings, tap the [Logout] key.
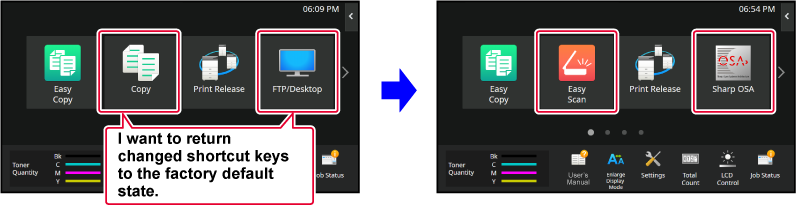
This section explains how
to return the shortcut keys in the home screen to the factory default
state.
This procedure can be performed from the touch panel or from
the Web page.
Open the action panel on the home screen, and tap [Edit Home].
The administrator password screen appears. Enter your password.
Enter the administrator password.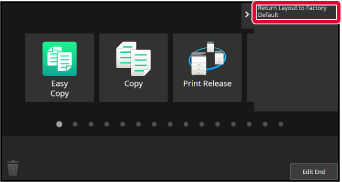
Tap the [Reset] key.
The shortcut keys are returned to the factory default state.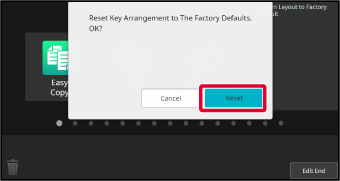
After completing the settings, tap the [Logout] key.
Enter the IP address set in the machine in the address bar of your web browser.
In the factory default state, you must enter your user password after entering the IP address.On the Web page, click the [System Settings] tab → [Home Screen Settings].
Some settings may require that you enter your user password after clicking [Home Screen Settings]. If you did not perform user authentication, you must enter the administrator password.Click [Condition Settings], and click the [Return to the Defaults] button.
A confirmation window appears. Click the [OK] button.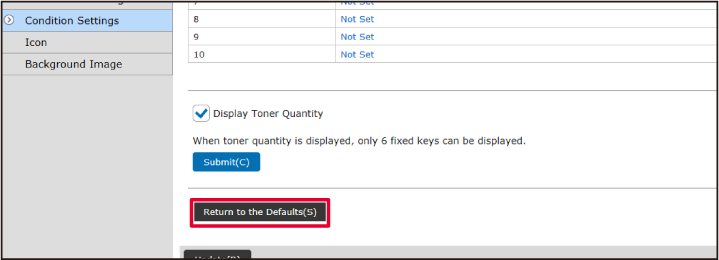
When you have finished configuring the settings, click the [Submit] button.
The settings are saved in the machine and applied.You can change the transparency
of the shortcut keys.
If you want to change the background of your home screen to
show what's behind the shortcut keys, increase the transparency
to make it easier to see what's behind the shortcut keys.
This procedure can be performed from the touch panel or from
the Web page.
Open the action panel on the home screen, and tap [Key Transparency Setting].
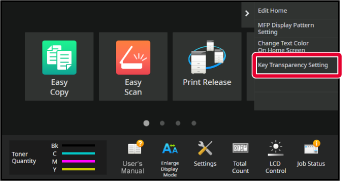
The administrator password screen appears. Enter your password.
Enter the administrator password.Select the level of transparency you wish to set.
Tap the [Finish and Return] key.
After completing the settings, tap the [Logout] key.
Enter the IP address set in the machine in the address bar of your web browser.
In the factory default state, you must enter your user password after entering the IP address.On the Web page, click the [System Settings] tab → [Home Screen Settings].
Some settings may require that you enter your user password after clicking [Home Screen Settings]. If you did not perform user authentication, you must enter the administrator password.Click [Condition Settings], and click the [Key Transparency Setting] button.
When you have finished configuring the settings, click the [Submit] button.
The settings are saved in the machine and applied.Multiple home screen layout
patterns are preset in the machine. These include a layout pattern
that reduces the display size of the shortcut keys to increase the
number of keys shown, and a layout pattern that eliminates the fixed
key display area to increase the number of shortcut keys shown.
The layout pattern can be changed in the Web page.
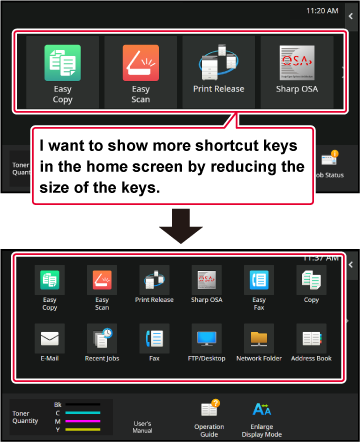
Six layout patterns are available.
| Pattern | Number of shortcut keys displayed per screen | Fixed key area | Maximum number of screens |
|---|---|---|---|
|
1 |
4 |
Yes |
15 screens |
|
2 |
8 |
No |
8 screens |
|
3 |
8 |
Yes |
8 screens |
|
4 |
12 |
No |
5 screens |
|
5 |
12 |
Yes |
5 screens |
|
6 |
18 |
No |
4 screens |
Enter the IP address set in the machine in the address bar of your web browser.
In the factory default state, you must enter your user password after entering the IP address.On the Web page, click the [System Settings] tab → [Home Screen Settings].
Some settings may require that you enter your user password after clicking [Home Screen Settings]. If you did not perform user authentication, you must enter the administrator password.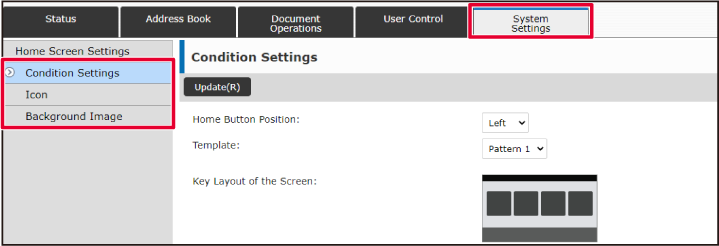
Click [Condition Settings] and select the desired layout pattern from the "Template".
When you have finished configuring the settings, click the [Submit] button.
The settings are saved in the machine and applied.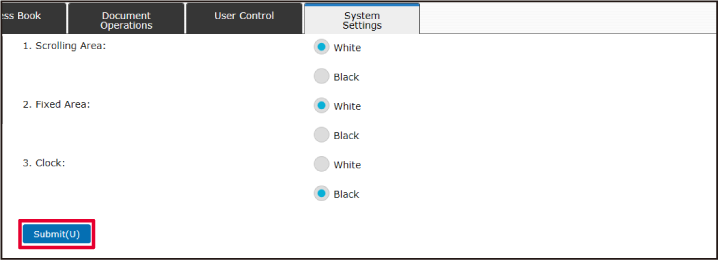
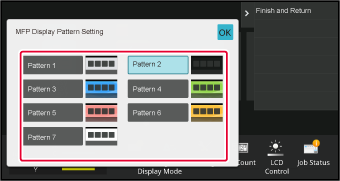
Multiple color patterns
are preset in the machine. You can change the color pattern
from the touch panel.
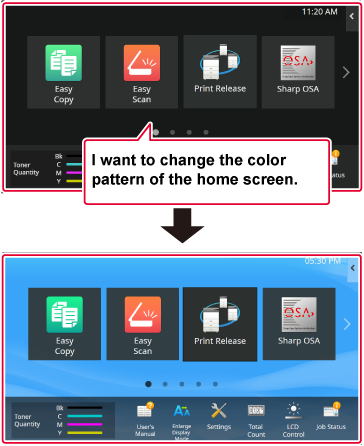
Open the action panel on the home screen, and tap [MFP Display Pattern Setting].
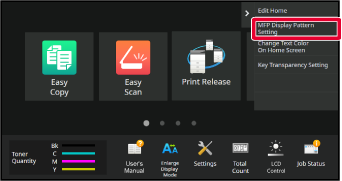
The administrator password screen appears. Enter your password.
Enter the administrator password.
Select the desired pattern.
After settings are completed, tap the [Logout] key.
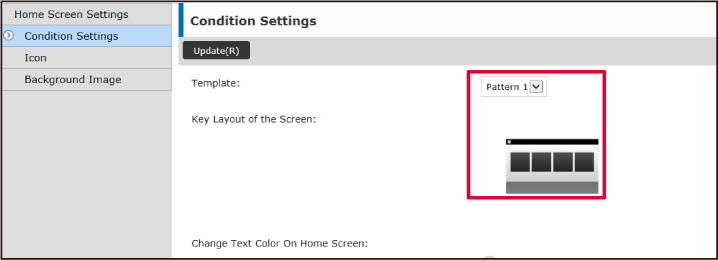
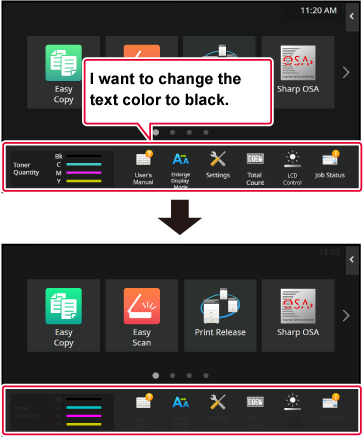
You can change the color of the text
in shortcut keys, fixed keys, and the clock on the home screen to
white or black.
The color is changed using the touch panel.
The color of text on the home screen varies depending
on the layout pattern.
For information about layout patterns of the home screen,
see "CHANGING THE LAYOUT PATTERN OF THE HOME SCREEN".
Factory default text colors
Home screen layout patterns and text colors
| Layout Pattern | Scrolling Area (Text color of shortcut key) | Fixed Area (Text color of fixed keys) | Clock (Text color of clock) |
|---|---|---|---|
|
1 |
White |
White |
Black |
|
2 |
White |
No |
Black |
|
3 |
Black |
White |
Black |
|
4 |
Black |
No |
Black |
|
5 |
Black |
White |
Black |
|
6 |
Black |
No |
Black |
Open the action panel on the home screen, and tap [Change Text Color On Home Screen].
The administrator password screen appears. Enter your password.
Enter the administrator password.Change the text color.
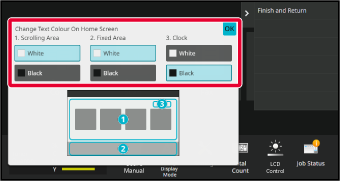
After settings are completed, tap the [Logout] key.
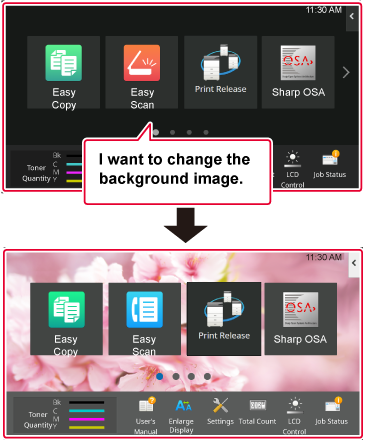
You can change the background
image of the home screen to a custom image.
This procedure can be performed from the touch panel or from
the Web page.
To change the image from the touch panel, first save the desired
image in a USB device and connect the device to the machine.
Connect the USB device containing the desired image to the machine.
When the USB device is connected to the machine, the popup window will be appeared. Tap the [OK] key.Tap the [Settings] key on the Home screen.
The screen changes to the settings screen.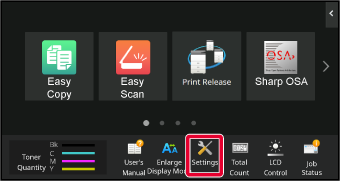
Tap [System Settings] → [Home Screen Settings] → [Background Image], and then tap [Change] key.
The "Register Background Image" screen will be appeared.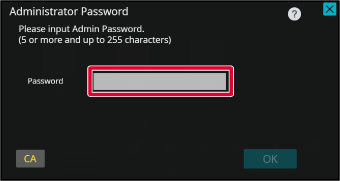
Set the [Use Custom Image] checkbox to
 , and select the desired image with [Folder Name/File Name].
Click the [Store] button.
After all U/I customize settings are completed, tap the [Logout] key.Enter the IP address set in the machine in the address bar of your web browser.
In the factory default state, you must enter your user password after entering the IP address.On the Web page, click the [System Settings] tab → [Home Screen Settings].
Some settings may require that you enter your user password after clicking [Home Screen Settings]. If you did not perform user authentication, you must enter the administrator password.Click the [Change] button in [Background Image].
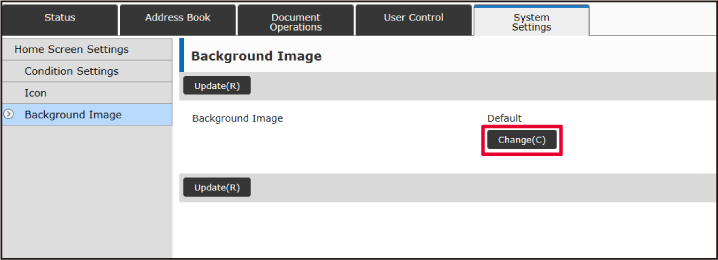
Set the [Use Custom Image] checkbox to
, and select the image with [Select File].
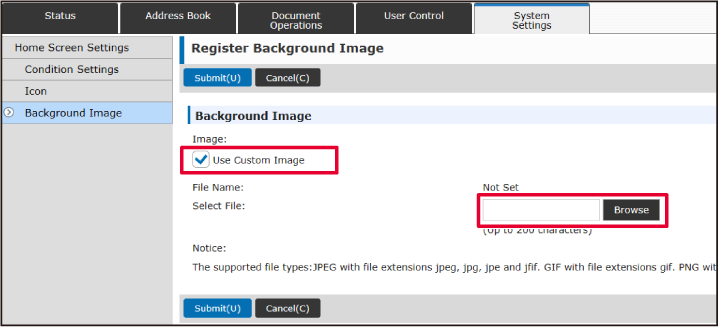
When you have finished configuring the settings, click the [Submit] button.
The settings are saved in the machine and applied.You can change the fixed
keys. The fixed keys are changed using the Web page.
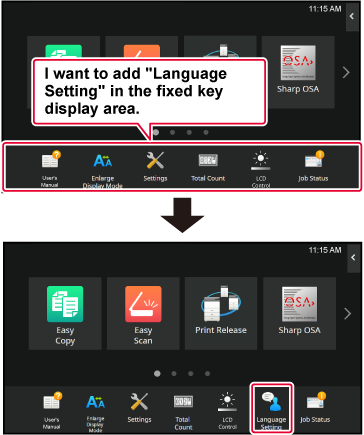
Enter the IP address set in the machine in the address bar of your web browser.
In the factory default state, you must enter your user password after entering the IP address.On the Web page, click the [System Settings] tab → [Home Screen Settings].
Some settings may require that you enter your user password after clicking [Home Screen Settings]. If you did not perform user authentication, you must enter the administrator password.Click [Condition Settings], and click the desired item under "Fix Key".
You can click [Not Set] to add a new fixed key.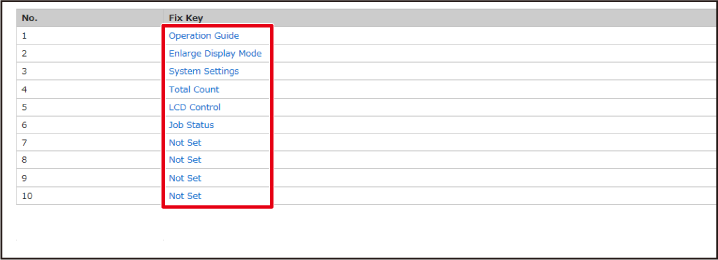
Select the function you want to add, and click the [Submit] button.
When you click the [Submit] button, the [Home Screen Registration] screen closes.When you have finished configuring the settings, click the [Submit] button.
The settings are saved in the machine and applied.In a Normal mode screen such as copy or
image send, you can enlarge the character size and interval. This
function is selected on the touch panel.
Tap the [Enlarge Display Mode] key in the home screen.
The key image changes to and enlarge display mode is enabled.
 and enlarge display mode is canceled.
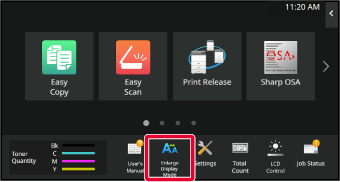
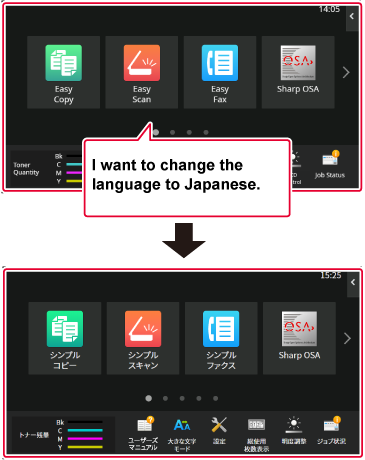
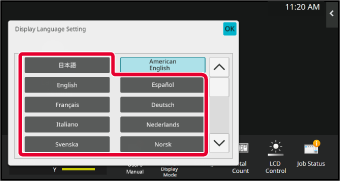
You can change the language used in the
home screen.
Open the action panel on the home screen, and tap [Edit Home].
The administrator password screen appears. Enter your password.
Enter the administrator password.Tap an empty shortcut key location.

Tap the function you want to add.
The shortcut key will be added to the selected location.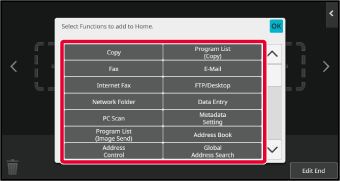
After settings are completed, tap the [Logout] key.
Tap the [Language Setting] key on the home screen.
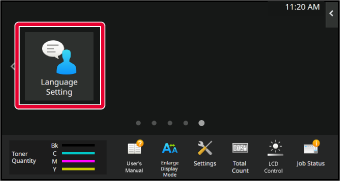
Select the desired language and tap
 .
.
Enter the IP address set in the machine in the address bar of your web browser.
In the factory default state, you must enter your user password after entering the IP address.On the Web page, click the [System Settings] tab → [Common Settings]→ [Operation Settings]→ [Condition Settings]→ [Language Setting].
This settings may require that you enter your user password. If you did not perform user authentication, you must enter the administrator password.Select the language you want to change from the list.
When you have finished configuring the settings, click the [Submit] button.
The settings are saved in the machine and applied.You can change the position
of the [Home Screen] key.
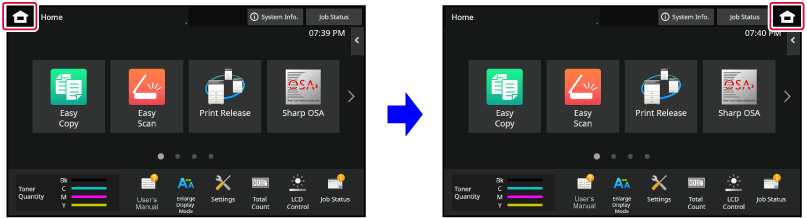
Tap the [Settings] key on the Home screen.
The screen changes to the settings screen.Tap [System Settings] → [Home Screen Settings] and then tap [Home Button Position] key.
Select [Left] or [Right]
Click the [Store] button.
After settings are completed, tap the [Logout] key.Enter the IP address set in the machine in the address bar of your web browser.
In the factory default state, you must enter your user password after entering the IP address.On the Web page, click the [System Settings] tab → [Home Screen Settings] → [Home Button Position].
Some settings may require that you enter your user password after clicking [Home Screen Settings]. If you did not perform user authentication, you must enter the administrator password.Select [Left] or [Right]
When you have finished configuring the settings, click the [Submit] button.
The settings are saved in the machine and applied.Version 06a / bp70c65_usr_06a_us
