SHARP

Language

CONVENIENT FUNCTIONS FOR CREATING PAMPHLETS AND POSTERS

CREATE A PAMPHLET (BOOKLET/SADDLE STITCH)

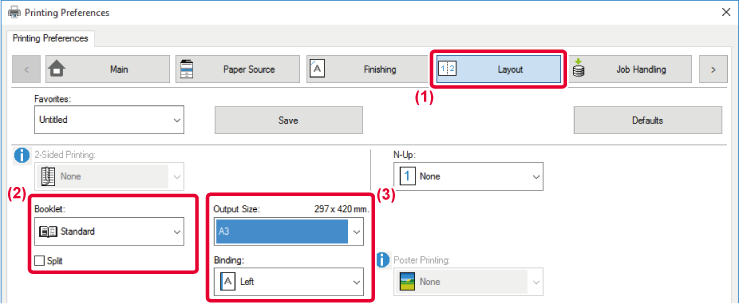
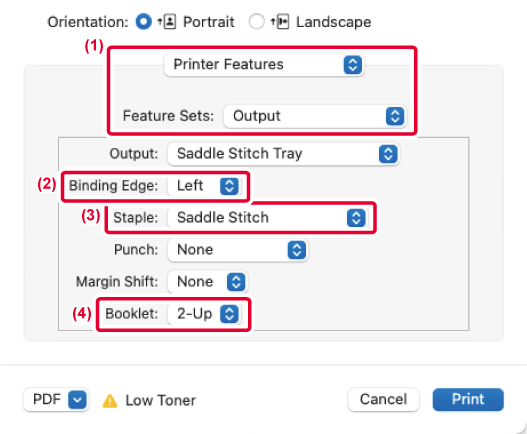
The pamphlet function prints on the front and back of each sheet of paper so that the sheets can be folded and bound to create a pamphlet.
If a saddle finisher is installed and if "Booklet" and "Staple" are selected, this function automatically folds and outputs the copies. This is convenient when you wish to compile printed output into a pamphlet.

Windows

  1. Click the [Layout] tab.
  2. Select [Standard] or [Full Image] in "Booklet".
    • When [Standard] is selected, the printed image will be enlarged or reduced to fit the paper selected in "Output Size".
    • When [Full Image] is selected, the printed image will be enlarged or reduced to fit the size selected in "Fit To Paper Size". By selecting a paper size that is larger than the print image, you can cut off the edges of the paper after making the booklet to create a booklet with no margins.
    • When the number of output pages will exceed the number of sheets that can be stapled, you can select the [Split] checkbox ( ) to divide the output into multiple sub-booklets that can each be stapled. When stacked, the sub-booklets will have the same page order as the original pages.

  3. Select the specified output size and the binding edge.
    • When [Standard] is selected, select the output paper size.
    • When [Full Image] is selected, select the size to which you want to enlarge or reduce the print image in [Fit To Paper Size], and select the paper size you want to use for printing in "Output Size".

    If a saddle stitch finisher is installed
  4. Click the [Finishing] tab.
  5. Select [Saddle Stitch] from "Staple".
When a saddle finisher (large capacity) is installed and the job is not output correctly with [Saddle Stitch], select [Saddle Stitch (Reverse)].

macOS

  1. Select [Printer Features] and then select [Output].
  2. Select "Binding Edge".
  3. Select [Saddle Stitch].
  4. Select [Tiled] or [2-Up].

PRINTING WITH MARGIN SHIFT SETTING (MARGIN)

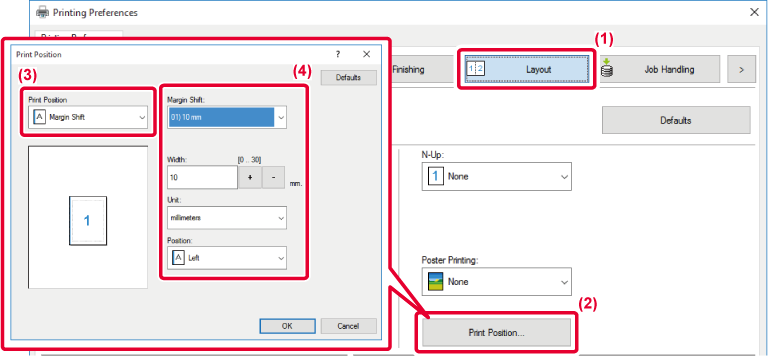
This function shifts the print image to increase the margin at the left, the right, or the top of the paper.
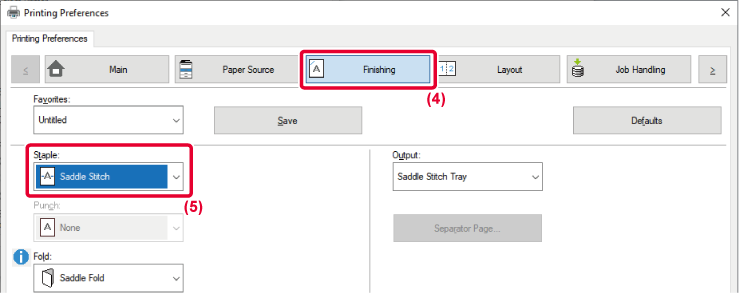
If a finisher or saddle finisher is installed, the staple and punch functions of the machine can also be used together.
This is convenient when you wish to staple or punch the output but the binding area overlaps the text.

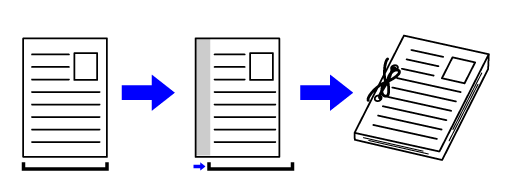
By shifting the image, the part of the image that is outside the print area will not be printed.

Windows

  1. Click the [Layout] tab.
  2. Click the [Print Position] button.
  3. Select [Margin Shift].
  4. Select the shift width.
  5. Select from the "Margin Shift" menu. If you wish to configure another numeric setting, select the setting and click buttons or directly enter the number.

macOS

  1. Select [Printer Features] and then select [Output].
  2. Select "Binding Edge".
  3. Select "Margin Shift".

CREATE A LARGE POSTER (POSTER PRINTING)

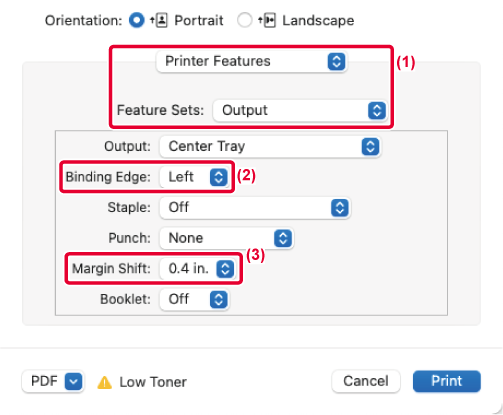
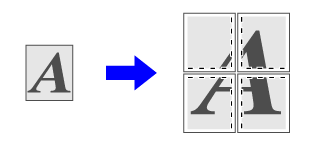
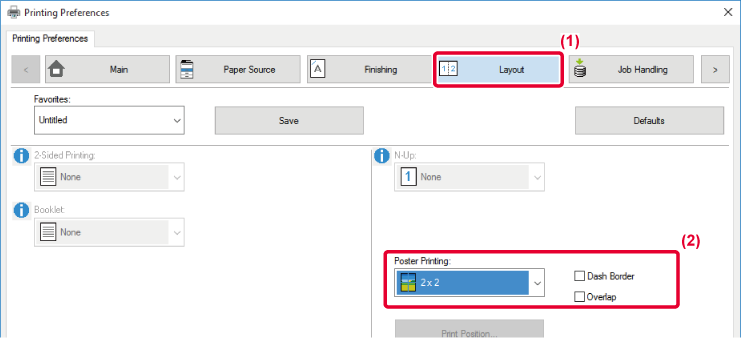
One page of print data is enlarged and printed using multiple sheets of paper (2 sheets (1 x 2), 4 sheets (2 x 2), 9 sheets (3 x 3) or 16 sheets (4 x 4)). The sheets can then be attached together to create a large poster.
To enable precise alignment of the edges of the sheets during attachment, borderlines can be printed or overlapping edges can be created (overlap function).

This function is available in a Windows environment.

Windows

  1. Click the [Layout] tab.
  2. Select the number of sheets to be used in "Poster Printing".
  3. If you wish to print borderlines and/or use the overlap function, click the corresponding checkboxes so that the appears.
Language

Version 03a / bp70c65_usr_03a_us

↑Top of page