Print a log of recent image
sending activities (date, name of destination, time required, result,
and other items).
The Image Sending Activity Report contains information that
is useful in dealing with problems, such as the types of errors
that occurred.
The most recent 200 transactions are included in the report.
You can have the machine print the Image Sending Activity
Report each time the number of transactions reaches 201, or at a
specified time (once a day only).
Error types and other information are printed
in the result column of transaction and activity reports. When a
transaction or activity report is printed, check the result of the
transaction in the result column and take action as needed.
| Print Page | Description |
|---|---|
|
OK |
The transaction was completed normally. |
|
Cancel |
A transmission was stopped while in progress, or a reserved transmission job was canceled. |
|
FULL |
The memory became full during reception. |
|
Rejected |
An Internet fax was sent from a party that is blocked. |
|
Report Wait |
Transmission confirmation was enabled, but transmission confirmation was not received within the set time. |
|
NG LIMIT |
Transmission was not possible because the file size exceeded the machine's file size limit setting. |
|
|
An e-mail was received, however, the attached file was not a TIFF-F file or there was no attached file, and thus printing was not possible. |
|
FAIL xx (xxxx) |
The transaction failed due to a communication error. First 2 digits of communication error number: Error code from 00 to 99. Last 4 digits of communication error number: Code for use by service technicians. |
|
displayed* |
Displayed at the receiving machine when delivery confirmation is set. |
|
dispatched* |
Forwarded elsewhere before being displayed at the receiving machine when delivery confirmation is set. |
|
processed* |
Processed without being displayed at receiving machine when delivery confirmation is set. |
|
deleted* |
Message deleted at receiving machine when delivery confirmation is set. |
|
denied* |
Receiving machine refused to notify sending machine of message processing content when delivery confirmation is set. |
|
failed* |
An abnormal condition occurred when delivery confirmation is set. |
If the receiving machine is a SHARP machine, the receiving machine will return "dispatched" if the fax was received normally, or "processed" if reception failed. When delivery confirmation is set for Internet Fax, the disposition feeld value indicated on the delivery confirmation return e-mail appears.
The Internet fax function periodically connects to the
mail server (POP3 server) and checks whether or not Internet faxes
have been received. When faxes have been received, the faxes are
automatically retrieved and printed.
In the default setting, this function checks for reception
once every five minutes.
 " position.
The machine rings and fax reception begins automatically.
A beep sounds when reception ends.The fax is automatically printed.
If the interval for checking for received
faxes is somewhat long and you wish to check immediately, you can
manually initiate reception.
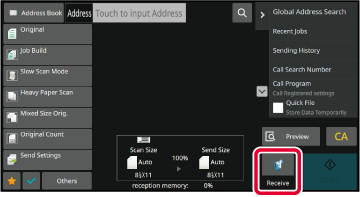
Tap the [Receive] key to connect to the mail server
and retrieve received faxes.
Enable this setting to have faxes received and stored
in memory without being printed. To print the faxes, a PIN Code must
be entered.
When this function is used, a PIN Code entry screen appears
in the touch panel when a fax is received.
When the previously programmed 4-digit PIN Code is entered
using the numeric keys, printing begins.
When the [Cancel] key is tapped, the PIN Code entry screen
closes; however, the data in memory key will blink in the touch
panel. The PIN Code entry screen will reappear when you tap the
blinking key or change modes.
Print received data at a
specified time.
For stress-free printing, you should avoid printing large
numbers of pages at peak times during the day, and when you do not
urgently need to print.

Check the image of received data on the
touch panel before printing.
This function is available when [System Settings] → [Image Send Settings]
→ [Common Settings] → [Condition Settings] → [Preview Setting] → [Received Data Image
Check Setting] is enabled
* in "Settings (administrator)"
* The factory default setting is disabled.
When data is received,
 is shown at the top of the screen.
In the System Information, tap the [Check Received Data.].
The received data is listed.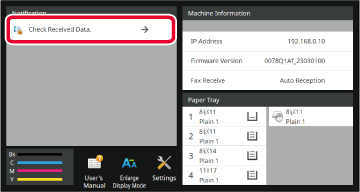
Tap the key of the received data you wish to check, and tap [Check Image] on the action panel.
Displays the received data image.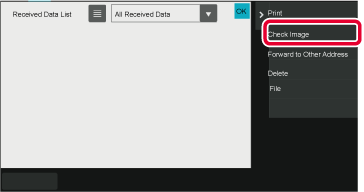
 to show thumbnails of received images
(Thumbnail screen). The list view or thumbnails view can be changed depending
on the setting mode.
to show thumbnails of received images
(Thumbnail screen). The list view or thumbnails view can be changed depending
on the setting mode.Tap the image you wish to print, and tap [Print] on the action panel.
The machine starts printing the image. /
/
 : Use these keys to enlarge or reduce
an image.
: Use these keys to enlarge or reduce
an image. /
/
 : Rotates image counterclockwise or clockwise.
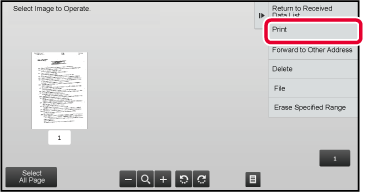
Version 06a / bp70c65_usr_06a_us
