SHARP

Language

AUTOMATIC 2-SIDED COPYING

USING THE AUTOMATIC DOCUMENT FEEDER FOR 2-SIDED COPYING

  • To make 2-sided copies, configure the 2-sided copy settings before scanning the original.
  • Dual-side copy helps to save paper.

Place the original in the document feeder tray of the automatic document feeder.

AUTOMATIC DOCUMENT FEEDER

Tap the [2-Sided Copy] key.

PREVIEW SCREEN

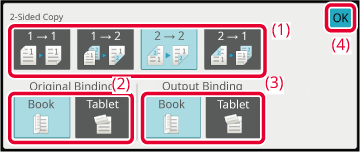
Select 2-sided copy mode.

  1. Select the 2-sided copy type.
  2. When the original is set to "2-Sided", select "Book" or "Tablet" in "Original Binding".
  3. When the output is set to "2-Sided", select "Book" or "Tablet" in "Output Binding".
  4. After the settings are completed, tap [OK].

Check the paper (tray) and color mode you want to use for copying, and tap the keys for any other settings you want to select.

Tap the [Original] key and specify the orientation of the original to have the orientation be correctly recognized.
Specifying the orientation of the original
For details on the functions that can be set, see step 3 in "COPYING".

Check the preview.

PREVIEW SCREEN

Tap the [Colour Start] or [B/W Start] key to start copying.
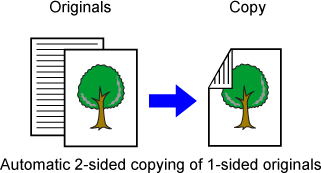
USING THE DOCUMENT GLASS FOR 2-SIDED COPYING

Dual-side copy helps to save paper.

Place the original on the document glass.

DOCUMENT GLASS

Tap the [2-Sided Copy] key.

BASIC PROCEDURE FOR MAKING COPIES

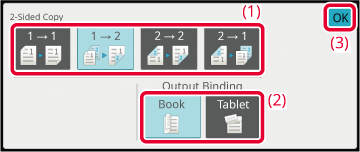
Select the 2-sided copy mode.

  1. Tap the [1 → 2] key.
  2. When the output is set to "2-Sided", select "Book" or "Tablet" in "Output Binding".
  3. After the settings are completed, tap [OK].
  • The [2 → 2] key and [2 → 1] key cannot be used when copying from the document glass.
  • Depending on the size of the placed original, there may be cases where the same size of paper as the original is not selected automatically. In this case, change the paper tray manually.

Check the paper (tray) and color mode you want to use for copying, and tap the keys for any other settings you want to select.

Tap the [Original] key and specify the orientation of the original to have the orientation be correctly recognized.
Specifying the orientation of the original
For details on the functions that can be set, see step 3 in "COPYING".

Tap the [Colour Start] or [B/W Start] key.

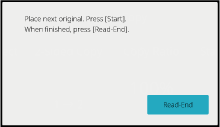
Set the next original, and tap the [Colour Start] or [B/W Start] key to scan the original.

Tap the same key you tapped in step 5.
Repeat this step until all originals have been scanned.

Tap the [Read-End] key to start copying.
Language

Version 04a / bp70c65_usr_04a_en

↑Top of page