SHARP

Language

PAPER, AND TIME SAVING FUNCTIONS

SKIPPING BLANK PAGES IN AN ORIGINAL (BLANK PAGE SKIP)

If the scanned original contains blank pages, this function skips them to copy only non-blank pages.
The machine detects blank pages, enabling you to skip useless copies without checking an original.

  • If an original of which one side is blank is scanned, blank pages are skipped for 2-sided copying.
  • Depending on the original, some pages that are not blank may be detected as blank pages and thus not being copied, and some pages that are blank may not be detected as blank and thus copied.
To use Blank Page Skip in Easy mode
In "Settings (administrator)", select [System Settings] → [Common Settings] → [Operation Settings] → [Easy Mode Settings] → [Easy Copy].

Place the original.

Place the original in the document feeder tray of the automatic document feeder, or on the document glass.
AUTOMATIC DOCUMENT FEEDER
DOCUMENT GLASS

Tap the [Others] key, and tap the [Blank Page Skip] key.

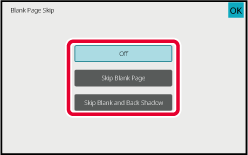
Tap the [Skip Blank Page] or [Skip Blank and Back Shadow] key.

After the settings are completed, tap [OK] and [Back] keys in sequence.
To cancel all settings:
Tap the [CA] key.

Tap the [Colour Start] or [B/W Start] key.

Check the confirmation message, and tap the [OK] key to start copying.

On the confirmation screen, the number of scanned original sheets appears in (A), the number of scanned sides in (B), and the number of copies excluding blank pages in (C).
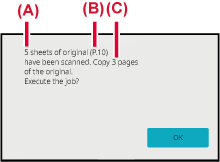
For example, if five original sheets that include two blank pages are scanned by duplex scanning, the result is displayed as follows:
5 pages of original have been scanned. (P.10)
Copy 8 pages of originals.

ADJUSTING THE BACKGROUND BY MAKING LIGHT AREAS OF THE ORIGINAL DARKER OR LIGHTER (BACKGROUND ADJUSTMENT)

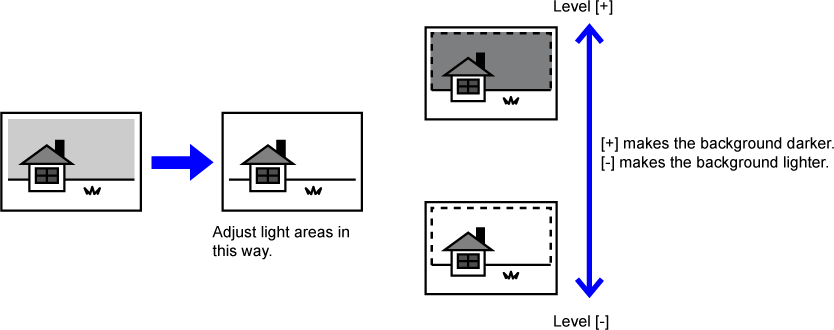
You can adjust the background by making light areas of the original darker or lighter.
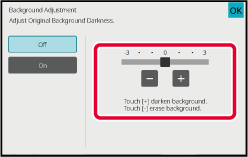
Changing the level of [Background Adjustment] to the [+] side makes the background darker, while changing to the [-] side makes it lighter.
Darkness of the light area can be adjusted by this function.
  • Background Adjustment cannot be selected in easy mode.
  • You must select Background Adjustment before scanning the original.

Tap the [Others] key, and tap the [Background Adjustment] key.

Tap or move the slider to set the value.

After the settings are completed, tap [OK] and [Back] keys in sequence.
To cancel the Background Adjustment setting:
Tap the [Off] key.

Place the original.

Place the original in the document feeder tray of the automatic document feeder, or on the document glass.
AUTOMATIC DOCUMENT FEEDER
DOCUMENT GLASS
To cancel all settings:
Tap the [CA] key.

Tap the [Colour Start] or [B/W Start] key to start copying.

MAKING A PROOF COPY (PROOF COPY)

This function makes a proof copy before printing the specified number of copies. Check the preview image with a proof copy. If necessary, change the settings.Using this function stores the scanned original in the machine, saving you the trouble of re-scanning the original in the changed setting.

Proof copy flow

  • Proof Copy cannot be selected in easy mode.
  • Proof Copy must be specified before scanning the original.
  • If Proof Copy is executed while the machine is printing another job, the job in progress is interrupted, and a proof copy is printed preferentially. The interrupted job will resume after proof copying has been completed.
  • However, if proof copy is executed during printing of a job for which both 2-sided printing and staple function are enabled, the proof copy will be printed after the job in progress is finished.
    If the [Start Print] key is tapped to execute printing of the remaining sets while the machine is printing another job, the remaining sets will be printed after all previously reserved jobs are completed.

Tap the [Others] key, and tap the [Proof Copy] key.

A checkmark appears on the icon.
After the settings are completed, tap the [Back] key.
To cancel the Proof copy setting:
Tap the [Proof Copy] key to uncheck it.

As necessary, specify the required functions such as "Exposure" and "Copy Ratio".

Place the original.

Place the original in the document feeder tray of the automatic document feeder, or on the document glass.
AUTOMATIC DOCUMENT FEEDER
DOCUMENT GLASS
To cancel all settings:
Tap the [CA] key.

Set the number of copies (number of sets) using the numeric keys.
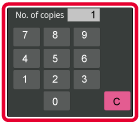
Up to 9999 copies (sets) can be set.
If an incorrect number of copies is set
Tap the [C] key, and enter the correct number.

Tap the [Colour Start] or [B/W Start] key.

Make only one set of copies.

Check the copy result. If no problem is found, tap the [Start Print] key.

As necessary, change the settings and repeat proof copying until you are satisfied with the copy result.
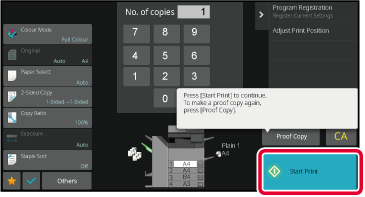
You can also change the number of copies. To change the number of copies, use the numeric keys.
  • In Proof Copy, unavailable function keys are not displayed.
  • Some available functions may be restricted.
  • To cancel all settings:
  • Tap the [CA] key.

CHECKING THE NUMBER OF SCANNED ORIGINAL SHEETS (ORIGINAL COUNT)

This function counts the number of scanned original sheets, and displays the result before making a copy.
By allowing you to check the number of original sheets that were scanned, this helps reduce the occurrence of copy mistakes.

  • Original count cannot be selected in easy mode.
  • The count result is displayed with the number of scanned original sheets, not the number of scanned original pages. For example, when 2-sided copying is performed using one original, the number "1" will appear to indicate that one original sheet was scanned, not "2" to indicate the front-side page and the reverse side page.
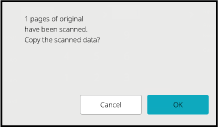
  • Original Count must be specified before scanning the original.

Tap the [Others] key, and tap the [Original Count] key.

A checkmark appears on the icon.
After the settings are completed, tap the [Back] key.
To cancel the Original Count setting:
Tap the [Original Count] key to uncheck it.

Place the original in the document feeder tray of the automatic document feeder.

AUTOMATIC DOCUMENT FEEDER

Tap the [Colour Start] or [B/W Start] key.

Check the number of original sheets.

The number that is displayed is the number of scanned original sheets, not the number of scanned original pages. For example, when 2-sided copying is performed using one original, the number "1" will appear to indicate that one original sheet was scanned, not "2" to indicate the front-side page and the reverse side page.
If the displayed number of original sheets is different from the actual number of sheets
Tap the [Cancel] key to stop the job.

Tap the [OK] key to start copying.

If this function is combined with [Job Build], the count result is displayed after the [Read-End] key has been tapped.

USING TWO MACHINES TO REDUCE THE COPY TIME (TANDEM COPY)

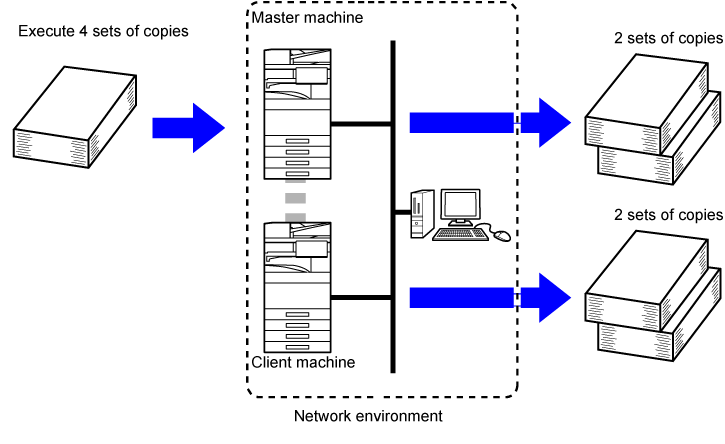
This function shares a copy job half-and-half between two machines connected to the network, enabling the reduction of the copy time.
Primary unit and secondary unit
The primary unit performs only scanning, and a secondary unit registered in the primary unit performs only printing without scanning the original.
  • Tandem Copy cannot be selected in easy mode.
  • To use this function, two machines must be connected to your network.
  • Even if more machines are connected to the network, this function can only be used to have one other machine share a job.
  • To configure the tandem connection setting, register IP address information of the secondary unit in the primary unit. For the port number, it is best to use the initial setting (50001). Unless you experience difficulty with this setting, do not change the port number. The tandem setting should be configured by your network administrator. If the primary unit and secondary unit will switch roles, configure the IP address of the primary unit in the secondary unit. The same port number can be used for both machines.
  • In this situation:
  • A saddle stitch finisher is installed in the primary unit while not installed in a secondary unit.
    • Tandem Copy is enabled when specifying copies without stapling.
    • Tandem Copy is disabled when specifying copies with stapling.
    • As shown here, if Tandem Copy is enabled using a function provided in the primary unit and not provided in a secondary unit, a message will appear.
    If a machine runs out of paper
    If either the primary unit or the secondary unit run out of paper, the machine that ran out of paper will hold the job while the machine that still has paper continues the job. When paper is added to the machine that ran out, the job resumes.
    If user authentication is specified
    • Tandem Copy is enabled when user authentication is specified in the primary unit.
    • Tandem Copy is disabled when user authentication is specified in the secondary unit while it is not specified in the primary unit.
  • If an odd number of sets is being made, one more set is output to the primary unit.

Tap the [Others] key, and tap the [Tandem Copy] key.

A checkmark appears on the icon.
After the settings are completed, tap the [Back] key.
To cancel the Tandem Copy setting:
Tap the [Tandem Copy] key to uncheck it.

Place the original.

Place the original in the document feeder tray of the automatic document feeder, or on the document glass.
When using the document glass to scan multiple original pages, change the original and tap the [Colour Start] or [B/W Start] key.
AUTOMATIC DOCUMENT FEEDER
DOCUMENT GLASS

Tap the number of copies key to specify the number of copies.

Up to 9999 copies (sets) can be set. The specified number of copies are shared between the primary unit and secondary unit. If the number of copies is odd, the primary unit makes more copies than the secondary unit.
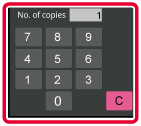
  • If an incorrect number of copies is set:
  • Tap the [C] key and then enter the correct number.
  • To cancel all settings:
  • Tap the [CA] key.

Tap the [Colour Start] or [B/W Start] key to start copying.

To cancel Tandem Copy:
Tap the [Cancel Copy] keys on both the primary unit and secondary unit.
Language

Version 04a / bp70c65_usr_04a_en

↑Top of page