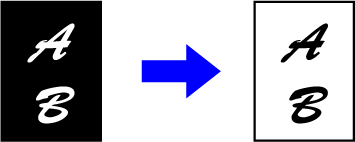
This function reverses black
and white in a copy to create a negative image. This function can
only be used for black and white copying.
Originals with large black areas (which use a large amount
of toner) can be copied using Black/White Reverse to reduce toner
consumption.
Tap the [Others] key, and tap the [B/W Reverse] key.
A checkmark appears on the icon.Place the original.
Place the original in the document feeder tray of the automatic document feeder, or on the document glass.Tap the [B/W Start] key to start copying.
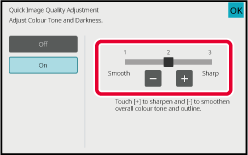
You can easily adjust the colour and outlines
of images and text.
Tap the [Others] key, and tap the [Quick Image Quality Adjustment] key.
Tap
 or slide the slider to adjust the image
quality.
or slide the slider to adjust the image
quality.
Place the original.
Place the original in the document feeder tray of the automatic document feeder, or on the document glass.Tap the [Colour Start] or [B/W Start] key to start copying.
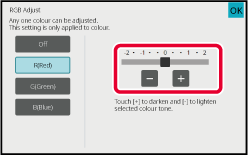
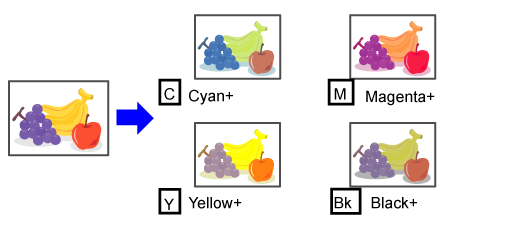
This function heightens or lightens any one of the three colour
components R (red), G (green), and B (blue).

Tap the [Others] key, and tap the [RGB Adjust] key.
Tap the key of the colour you want to adjust.
Tap
or slide the slider to adjust the colouring.
Place the original.
Place the original in the document feeder tray of the automatic document feeder, or on the document glass.Tap the [Colour Start] key to start copying.
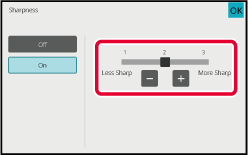
This function adjusts the sharpness to make a sharper or softer
image.

Tap the [Others] key, and tap the [Sharpness] key.
Tap
or slide the slider to adjust the sharpness.
Place the original.
Place the original in the document feeder tray of the automatic document feeder, or on the document glass.Tap the [Colour Start] or [B/W Start] key to start copying.
You can adjust the colour, tone, and density of copies.
Use the [Colour] tab for colour copy settings, or the
[B/W] tab for black & white copy settings.
If you select the [Colour] tab, the densities of the colours
yellow, magenta, cyan, and black are divided into three ranges, and
you can adjust the density of each range. If needed, you can also
adjust all three density ranges at once.
Tap the [Others] key, and tap the [Colour Balance] key.
Tap the tab of the mode you want to adjust.
Tap the
key or slide the slider to adjust the
colour balance.
 ...
... keys, tap the slider you want to adjust
and tap the
keys.
keys, tap the slider you want to adjust
and tap the
keys.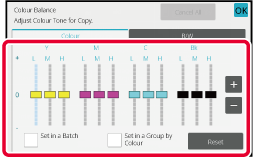
Place the original.
Place the original in the document feeder tray of the automatic document feeder, or on the document glass.Tap the [Colour Start] or [B/W Start] key to start copying.
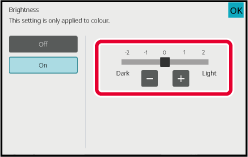
This function adjusts the brightness of a colour copy image.

Tap the [Others] key, and tap the [Brightness] key.
Tap the
key or slide the slider to adjust the
brightness.
Place the original.
Place the original in the document feeder tray of the automatic document feeder, or on the document glass.Tap the [Colour Start] key to start copying.
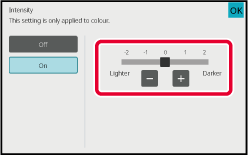
This function adjusts the intensity (saturation) of a colour copy
image.

Tap the [Others] key, and tap the [Intensity] key.
Tap the
key or slide the slider to adjust the
intensity.
Place the original.
Place the original in the document feeder tray of the automatic document feeder, or on the document glass.Tap the [Colour Start] key to start copying.
Version 06a / bp70c65_usr_06a_en
