SHARP

Language

BASIC TRANSMISSION METHODS

This section explains how to enter a destination from the initial screen of easy mode.
SELECTING FAX MODE

FAX TRANSMISSION METHODS

The methods that can be used to send a fax from the machine are described below. Select the method that best suits your needs.

To fax a large number of sheet originals:

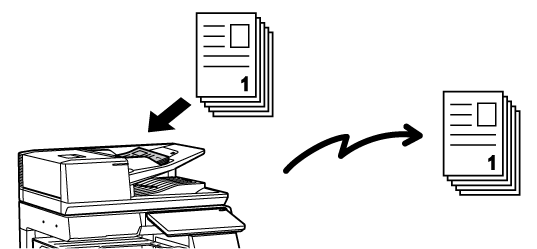
Use the automatic document feeder.
The originals will be scanned into memory and then transmitted (memory transmission).
When multiple original sheets are placed in line idle state, they will be sent in sequence from the scanned page in parallel with the scanning process (Quick On Line Sending).
If transmission cannot begin immediately because the line is in use, all pages will be scanned and stored in memory.
USING THE AUTOMATIC DOCUMENT FEEDER FOR TRANSMISSION
Storing a fax job
If transmission cannot begin immediately because the line is in use, all pages will be scanned and stored in memory. If you want to attempt to send a fax while another job is in progress, you can store the fax job. To check the stored fax job, display the job status screen.
FAX JOBS

  • If memory becomes full while the first original page is being scanned, transmission will stop.
  • When the transmission is finished, the scanned original pages are cleared from memory. However, when the document filing function is used, the transmitted fax is stored.
  • QUICK FILE
    FILE
  • If Job Build is enabled, you can select the automatic document feeder or the document glass to scan the original. This sending method may not be available depending on the function.
  • SCANNING MANY ORIGINALS AT ONCE (JOB BUILD)
In the following situations, the transmission will be automatically reserved (memory transmission)
  • When the line is busy or a communication error occurs and automatic resending is enabled.
  • WHEN A COMMUNICATION ERROR OCCURS
  • The line of the machine will be busy if another fax is being sent, received, or if the machine is in the busy state.
  • Another fax transmission was reserved ahead of your fax.
  • One of the following functions is being used for transmission.
    • Broadcast transmission, F-code transmission, Timer transmission, Dual Page Scan, Book Divide, N-Up, Card Shot, Job Build, Original Count
  • The document glass is being used (except when the speaker is being used to dial).
To disable the Quick On Line Sending setting:
In "Settings", select [System Settings] → [Image Send Settings] → [Fax Settings] → [Send Settings] → [Quick On Line Sending].
If you disable this setting, transmission will not begin until all pages have been scanned. Note that this setting does not apply to manual transmission.

To fax thick originals or pages of a book:

Place the original on the document glass.
USING THE DOCUMENT GLASS FOR TRANSMISSION

  • Quick On Line Sending is not available when a fax is being sent from the document glass.
  • When the document glass is used, multiple original pages cannot be scanned at a time. In this case, the original pages can be separated into multiple times of scanning.

If you wish to send a fax ahead of other previously reserved fax transmissions:

Send the fax in direct transmission mode. The original is transmitted directly to the receiving fax machine without being scanned into memory. When direct transmission mode is used, transmission will begin as soon as the transmission in progress is completed (ahead of any previously reserved transmissions). Tap [Direct TX] on the action panel to send a fax.
USING THE AUTOMATIC DOCUMENT FEEDER FOR FAXING IN DIRECT TX MODE
USING THE DOCUMENT GLASS TO SEND A FAX IN DIRECT TX MODE

When transmission in direct transmission mode ends, the mode automatically changes back to memory transmission mode.
In direct transmission mode, the [Preview] key cannot be used for transmission.

ORIGINAL ORIENTATION

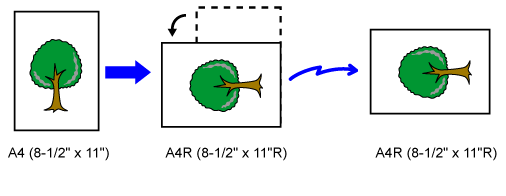
When an A4 (8-1/2" x 11") original is placed in vertical orientation ( ), the image is automatically rotated 90 degrees and transmitted in horizontal orientation ( ) (Rotation Sending).
If the original is placed in horizontal orientation ( ), it is transmitted in that orientation () without being rotated.

Rotation sending is not available for originals with A4R, B5, or A5 (8-1/2" x 11"R or 5-1/2" x 8-1/2") size.
To cancel the rotation sending setting:
In "Settings (administrator)", select [System Settings] → [Image Send Settings] → [Fax Settings] → [Send Settings] → [Rotation Sending Setting].
If this setting is disabled, the original will be transmitted in the orientation in which it is placed.
Because of this, some receiving machines may reduce the received data.

AUTOMATIC REDUCTION OF THE TRANSMITTED IMAGE

If the width of the transmitted image is larger than the width of the paper in the receiving machine, the image will be automatically reduced to fit the receiving machine's paper width.
Example: Reduced sizes and reduction ratios

Transmitted image width Receiving machine's paper width Reduced size Scaling
A3 (11" x 17") B4 B4 1:0.8
A3 (11" x 17") A4 (8-1/2" x 11") A4R 1:0.7
B4 A4 (8-1/2" x 11") A4R 1:0.8
To cancel the Auto Reduction Sending setting:
In "Settings", select [System Settings] → [Image Send Settings] → [Fax Settings] → [Send Settings] → [Auto Reduction Sending Setting]. If this setting is disabled, the image will be sent at full size and part of the image may be cut off.

TRANSMITTABLE ORIGINAL SIZES

For information on the original sizes that can be loaded, see " AUTOMATIC DOCUMENT FEEDER" and " DOCUMENT GLASS".

THE SIZE OF THE PLACED ORIGINAL

When a standard size original is placed, the original size is automatically detected and displayed in "Scan Size" on the base screen.
AUTO DETECTION
Standard sizes are sizes that the machine can automatically detect. The standard sizes are set in "Original Size Detector Setting" in setting mode.

When the automatic original detection function is operating and the original (of inch or non-standard size) is placed, the closest size may be displayed or the original size may not appear. In this event, manually set the correct original size.
SPECIFYING THE ORIGINAL SCAN SIZE IN PAPER SIZE
SPECIFYING THE ORIGINAL SCAN SIZE USING NUMERIC VALUES
To specify the size that the machine can automatically detect:
In "Settings (administrator)", select the group of detected original sizes in [System Settings] → [Common Settings] → [Device Control] → [Condition Settings] → [Original Size Detector Setting].

List of original size detector settings

DETECTABLE ORIGINAL SIZES

WHEN THE LINE IS BUSY

If the line is busy when you send a fax, transmission will be attempted again automatically after a preset interval. This function only operates in memory transmission mode. In direct transmission mode or manual transmission mode, the transmission will be cancelled. Wait for a brief period and then try sending the fax again.

To cancel transmission:
Do so from the job status screen.
STOPPING/DELETING A JOB, PRIORITY PROCESSING AND CHECKING THE STATUS
To set the number of recall attempts and the interval between attempts when the connection cannot be established because the line is busy, or for other reasons:
In "Settings (administrator)", select [System Settings] → [Image Send Settings] → [Fax Settings] → [Send Settings] → [Recall in Case of Line Busy].
When this setting is enabled, note that the machine will not attempt the call again when manual transmission or direct transmission is used.

WHEN A COMMUNICATION ERROR OCCURS

If a communication error occurs or the other fax machine does not answer the call within a preset period of time, transmission will automatically be attempted again after a preset interval. This function only operates in memory transmission mode.

Faxes sent by direct transmission or manual transmission are not automatically resent.
To cancel transmission:
Do so from the job status screen.
STOPPING/DELETING A JOB, PRIORITY PROCESSING AND CHECKING THE STATUS
To set the number of recall attempts and the interval between attempts when a transmission fails due to an error:
In "Settings (administrator)", select [System Settings] → [Image Send Settings] → [Fax Settings] → [Send Settings] → [Recall in Case of Communication Error].

FAX DEST. CONFIRMATION MODE

This mode displays a destination confirmation message when a fax is sent to prevent accidental transmission to the wrong destination. Set it in setting mode. If a fax is sent while this function is enabled, an address confirmation message will appear when the [Start] key is tapped.
The message that appears will vary depending on the method used to specify the destination.

After tapping the [Speaker] key while "Fax Dest. Confirmation Mode" is enabled, the destination cannot be specified using the numeric keys, one-touch key, [Call Search Number] key, or [Sending History] key. However, it is possible to send through a telephone.
  • To display the destination confirmation message prior to fax transmission:
  • In "Settings", select [System Settings] → [Image Send Settings] → [Fax Settings] → [Default Settings] → [Fax Dest. Confirmation Mode].
  • To check destinations other than fax:
  • In "Settings", select [System Settings] → [Image Send Settings] → [Fax Settings] → [Default Settings] → [Fax Dest. Confirmation Mode] → [Apply to Addresses Other Than Fax].
  • To disable fax broadcast when Fax Dest. Confirmation Mode is enabled:
  • In "Settings", select [System Settings] → [Image Send Settings] → [Fax Settings] → [Send Settings] → [Disable Fax Broadcasting].

Destination specified by one-touch key/search number/global address search

Tap the [Start] key to display all destinations in the destination confirmation screen. Check that the destinations are correct, and tap the [Enter for send] key to start scanning of the original.
If the destination is not correct, tap the [OK] key and select the destination again.

  • You can select multiple one-touch keys for contacts or groups including fax destinations.
  • Before tapping the [Enter for send] key, you can change scan or other settings.

Destination specified using the numeric keys

With "Fax Dest. Confirmation Mode" enabled, and "Require Re-entry when Directly Entering the Fax Destination" enabled
Tap the [Start] key to display the confirmation message. Tap the [OK] key, re-enter the destination using the numeric keys, and tap the [Enter Address] key. If the re-entered destination is correct, scanning will begin. If the re-entered destination is not correct, a message will appear. Tap the [OK] key and re-enter the destination. If an incorrect address is entered three times for confirmation, all the previous settings are cancelled, and you will return to the base screen.
With "Fax Dest. Confirmation Mode" enabled, and "Require Re-entry when Directly Entering the Fax Destination" disabled
Tap the [Start] key to display entered destinations in the destination confirmation screen. Check that the destinations are correct, and tap the [Enter for send] key to start scanning of the original.

  • You can use the numeric keys to enter fax numbers serially. In that case, tap to enter the destination fax number to be added.
  • If the [Sub Address] key was tapped to enter a sub-address and passcode, the fax number must be re-entered during confirmation. After re-entering the fax number, tap the [Sub Address] key and enter the sub-address and passcode.
  • If chain dialling was used, tap the [Pause] key to enter "-" during confirmation.
  • Before tapping the [Enter for send] key, you can change scan or other settings.
To set whether to re-enter at direct entry:
In "Settings (administrator)", select [System Settings] → [Image Send Settings] → [Fax Settings] → [Condition Settings] → [Fax Dest. Confirmation Mode] → [Require Re-entry when Directly Entering the Fax Destination].

When a fax that was selected from the Sending History has been resent

A confirmation screen is displayed based on the method used to specify the destination during the previous transmission.

CHECKING THE IMAGE TO BE TRANSMITTED

Check the image that will be sent in the touch panel before transmission.
You can tap the [Preview] key and then scan the original to check a preview of the scanned image. As you can adjust the exposure and resolution to scan the original while checking it in the preview screen, you can send a better quality original to the destination.
PREVIEW SCREEN
The settings and functions that can be changed while and after an image is scanned for preview are as follows:
Exposure, Send Size, 2-Sided Booklet/Tablet, Resolution, Erase, N-Up, File, Quick File, Timer, Own Name Select, and Transaction Report.

  • Depending on the size of the transmission data, part of the preview image may not appear in the preview screen in the touch panel.
  • The preview function is not available when the original size is set to Long Size.
Language

Version 03a / bp70m65_usr_03a_en

↑Top of page