NETWORK SCANNER MODE
Network scanner mode has two modes: easy mode and normal
mode.
Easy mode is limited to frequently used functions that allow
you to smoothly perform most image send jobs.
If you need to select detailed settings or special functions,
use normal mode. All functions can be used in normal mode.
EASY MODE
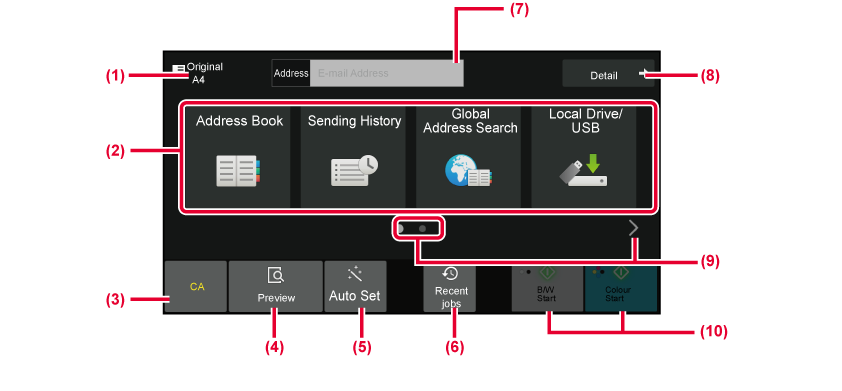
Easy mode makes it easy
to select basic settings for network scanner mode.
- The original size is displayed.
- Set an address.
- Reset the address and settings.
- Scans the original and shows a preview image.
-
PREVIEW SCREEN
- Automatically set the original placement orientation, resolution,
skipping of blank pages, automatically detect mono2/greyscale, and Original Skew Adjustment.
-
SETTING SCAN SETTINGS AUTOMATICALLY (AUTO SET)
- Recently used job setting can be loaded.
-
JOB STATUS
- Tap to display the soft keyboard.
- Change to normal mode.
-
NORMAL MODE
- Change the function display.
- Starts black and white or colour transmission.
- Select the function you want to
use.
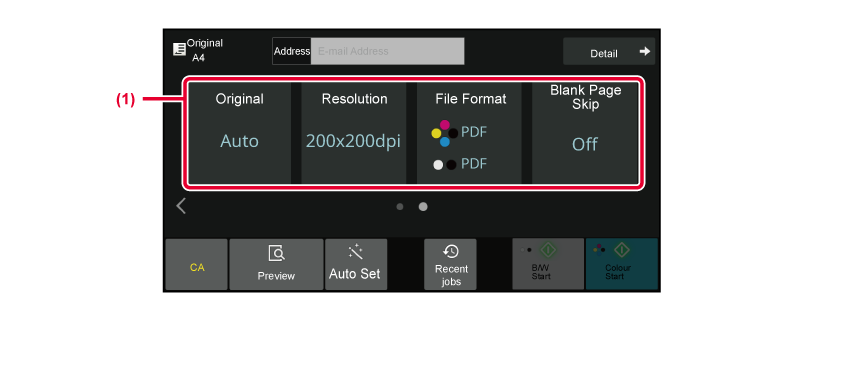
You can select these functions in easy mode.
Original:
CHANGING THE EXPOSURE AND ORIGINAL IMAGE TYPE
Resolution:
CHANGING THE RESOLUTION
File Format:
CHANGING FORMAT IN SCAN OR DATA ENTRY MODE
Blank Page Skip:
ELIMINATING BLANK PAGES FROM A TRANSMISSION (BLANK PAGE SKIP)
If able to search for My Address, a [Find My Address]
key will be displayed next to the address entry.
- To
select a function in easy mode
In "Settings
(administrator)", select [System Settings] → [Common Settings] → [Operation Settings]
→ [Easy Mode Settings] → [Easy Scan].
- To cancel
the warning message displayed when switching from easy mode to normal
mode
In "Settings (administrator)", select [System Settings]
→ [Common Settings] → [Operation Settings] → [Easy Mode Settings] → [Display
a Confirmation Message when Selecting "Detail" in Easy Modes] to
disable this setting.
NORMAL MODE
Normal mode lets you select any function
setting that can be used for network scanner.
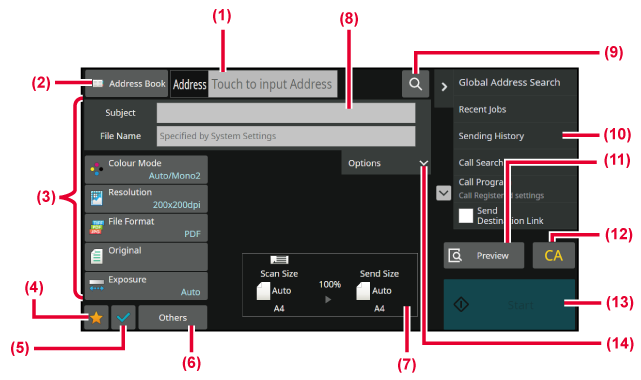
This section explains the keys on a base screen, taking as
an example the E-mail base screen. Several methods are available
in the Image Send mode, including Scan to E-mail and Scan to FTP.
The base screen layout slightly differs depending on how image is
sent.

- Tap to display the soft keyboard.
- Displays the address box to enter addresses.
- Setting keys used for image send operations.
- Displays the list of setting keys. Frequently used [Others],
programs, and other settings can be registered.
- Check the current settings.
- Displays keys other than the function keys indicated above.
- Displays the sizes of the original and the data to send.
- Enter subject, file name, and other items.
- Searches for the address.
- Displays the functions that can be used in image send
mode.
- Scans the original and shows a preview image.
-
PREVIEW SCREEN
- Reset the address and settings.
- Transmission will start immediately.
- Enter reply address and body text.


