.png)
This section describes paper types that
can be used and those that cannot be used.
All types of paper other than plain paper are referred to
as special media.
Caution
Specifications of plain
paper, heavy paper and thin paper
|
Plain Paper * |
Plain Paper 1 |
16 lbs. bond to 24 lbs. bond (60 g/m2 to 89 g/m2) |
|---|---|---|
|
Plain Paper 2 |
24 lbs. bond to 28 lbs. bond (90 g/m2 to 105 g/m2) |
|
|
Heavy Paper |
Heavy Paper 1 |
28 lbs. bond to 65 lbs. cover (106 g/m2 to 176 g/m2) |
|
Heavy Paper 2 |
65 lbs. cover to 80 lbs. cover (177 g/m2 to 220 g/m2) |
|
|
Thin Paper |
13 lbs. bond to 16 lbs. bond (55 g/m2 to 59 g/m2) |
|
* If the paper that you normally use is Recycled, Pre-Punched, Pre-Printed, Letter Head, Color, or User Type 1 to 7, set an appropriate paper weight in "Settings" – [System Settings] → [Common Settings] → [Paper Settings] → [Paper Tray Settings] → [Paper Weight].
8-1/2” x 14”, 8-1/2” x 13-2/5”, 8-1/2” x 13”, 8-1/2” x 11”,
5-1/2” x 8-1/2”, A4
|
Paper Type |
Plain, Recycled, Color, Letter Head, Pre-Printed, Punched, Heavy Paper 1 (28 lbs. bond to 65 lbs. cover (106 g/m 2 to 176 g/m2)) |
|---|---|
|
Paper Size |
8-1/2" x 14", 8-1/2" x 13-1/2", 8-1/2" x 13-2/5", 8-1/2" x 13", 8-1/2" x 11", 5-1/2" x 8-1/2", A4, B5, A5, 16K, Custom (X direction: 8-3/8" to 14" (210 mm to 356 mm), Y direction: 5-1/2" to 8-1/2" (140 mm to 216 mm)) |
Types of paper that can
be set in each tray
| Tray 1 | Tray 2*1 Tray 3*2 Tray 4*3 |
Bypass tray | |
|---|---|---|---|
|
Plain Paper 1*4 |
Permitted |
Permitted |
Permitted |
|
Plain Paper 2*4 |
Permitted |
Permitted |
Permitted |
|
Heavy Paper 1*5 |
Permitted |
Permitted |
Permitted |
|
Heavy Paper 2*5 |
- |
Permitted |
Permitted |
|
Thin Paper |
- |
Permitted |
Permitted |
|
Embossed |
- |
- |
Permitted |
|
Pre-Printed |
Permitted |
Permitted |
Permitted |
|
Recycle Paper |
Permitted |
Permitted |
Permitted |
| Letter Head |
Permitted |
Permitted |
Permitted |
|
Pre-Punched |
Permitted |
Permitted |
Permitted |
|
Color |
Permitted |
Permitted |
Permitted |
|
Labels |
- |
- |
Permitted |
|
Glossy Paper |
- |
- |
Permitted |
|
Transparency |
- |
- |
Permitted |
|
Envelope*6 |
Permitted |
- |
Permitted |
*1 when a 600-sheet paper feed unit is installed
*2 when two 600-sheet paper feed units are installed
*3 when three 600-sheet paper feed units are installed
*4 "Plain Paper 1" is plain paper 16 to 24 lbs. bond (60 to 89 g/m2), "Plain Paper 2" is plain paper 24 to 28 lbs. bond (90 to 105 g/m2).
*5 "Heavy Paper 1" is heavy paper up to 65 lbs. cover (176 g/m2), "Heavy Paper 2" is heavy paper up to 80 lbs. cover (220g/m2).
*6 For envelopes that can be used, see "Paper Tray Settings".
Setting
orientation of the print side
The setting orientation varies for the print side of paper,
depending on the tray used. For "Letter Head" and "Pre-Printed", set
the paper in the reverse orientation.
Place with the print side facing the direction indicated below.
| Tray | In normal status | With letter head or pre-printed paper set |
|---|---|---|
|
Trays 1 - 4 |
Facing up |
Facing down |
|
Bypass |
Facing down |
Facing up |
When copying or printing with envelopes loaded, a message
will appear to operate the fusing pressure release lever. Move the
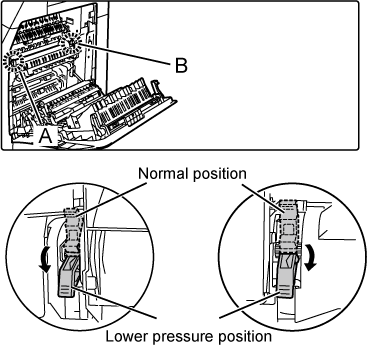
fusing pressure release lever from the "normal position" to the
"lower pressure position" following the procedure below.
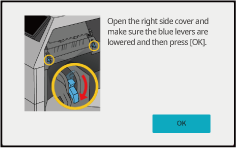
Open out the right side cover.
Gently open the cover.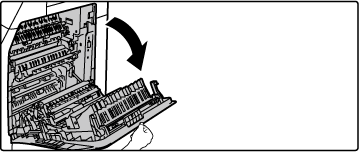
Move the fusing pressure release lever (two) to the lower pressure position as shown.
Close the right side cover.
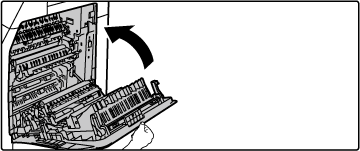
When the paper type is changed to other than envelopes after feeding envelopes, the following message is displayed. Return the lever to the normal position.
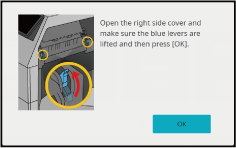

Warning
The fusing unit is hot. Take care not to burn yourself when operating the fusing unit pressure adjusting levers.Caution
Be sure to return the levers to the "normal pressure position" before printing or copying on paper other than envelopes. Otherwise, fusing problems, paper misfeeds, or equipment failure may occur.Version 03a / bpc545wd_usr_03a_us