PRINTING WHEN THE USER AUTHENTICATION FUNCTION IS ENABLED
The user information (such as login name and password)
that must be entered varies depending on the authentication method
being used, so check with the administrator of the machine before
printing.
- If
you have configured "Printing Policy" on the [Configuration] tab so that
user authentication is always performed, users are required to be
authenticated for each print job. This is done by entering authentication
information in a dialog box that appears each time printing is performed.
- The machine's
user authentication function cannot be used when the PPD driver
* is installed and the Windows standard PS
printer driver is used.
For this
reason, the machine can be configured to prohibit users from executing
printing unless their user information is stored in the machine.
* The PPD driver enables the machine
to print using the Windows standard PS printer driver. The PS3 expansion
kit is required.
In the printer driver properties window of the application,
select the printer driver of the machine and click the [Preferences]
button.
The button that is used to open the printer driver
properties window (usually [Property] or [Preferences]) may vary depending
on the application.
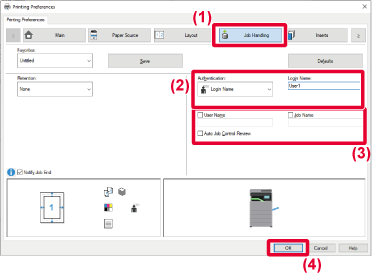
Enter your user information.
- Click the [Job Handling] tab.
- Enter your user information.
- When
authentication is performed by login name, select [Login Name] and
enter your login name.
- When authentication
is performed by login name/password, click [Login Name/Password] and enter
your login name and password. Enter the password using 1 to 32 characters
- When authentication
is performed by user number, select [User Number] and enter your
5 to 8 digit user number.
- Enter the user name and job name as necessary.
- Click
the [User Name] checkbox, and enter your user name using up to
32 characters. The entered user name will appear on the touch panel
of the machine. If you do not enter a user name, your PC login name will
appear.
- Click the [Job Name]
checkbox, and enter a job name using up to 30 characters. The entered
job name will appear as a file name on the touch panel of the machine.
If you do not enter a job name, the file name set in the application
will appear.
- To have a confirmation window appear
before printing starts, select the [Auto Job Control Review] checkbox.
- Click the [OK] button to execute printing.

