BEFORE USING THE MACHINE AS A FAX
To use the machine as a facsimile, connect the telephone
line, and set the telephone line type.
The facsimile expansion kit is required in order
to make use of fax functionality.
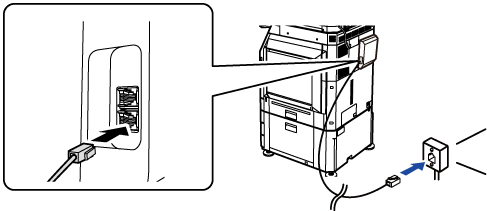
Connecting to the telephone line.
Insert the plug on one end of the telephone line cord
into the telephone line jack (LINE) of the machine as shown until
it clicks, and insert the other plug into a wall telephone jack
until it clicks.
If the connection cable is not properly connected,
"Sending has failed. Please check network connection." will appear when
you attempt to send a fax. Properly connect the connection cable.
Make sure the main power switch is in the "
 " position.
When the main power indicator is lit up, the main power
is in the "
" position. If the main power indicator
is not lit up, turn the main power switch to the "
" position and press the [POWER] button
on the operation panel.
TURNING ON THE POWER
When "Settings (administrator)" → [System Settings] → [Image Send
Settings] → [Fax Settings] → [Condition Settings] → [Auto Wake Up
Print] is enabled, even if the power to the machine is turned off
(the main power switch is on), when a fax is received, the machine
will automatically turn on and output the received data. When [Auto
Wake Up Print] is disabled and the [Power] button is unlit, the
received data is stored in memory in the machine and will not be
output until the power is turned on.
If the fax function will be used, and in particular
if reception or timer transmission will take place at night, do
not turn the main power off.
Setting the telephone line type.
The machine's dial mode setting must be set to match
the type of telephone line you are using.
* If the setting is incorrect, it may result in dialing failures
or cause calls to be made to the wrong destination.
-
If you want to set the type of telephone line automatically
In "Settings
(administrator)", select [System Settings] → [Image Send Settings] → [Fax Settings]
→ [Default Settings] → [Dial Mode Setting], and tap the [Auto Select] key.
- If necessary,
you can set the type of telephone line manually.
- When you
connect to a digital line When Digital Line Network is enabled,
the send level will be 15 dB or less when you connect to a digital
line. In "Settings (administrator)", select [System Settings] → [Image Send Settings]
→ [Fax Settings] → [Default Settings] → [Digital Line Network].
Checking the date and time.
Verify that the correct date and time are set in the
machine.
To
set the date and time of the machine:
In "Settings", select [System Settings] → [Common Settings] → [Device Control]
→ [Clock Adjust].
Storing the sender fax number.
Store a sender name in [Sender Name] and a fax number
in [Fax No.]. Be sure to configure this information, as it is required
for communication.
To store
the sender's name and address:
In "Settings
(administrator)", select [System Settings] → [Image Send Settings] → [Common Settings]
→ [Own Number and Name Set] → [Sender Data Registration].
Storing
destination addresses for each scan mode in the address book.
When using fax, it is convenient to previously store addresses
in the address book.
For how to use the address books and how to store addresses,
see the following item.
ADDRESS BOOK
STORING ADDRESSES THROUGH DIRECT ENTRY
STORING ADDRESSES THROUGH GLOBAL ADDRESS SEARCH
STORING ADDRESSES FROM FAX OR IMAGE SEND LOGS
STORING GROUPS