This function allows you
to store an original in copy mode or image send mode as an image
file in the Quick File folder of the machine.
The image file stored in quick file mode can be retrieved
at a later time, allowing you to copy the document or transmit it in
image send mode without having to locate the original.
As an example, the procedure for using "Quick File" in copy
mode is explained below.
Place the original.
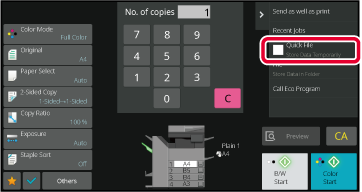
Place the original in the document feeder tray of the automatic document feeder, or on the document glass.Change to normal mode and tap [Quick File] on the action
panel so that it is selected
 .
.
Start a copy or image sending.
When the function is executed, the image data of the original is stored in the Quick File folder. .
.Tapping the [File] key of the document
filing function when printing or transmitting an original in each
mode allows you to store the original in the Main folder or stored
Custom folder as a file simultaneously with printing or transmission.
The stored file can be retrieved at a later time, allowing you to
recopy or resend the original without having to locate it.
As an example, the procedure for using "File" in copy mode
is explained below.
Place the original.
Place the original in the document feeder tray of the automatic document feeder, or on the document glass.Change to normal mode and tap [File] on the action panel to specify the file information.
To select the user name, file name, folder, and property setting, see “File Information".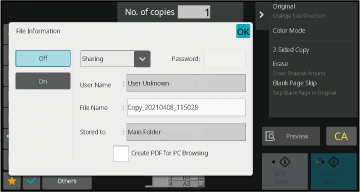
Tap
 .
.
Select copy settings and then tap the [Color Start] key or the [B/W Start] key.
The procedure for detail settings is described below.
Specifying a property, user name, file name, and folder makes
it easier to manage and search for a file. In addition, when [Confidential]
is selected for Property and a password is established, other people
will not be able to view the file without permission.
A protect setting can be selected for files saved with
the document filing function. This prevents a file from being moved, or
automatically or manually deleted.
Three properties are available for saved files: "Sharing",
"Protect", and "Confidential". When saved with the "Sharing" property,
a file is not protected. When saved with the "Protect" or "Confidential"
property, a file is protected.
Files saved to the Quick File folder are all saved as "Sharing"
files. When a file is saved to the Main folder or a custom folder,
"Sharing", "Protect" or "Confidential" can be selected.
| Sharing |
A "Sharing" file can be changed to "Protect" or "Confidential" using "Property Change" in the Job Settings. |
| Protect |
"Protect" does not require setting of a password, but prevents a file from being moved, deleted or edited. A password cannot be established. |
| Confidential |
To protect a "Confidential" file, a password is set. (The password must be entered to retrieve the file.) When a file is saved in encrypted PDF format, the file property is automatically set to "Confidential". |
Select [Property] in the File Information screen.
When you have selected [Confidential], enter a password (4 to 32 characters).
Every time you enter one digit, “ " is displayed.
Tap the [User Name] text box.
When user authentication is used, the user name that was used for login is automatically selected. In this case, this step is not necessary.Tap the key of the user name.
Alternatively, you can select a user name by tapping the [Call with Registration Number] key and entering the user number.Tap
.
A file name can be assigned to the
file.
Tap the [File Name] text box and enter the file name.
Enter a file name using up to 30 characters.Specify the folder for storing the
file.
Tap the [Stored to] text box.
If a user name with a "My Folder" setting is selected, "My Folder" of that user will automatically be selected. Tap the key of the folder where you want to store the
file, and tap
.
 .
.Tap the [Create PDF for PC Browsing] checkbox to
 , and a public PDF for PC browsing will
be created when the file is saved.
, and a public PDF for PC browsing will
be created when the file is saved.
Version 06a / bp70c65_usr_06a_us
