This setting is used when you want to set a more strict
password or when users who have not logged in for a specified period
of time are to be deleted.
Enables this option when you want to make your existing
password settings more strict.
Changes the setting of the administrator password.
Specifies the number of characters for the password
to be entered.
When setting a password, make sure that it contains
at least one or more numbers, uppercase and lowercase letters of the
alphabet, and symbols.
The characters that can be entered are as follows.
Check if the password you set before the change is the
same as the password after the change, and if it is the same, you
will not be able to register it. (However, if "Minimum Password Length" is 0,
this setting cannot be used.)
Changes the setting of the user password.
Specifies the number of characters for the password
to be entered.
When setting a password, make sure that it contains
at least one or more numbers, uppercase and lowercase letters of the
alphabet, and symbols.
The characters that can be entered are as follows.
Check if the password you set before the change is the
same as the password after the change, and if it is the same, you
will not be able to register it. (However, if "Minimum Password Length" is 0,
this setting cannot be used.)
Deletes users who have not logged in to the machine
for the specified period from the machine’s user list.
Prohibits the reregistration of user accounts (login
names) once they have been deleted. This setting can be used to prohibit
reregistration for a certain period of time or for no period of
time.
After enabling the setting, set the period of time to prohibit
reregistration. If you select "Undefined", you can prohibit reregistration
without setting a period.
If [Case sensitivity of login name is enabled.] is enabled in the authentication settings,
it will be judged case sensitive. If it is disabled, it will be
judged without distinguishing case.
Example: Deleted login name: ABC, login name to be registered:
Abc
If [Case sensitivity of login name is enabled.] is enabled in the authentication settings,
the login name Abc can be registered because bc is in lower case.
If it is disabled, Abc cannot be registered.
Use this setting to display the login screen and require
login in order to access the Web server.
The administrator password can be changed.
When you change the password, be sure to remember the new
password.
(It is recommended that you periodically change the administrator
password.)
You can select settings to cancel print jobs
that are not print hold jobs, or force all print jobs to be held.
When [Restrict Print Jobs] is turned ON, the settings below
can be selected.
| Item | Description |
|---|---|
|
Function to Use |
Specify document filing or print release as the function for restricting printer jobs. When document filing is specified and [Force Retention] is selected as the Restrict Operation, the job will be saved in document filing even if document filing is not specified in the printer driver. Also, if print release is specified, the document will be saved in print release even if print release is not specified in the printer driver. |
|
Restrict Operation |
Specify [Force Retention] or [Disable Jobs except Print Hold] when the function to be used is document filing. When [Disable Jobs except Print Hold] is specified, print jobs for which document filing is not specified in the printer driver will be job canceled. |
If the job is interrupted due to a paper jam,
etc., the job is automatically deleted after the time set in "Time
until automatic deletion" has elapsed.
Set the time after stopping a job to automatically
deleting the job.
You can reject the request from external sites.
When the machine starts up, the firmware is
inspected, and if any damage is found, it automatically recovers
to the state before the damage.
The default administrator is displayed at login.
Set whether to apply the security policy on this machine.
Set whether to perform forced access control.
Once set, access to all files inside the machine will be forcibly
controlled.
Set to show/hide the completion screen of the
job status screen.
Sets the contents to be displayed in the job
status. For printing, you can choose to show or hide the file name.
For image send, the destination can be shown or hidden.
For the various major ports used in the system, set
the prohibition/permission and port number, and tap the [Register] key.
The ports that can be set are as follows.
| Server Port | Factory default settings | Client Port | Factory default settings | ||
|---|---|---|---|---|---|
| Port Control | Enable/Disable | Port Control | Enable/Disable | ||
|
HTTP |
80 |
Enabled |
HTTP |
Enabled |
|
|
HTTPS |
443 |
Enabled |
HTTPS |
Enabled |
|
|
FTP Print |
21 |
Enabled |
FTP |
Enabled |
|
|
Raw Print |
9100 |
Enabled |
FTPS |
Enabled |
|
|
LPD |
515 |
Enabled |
SMTP |
Enabled |
|
|
IPP |
631 |
Enabled |
SMTP-SSL/TLS |
Enabled |
|
|
IPP-SSL/TLS |
443 |
Disabled |
POP3 |
Enabled |
|
|
Tandem Output Receive |
50001 |
Enabled |
POP3-SSL/TLS |
Enabled |
|
|
PC Scan |
52000 |
Enabled |
SNMP-TRAP |
162 |
Enabled |
|
Remote Operation Panel |
5900 |
Enabled |
Notify Job End |
Enabled |
|
|
SNMPD |
161 |
Enabled |
LDAP |
Enabled |
|
|
SMB |
Disable |
LDAP-SSL/TLS |
Enabled |
||
|
SMTP |
Enabled |
SMB |
Enabled |
||
|
WSD |
Enabled |
SNTP |
Enabled |
||
|
Print Release |
53000 |
Enabled |
mDNS |
Enabled |
|
|
Sharp OSA (Expansion Platform) |
Tandem Output Send |
Enabled |
|||
|
|
10080 |
Enabled |
Data Backup (Send) |
Enabled |
|
|
|
1443 |
Enabled |
Print Release |
Enabled |
|
|
IPP INFRA |
Enabled |
||||
|
syslog |
514 |
Enabled |
|||
|
syslog-SSL/TLS |
6514 |
Enabled |
|||
You can set the filter by an IP or MAC address to prevent
an unauthorized access to the machine via a network.
Set the IP or MAC address filter and tap the [Store] key.
This option sets an IP address.
You can specify whether to allow or prohibit access to the
machine from the IP address you set.
This option sets a MAC address.
It allows access to the machine from the MAC address you set.
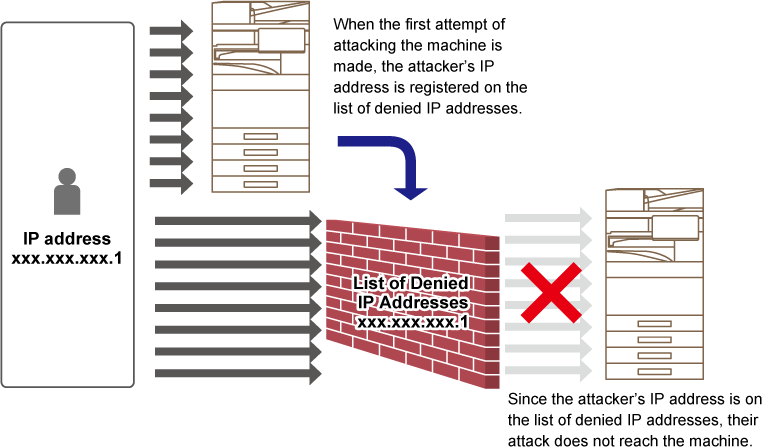
This section explains how to protect the machine by
partially blocking communications with an attempt to attack the machine
via network.
If the multifunction device receives more than the set number
of communications from the same IP address within the set period,
communication from that IP address is prohibited.
IP addresses whose communication is prohibited are recorded
in the audit log and registered as a reception refusal list.
In addition, those IP addresses are notified by e-mail to
the addresses in the e-mail alert message list 1/2 and dealer e-mail
alert message list.
The removal of the IP address from the rejection list is also
recorded in the audit log.
The maximum number of IP addresses that can be registered
in the reception rejection list is 100, and when the number reaches
100, external connection requests for multifunction devices will
not be accepted.
| Item | Description |
|---|---|
|
IP Address |
Displays the IP address that is rejected. The default setting is "OFF". |
|
Start Time of Incoming Packet Denials |
Displays the date and time when reception refusal started. |
|
Total |
Displays the number registered in the reception rejection list.
|
This setting is available when the virus detection kit
is installed. Specifies the settings for virus detection.
Specifies whether to use the virus scan function.
When the input/output data of the machine is generated,
the corresponding data is scanned for viruses.
Scans for viruses at the specified date and time.
Perform this setting when you want to scan for viruses
immediately.
Specifies the schedule for virus scan.
When this setting is enabled, a daily virus scan will
be performed.
(Start time)
Sets the time to start scanning.
When this setting is enabled, a virus scan will be performed
every week on the specified day and time.
(Days of the
week)
Sets the day of the week to start scanning.
When this setting is enabled, virus scan will be performed
on the specified day and time.
(Date)
Sets the date when the scan will start.
For months that have days that do not exist (for example,
February and April when 31 is set), run at the end of the month.
Select the data to be scanned for viruses.
Perform this setting when you want to update the virus
scan definition files immediately
SSL/TLS can be used for data transmission over a network.
SSL/TLS is a protocol that enables the encryption of information
communicated over a network. Encrypting data makes it possible to
transmit and receive sensitive information safely.
Data encryption can be set by the following protocols.
The encryption strength can be set to one of three levels.
Displays the status of the certificate required for
SSL/TLS communication. Click the [Select] key to install the certificate.
If the device certificate is installed, click the [Show]
key to display the certificate information.
Click the [Select] key to display the device certificates
that have already been registered. Select from them.
Sets whether or not to use S/MIME for scan
to E-mail.
Shows the status of the certificate required for sending
using S/MIME. If you want to install the certificate, click the [Select]
key.
Enable "Sign E-mail" to use a signature.
Set the algorithm for the signature.
Sets the use of encryption.
Select the method to be used for encryption.
Prohibit transmission to addresses that cannot be encrypted.
If the device certificate is installed, click the [Show]
key to display the certificate information.
Click the [Select] key to display the device certificates
that have already been registered. Select from them.
IPsec can be used for data transmission/reception on
a network.
When IPsec is used, data can be sent and received safely without
the need to configure settings for IP packet encryption in a Web
browser or other higher-level application.
When enabling this settings, take the following notes.
Sets whether to use IPsec for transmission.
Enter the Pre-Shared Key to be used for IKEv1.
Set the SA lifetime.
Set the SA lifetime size.
Set the IKE lifetime.
The registered IPsec rules are displayed.
To add a new rule, click the [Add] key.
To delete a rule, select the rule you want to delete and click
the [Delete] key.
Enter a name for the IPsec rule.
Set the priority level.
If there is a previously registered rule that is similar
to the rule you want to create, you can create the new rule based
on the registered rule.
Set the type of IP address to be used on the machine
and the port number (for IPv6, set the port number / prefix length).
Set the destination IP address type and port number
(for IPv6, set the port number / prefix length).
Set the protocol to be used.
Configure settings for the authentication method used
for IPsec.
Configure settings for the authentication method used
for IPsec.
Select to use ESP authentication.
Specify whether or not communication that does not use
ESP is allowed.
Select to use AH authentication.
Specify whether or not communication that does not use
AH is allowed.
All of the transmitted image data (sent or received
by facsimile or e-mail transfer) can be forwarded to any destination.
| List name | Settings |
|---|---|
|
Forwarding Destination Settings (Send Data) |
|
|
Forward Send Data |
Set a destination to forward the send data.
|
|
E-mail/Network Folder/FTP/Desktop |
Select a forwarding type of the send or received image data. When determined, select the destination from the address book. You can enter an e-mail directly.
|
|
Release Settings |
Releases the destination settings. |
|
File format |
Select the file format for inbound routing. |
|
Forwarding Destination Settings (Received Data) |
|
|
Forward Received Data |
Set a destination to forward the received data.
|
|
E-mail/Network Folder/FTP/Desktop |
Select a forwarding type of the send or received image data. When determined, select the destination from the address book. You can enter an e-mail directly.
|
|
Release Settings |
Releases the destination settings. |
|
File format |
Select the file format for inbound routing.
|
Select Hidden Pattern Print Setting.
The hidden pattern print function is effective at preventing unauthorized copying
as the specified text emerges in the background on output sheets.
| Item | Description |
|---|---|
|
Hidden Pattern Print Setting |
A pattern print can be printed with this settings.
|
|
Print Color |
Select a print color.
|
|
Exposure |
Select an exposure.
|
|
Font Size |
Select a font size.
|
|
Angle |
Select a character angle.
|
|
Font Style |
Select the standard or italic character settings.
|
|
Camouflage Pattern |
Set a camouflage pattern.
|
|
Print Method |
Select a character display pattern.
|
| Item | Description |
|---|---|
|
Standard Characters |
Allows you to select a preset character string. The following character strings can be selected.
|
|
Pre-set Text |
Select a stored preset character string. This setting is ignored if [Direct Entry] is enabled.
|
|
Information Printing |
Enables simultaneous printing of the following information sets.
|
|
Disable Direct Entry |
Set whether to enable direct input of print characters for tint block printing in each mode.
|
Set a character contrast.
The black, magenta, and cyan can be set in any of 9 levels.
Stores the user-created print characters. Up to 30 characters
can be stored.
Prints the tracking information at the top or bottom
of output pages when copy or print job is executed.
This function forcibly prints the pre-specified traceable
information to prevent an unauthorized copy.
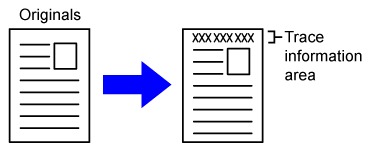
| Item | Description |
|---|---|
|
Print tracking information settings |
Set this option to print the tracking information.
|
|
Print Data |
The following information can be printed.
|
|
Print Color |
Set the print color.
|
|
Print Position |
Set a print position on each page.
|
|
Font Size |
Set the size of the characters to be printed.
|
|
Select the Job to Print |
Set a job to print the tracking information.
|
Logs are created and saved for various events relating
to security functions and settings.
Audit logs are created and saved in English. However, setting
values such as filenames which are input from external sources are
saved as-is.
Audit logs which have been saved in the internal storage can
be exported by an administrator to a PC as TSV files.
You can select either the internal storage or an external
server as the destination for saving audit logs.
"Audit Log" can be carried out as follows.
In "Settings (administrator)", select [System Settings] →
[Security Settings] → [Audit Log]
Select "Security Control", "Storage/Send Settings" or "Save/Delete
Audit Log".
"Storage/Send Settings" can be carried as follows.
In "Settings (administrator)", select [System Settings] →
[Security Settings] → [Audit Log]→ [Storage/Send Settings]
Then make the storage and transmission settings.
"Save/Delete Audit Log" can be carried out as follows.
In "Settings (administrator)", select [System Settings] →
[Security Settings] → [Audit Log]→ [Save/Delete Audit Log]
Select "Save Audit Log" or "Delete Audit Log".
If the audit log is saved to an external server, the
audit log is temporarily saved in the buffer area reserved in the
internal storage until the transmission to the external server is
successful.
| Event name | Date & Time *1 |
Operation I/F *2 |
Login Name | Result *3 |
Additional Information |
|---|---|---|---|---|---|
|
Audit Start |
Yes |
N/A |
N/A |
Yes |
Reasons for starting Normal start-up: main power on, panel SW pressed, reboot, timer, fax, network, waste paper tray fax paper removal, other Other: security erase |
|
Audit End |
Yes |
N/A |
N/A |
Yes |
N/A |
|
Job Completion |
Yes |
Yes |
Job owner (SYSTEM) |
Yes |
Finished job name |
|
I&A Success |
Yes |
Yes |
The string entered as your login name |
N/A |
IP address of the login source 127.0.0.1 for the operation panel |
|
I&A Failure |
Yes |
Yes |
The string entered as the login name |
N/A |
IP address of the login source 127.0.0.1 for the operation panel |
|
Add User |
Yes |
Yes |
User who added |
Yes |
Added login name |
|
Login Terminated |
Yes |
Yes |
The string entered as your login name |
N/A |
Active termination/ Timeout |
|
Change Password |
Yes |
Yes |
The user who made the change |
Yes |
Login name of the user whose password has been changed |
|
Change Login Name |
Yes |
Yes |
The user who made the change |
Yes |
Login name after change |
|
Delete user |
Yes |
Yes |
User who deleted |
Yes |
Deleted login name (ALL if all users are deleted) |
|
Add Auth Group |
Yes |
Yes |
User who added |
Yes |
Added authority group name |
|
Change Role |
Yes |
Yes |
The user who made the change |
Yes |
|
|
Change Auth Group Setting |
Yes |
Yes |
The user who made the change |
Yes |
Privilege changed settings Group Name |
|
Add Page Limit Group |
Yes |
Yes |
Users with additional functions |
Yes |
Name of the additional page limit group |
|
Delete Page Limit Group |
Yes |
Yes |
Users whose functions are deleted |
Yes |
Name of the deleted page limit group |
|
Change Page Limit Group Setting |
Yes |
Yes |
Users who have changed the settings |
Yes |
Name of the changed page limit group |
|
Change Time Setting |
Yes |
Yes |
The user who made the change |
Yes |
N/A |
|
Change Setting |
Yes |
Yes |
User who made the change (“ByPolicy” when applying AD policy) |
Yes |
|
|
Firm Recovery |
Yes |
N/A |
N/A |
Yes |
|
|
Exec Rejection |
Yes |
N/A |
N/A |
Yes |
Distinguished name of firmware or embedded OSA app |
|
TLS, IPsec communication |
Yes |
N/A |
Users who are communicating |
N/A |
|
|
Modify AddrBook |
Yes |
Yes |
User who updated |
Yes |
|
|
Firm Update |
Yes |
Yes |
User who updated |
Yes |
|
|
Intrusion/Attack Detected |
Yes |
N/A |
N/A |
Yes |
|
|
Release Denied Addr |
Yes |
Yes |
Users who have been released |
Yes |
Released IP address |
|
Invoke EAM App |
Yes |
N/A |
N/A |
Yes |
Starting Sharp OSA External Accounts Application Additional Information: IP Address and Application Name of Sharp OSA External Account Server |
|
CSRF Trial |
Yes |
Net |
N/A |
N/A |
Attacking IP address |
|
Enabling Embedded OSA |
Yes |
Yes (N/A for firmware updates) |
Users who have activated the function (default administrator for installation and update via Application Portal, system for firmware update) for installation and update from Application Portal, "system" for firmware update) |
Yes |
|
|
Send External Dest |
Yes |
Yes |
Users who sent |
Yes |
Destination e-mail address/IP address/SMB folder path |
|
Web Push Print |
Yes |
Yes |
Users of the function |
Yes |
IP address from which the file was downloaded |
|
Change Service Setting |
Yes |
Yes |
Users who have changed the settings |
Yes |
Changed settings and their values |
|
Switch to service mode |
Yes |
Yes |
Service |
Yes |
N/A |
|
Running in service mode |
Yes |
Yes |
Service |
Yes |
Changed setting values |
|
Sharp OSA external account |
Yes |
Yes |
The string entered as your login name |
Yes |
N/A |
|
Scheduled Virus Scan |
Yes |
N/A |
N/A |
Success/ Failure |
In case of failure, the reason
|
|
On-demand Virus Scan |
Yes |
Ope/Web |
Users who requested the scan to be performed |
Success/ Failure |
In case of failure, the reason
|
|
Virus Detection |
Yes |
N/A |
N/A |
Always "Success" |
One of the following
Data identification name (file name, etc., if obtainable. N/A if not possible) Identification name of the virus |
|
Auto Pattern Update |
Yes |
N/A |
N/A |
Success/ Failure |
In case of failure, the reason
|
|
On-demand Pattern Update |
Yes |
Ope/Web |
Users who requested the implementation of the update |
Success/ Failure |
In case of failure, the reason
|
|
Change Setting |
Yes |
Yes |
Users who have changed the setting values |
Success/ Failure |
Setting items and values for Web page (Virus Scan Setting) |
* 1 The date and time when the event occurred is displayed in the extended format of ISO 8601.
* 2 Either Ope/Web/sNet is displayed as the operation interface. However, if it is “N / A” in the table, it will be written as “N / A”.
* 3 Either Success / Failure will be displayed as the result of the event.
Import the certificate/private key.
Export the certificate/private key.
Shows the status of the certificate.
Enter the name to be used.
Enter the name of the organization.
Enter the name of the unit within the organization.
Enter the city or locality.
Enter the state or province.
Enter the country code.
Enter the sender's E-mail address.
Enter the start date and time for the certificate.
Enter the expiration date of the certificate.
Enter the Certificate Information.
Install the certificate.
Shows the status of the certificate.
Enter the name to be used.
Enter the name of the organization.
Enter the name of the unit within the organization.
Enter the city or locality.
Enter the state or province.
Enter the country code.
Enter the sender's E-mail address.
Enter the start date and time for the certificate.
Enter the expiration date of the certificate.
Enter the Certificate Information.
Import the certificate.
Shows the status of the certificate.
Version 06a / bp70c65_usr_06a_us
