Warning
Caution
Turn off the machine.
After turning off the machine, unplug it from the power outlet.
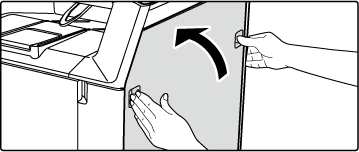
Open the right side cover.
Hold both sides and open.
Remove the toner collection container.
While gently pressing down on the hook at the top of the toner collection container, pull the toner collection container toward you.

Remove all toner cartridges.
Spread newspaper or something similar in advance where you will place the toner cartridge.

Caution
When the removed toner cartridge is placed, be sure to place it with the gear-mounted side facing up.
Unlock the primary transfer unit pressure transfer lever.
Turn the primary transfer unit pressure transfer lever 180 degrees to the left to set the mark to the unlocked (


Unlock the imaging unit.
Turn the left lock of the imaging unit 90 degrees to the right. Turn the right lock of the imaging unit 90 degrees to the left.
Remove the imaging unit.
At first, pinch the locks on the left and right sides of the imaging unit and pull it out slowly and horizontally.

Caution
Imaging unit is heavy and handled with care.Install the new imaging unit

Caution
Lock the imaging unit.
Turn the left lock of the imaging unit 90 degrees to the left. Turn the right lock of the imaging unit 90 degrees to the right.
Lock the primary transfer unit pressure transfer lever.
Turn the primary transfer unit pressure transfer lever 180 degrees to the right to set the mark to the locked (


Slowly insert the toner cartridge on the level.
Push in the rounded indentation until it “clicks” into position.
Install a toner collection container.
Push in the rounded indentation until it “clicks” into position.
Close the right side cover.
Hold both sides and close.
Version 05a / bpc131wd_usr_05a_en