Your sender information
(date, time, sender name, sender address, number of pages) is automatically
added to the top of the file you transmit.
This function cannot be used in scan mode or data
entry mode.
Example of the sender information printed
- Date, time: The date and time of
transmission.
- Sender name: The sender name programmed in the machine.
- Source Address.
- Page numbers: Page number/total pages.
- Storing
and setting sender information
Date,
time: In "Settings", select [System Settings] → [Common Settings] → [Device Control]
→ [Clock Adjust].
Sender name, sender address: In "Settings (administrator)", select
[System Settings] → [Image Send Settings] → [Common Settings] → [Own Number and Name
Set] → [Sender Data Registration].
If you intend to use the I-Fax Own Address Send function, be sure
to configure this information.
Page numbers: Select whether or not to include page numbers using
[System Settings] → [Image Send Settings] → [Internet Fax Settings] → [Send Setting]
→ [Printing Page Number at Receiver]
in "Settings (administrator)".
- Position
of sender information
The sender
information is printed at the top of the scanned image data. This
makes the transmission data longer than the scan size, so it may
be reduced or divided onto two pages when printed by the receiving
machine.
A transaction report is automatically printed
out to alert you when an Internet fax transmission fails or when
a broadcast transmission is performed.
The transaction report contains a description of the transmission
(date, start time, name of destination, time required, number of
pages, result, etc.).
INFORMATION APPEARING IN THE RESULT COLUMN
Transaction reports are printed based on conditions set in
the setting mode. Select different conditions for a transmission
as required.
This function cannot be used in scan mode or data
entry mode.
For a broadcast transmission, changes to the transaction
report print conditions apply to all destinations.
Original image in transaction report
When [Print Original Image] is enabled, the first page of the
transmitted original is printed on the same sheet as the transaction
report. The original image is reduced to allow it to fit on the
sheet. If the vertical scanning length (X direction) of the original
is longer than 432 mm (17-1/64"), the part that exceeds 432 mm (17-1/64")
may be cut off.
Specify a time at which
a transmission or broadcast transmission will automatically take
place. Transmission begins automatically at the specified time.
This function is helpful when you wish to perform reserved,
broadcast or other transmissions during your absence or at night
or other times when telephone rates are low.
In fax mode, a timer setting can also be specified for polling
reception to receive a fax when you are not present.
For example, if it is set to print data received during the
day at 20:00, the received data will not be printed immediately, and
printing will begin automatically at 20:00.
.png)
- When
a timer transmission is set, keep the main power switch in the "
 " position. If the main power switch is
in the "
" position. If the main power switch is
in the "
 "position at the specified time, transmission
will not take place.
"position at the specified time, transmission
will not take place.
- When performing a timer transmission, you
must scan the original into memory when you set up the transmission.
It is not possible to leave the document in the document feeder
tray or on the document glass and have it scanned at the reserved time
of transmission.
- Up to 100 timer transmissions can be stored
at once.
- In fax mode, this function cannot be used
in direct transmission mode or when the speaker is used to dial.
- Settings selected for a timer transmission
(exposure, resolution, and other functions) are automatically cleared
after the transmission is finished. (However, when the document
filing function is used, the scanned original image and settings
are stored in the built-in local drive.)
- If another transmission is in progress
when the specified time arrives, the timer transmission will begin
after that transmission is finished.
- If a job scheduled for timer transmission
is given priority on the job status screen, the timer will be cancelled.
The transmission will begin as soon as the job in progress is completed.
PRIORITY PROCESSING OF A RESERVED JOB
- The time can be specified up to a week
in advance.
- After the timer transmission settings are
specified, start the transmission in the same way as other functions.
- A timer transmission can be deleted in
the job status screen.
- When in fax mode, only one timer polling
operation can be stored at once. To receive data from multiple destinations
by polling, specify Timer for serial polling.
Place the original.
When in fax mode, then after completing this procedure,
proceed to Step 3.
Place the original in the document feeder tray of the
automatic document feeder, or on the document glass.
AUTOMATIC DOCUMENT FEEDER
DOCUMENT GLASSTap the mode display to switch to the initial screen
of each mode.
CHANGING MODESSpecify the destination.
RETRIEVING A DESTINATION FROM AN ADDRESS BOOK
VIEWING A LIST OF THE SELECTED DESTINATIONS
USING A SEARCH NUMBER TO RETRIEVE A DESTINATION
ENTERING AN ADDRESS MANUALLY
SPECIFYING A NETWORK FOLDER
RETRIEVING A DESTINATION FROM A GLOBAL ADDRESS BOOK
RETRIEVING A DESTINATION FROM A MOBILE ADDRESS BOOK
USING A TRANSMISSION LOG TO RESENDWhen in fax mode, enter the destination number.
ENTERING A DESTINATION NUMBER USING THE NUMERIC KEYS
RETRIEVING A DESTINATION FROM AN ADDRESS BOOK
USING A SEARCH NUMBER TO RETRIEVE A DESTINATION
RETRIEVING A DESTINATION FROM A GLOBAL ADDRESS BOOK
RETRIEVING A DESTINATION FROM A MOBILE ADDRESS BOOK
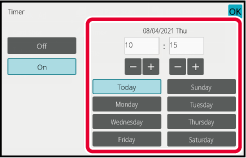
USING A TRANSMISSION LOG TO RESENDTap the [Others] key, and tap the [Timer] key.
Tap [On] key.
Specify the date.
Specify the time (hour and minute) in 24-hour format.
After the settings are completed, tap

and [Back] keys in sequence.
- Tap the areas displaying the hour
and minute respectively, and enter the values using the numeric
keys.
- It is convenient to use
 to finely adjust the time.
- The setting will show the current time.
If the time is not correct, press the [CA] key to cancel
the operation. Correct the time in setting mode and then perform
the timer transmission procedure.
-
BEFORE USING THE MACHINE AS A NETWORK SCANNER FUNCTION
To
cancel the Timer Transmission settings:
Tap the [Off] key.
To
set the date and time of the machine:
In "Settings", select [System Settings] → [Common Settings] → [Device Control]
→ [Clock Adjust].
Tap the [Start] key to start scanning of the original.
- If you inserted
the original pages in the document feeder tray, all pages are scanned.
A beep will sound to indicate that scanning
has ended, and the machine stands by for transmission.
- When you place the original
on the document glass, scan each page one at a time.
When scanning finishes, place the next
original and tap the [Start] key.
Repeat until all pages have been scanned
and then tap the [Read-End] key.
A beep will sound to indicate that scanning
has ended, and the machine stands by for transmission.
The original is scanned into memory. The original
cannot be scanned at a specified time.
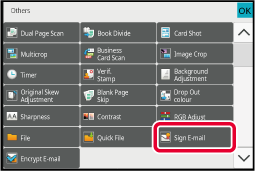
You can add a signature when sending a scanned
image. This allows the recipient to check your sender information
in the electronic signature.
This function is available for Scan to E-mail.
To
add an electronic signature to a scanned image
- In "Settings (administrator)", select
[System Settings] → [Security Settings] → [S/MIME Settings] → [Condition Settings].
- When [Select at Sending] is selected in "Sign E-mail"
in "Settings (administrator)", you can specify whether or not an electronic
signature is added each time you send an image. When [Always Enable]
is selected, the setting cannot be changed.
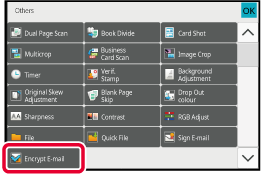
You can encrypt the transmitted data to
strengthen security.
This function is available for Scan to E-mail.
To
encrypt transmitted data
- In
"Settings (administrator)", select [System Settings] → [Security Settings] →
[S/MIME Settings] → [Condition Settings].
- When [Select at Sending]
is selected in "Encrypt E-mail" in "Settings (administrator)", you can
specify whether or not the data is encrypted each time you send
an image. When [Always Enable] is selected, the setting cannot be changed.
Place the original.
Place the original in the document feeder tray of the
automatic document feeder, or on the document glass.
AUTOMATIC DOCUMENT FEEDER
DOCUMENT GLASSTap the mode display to switch to the initial screen
of E-mail mode.
CHANGING MODESSpecify the destination.
RETRIEVING A DESTINATION FROM AN ADDRESS BOOK
VIEWING A LIST OF THE SELECTED DESTINATIONS
USING A SEARCH NUMBER TO RETRIEVE A DESTINATION
RETRIEVING A DESTINATION FROM A GLOBAL ADDRESS BOOK
RETRIEVING A DESTINATION FROM A MOBILE ADDRESS BOOK
- Data encryption is not possible when
the address is directly entered.
- Encrypted data can only be sent to an address
for which you have registered a user certificate.
Register
a user certificate for the address in "Settings (Web version)"
- [Address Book] → [E-mail] → "User Certificate". Only one E-mail address
can be registered for an address that has a user certificate.
- If the "Disable sending to the addresses which cannot be encrypted." checkbox is (
 ) in "Settings (administrator)" - [System Settings]
→ [Security Settings] → [S/MIME Settings] → [Condition Settings] → [Encryption Settings],
addresses
without a user certificate cannot be selected. When the checkmark
is removed (
) in "Settings (administrator)" - [System Settings]
→ [Security Settings] → [S/MIME Settings] → [Condition Settings] → [Encryption Settings],
addresses
without a user certificate cannot be selected. When the checkmark
is removed (
 ), the data is sent without encryption.
Tap the [Others] key, and tap the [Encrypt E-mail] key.
A checkmark appears on the icon.
After the settings are completed, tap the [Back]
key.
To
cancel the encryption setting
Tap the [Encrypt E-mail] key to remove the checkmark.
Tap the [Start] key to start scanning of the original.
- If
you inserted the original pages in the document feeder tray, all
pages are scanned.
A beep
will sound to indicate that scanning and transmission have ended.
- When you
place the original on the document glass, scan each page one at
a time.
When scanning
finishes, place the next original and tap the [Start] key.
Repeat the procedure until all pages have been scanned and then
tap the [Read-End] key.
A beep will sound to indicate that scanning
and transmission have ended.
-s.png)