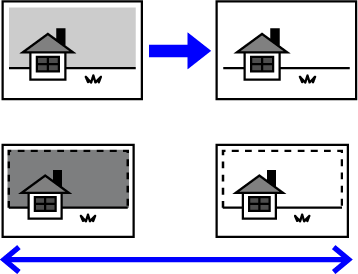
If the scanned
original contains blank pages, this function skips them to copy
only non-blank pages.
The machine detects blank pages, enabling you to skip useless
copies without checking an original.
Place the original.
Place the original in the document feeder tray of the automatic document feeder, or on the document glass.Tap the [Others] key, and tap the [Blank Page Skip] key.
Tap the [Skip Blank Page] or [Skip Blank and Back Shadow] key.
After the settings are completed, tap [OK] and [Back] keys in sequence.Tap the [Color Start] or [B/W Start] key.
Check the confirmation message, and tap the [OK] key to start copying.
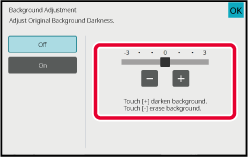
On the confirmation screen, the number of scanned original sheets appears in (A), the number of scanned sides in (B), and the number of copies excluding blank pages in (C).You can adjust the background
by making light areas of the original darker or lighter.
Changing the level of [Background Adjustment] to the [+] side
makes the background darker, while changing to the [-] side makes
it lighter.
Darkness of the light area can be adjusted by this function.
Tap the [Others] key, and tap the [Background Adjustment] key.
Tap
 or move the slider to set the value.
Place the original.
Place the original in the document feeder tray of the automatic document feeder, or on the document glass.Tap the [Color Start] or [B/W Start] key to start copying.
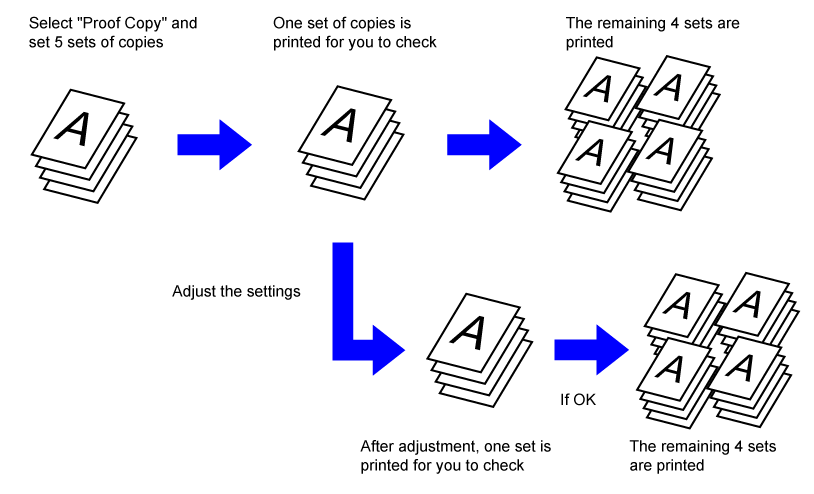
This function makes a proof
copy before printing the specified number of copies. Check the preview
image with a proof copy. If necessary, change the settings.Using
this function stores the scanned original in the machine, saving
you the trouble of re-scanning the original in the changed setting.
Proof
copy flow
Tap the [Others] key, and tap the [Proof Copy] key.
A checkmark appears on the icon.As necessary, specify the required functions such as "Exposure" and "Copy Ratio".
Place the original.
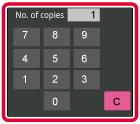
Place the original in the document feeder tray of the automatic document feeder, or on the document glass.Set the number of copies (number of sets) using the numeric keys.
Tap the [Color Start] or [B/W Start] key.
Make only one set of copies.Check the copy result. If no problem is found, tap the [Start Print] key.
As necessary, change the settings and repeat proof copying until you are satisfied with the copy result.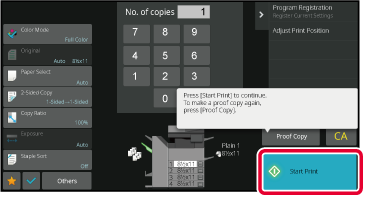
This function counts the number of scanned
original sheets, and displays the result before making a copy.
By allowing you to check the number of original sheets that
were scanned, this helps reduce the occurrence of copy mistakes.
Tap the [Others] key, and tap the [Original Count] key.
A checkmark appears on the icon.Place the original in the document feeder tray of the automatic document feeder.
AUTOMATIC DOCUMENT FEEDERTap the [Color Start] or [B/W Start] key.
Check the number of original sheets.
The number that is displayed is the number of scanned original sheets, not the number of scanned original pages. For example, when 2-sided copying is performed using one original, the number "1" will appear to indicate that one original sheet was scanned, not "2" to indicate the front-side page and the reverse side page.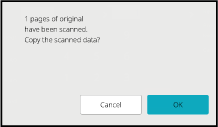
Tap the [OK] key to start copying.
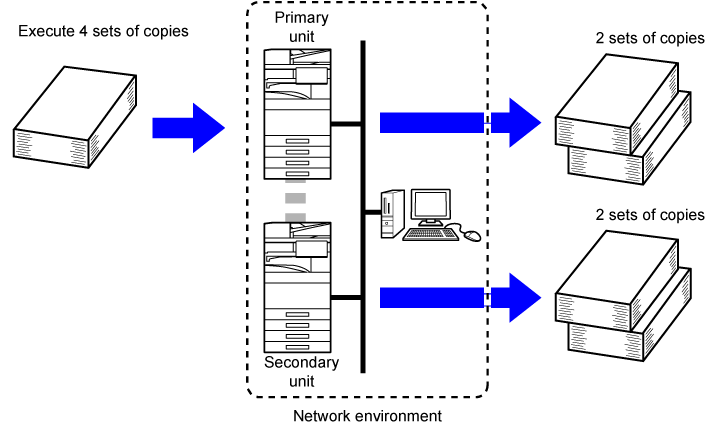
This function shares a copy
job half-and-half between two machines connected to the network,
enabling the reduction of the copy time.
Primary
unit and secondary unit
The primary unit performs only scanning, and a secondary unit
registered in the primary unit performs only printing without scanning
the original.
Tap the [Others] key, and tap the [Tandem Copy] key.
A checkmark appears on the icon.Place the original.
Place the original in the document feeder tray of the automatic document feeder, or on the document glass.Tap the number of copies key to specify the number of copies.
Up to 9999 copies (sets) can be set. The specified number of copies are shared between the primary unit and secondary unit. If the number of copies is odd, the primary unit makes more copies than the secondary unit.
Tap the [Color Start] or [B/W Start] key to start copying.
Version 06a / bp70c65_usr_06a_us
