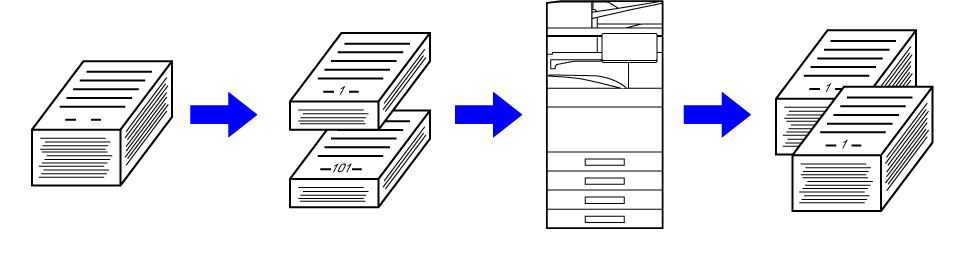
This function divides the
originals into sets and feeds each set through the automatic document
feeder one set at a time when copying a very large number of originals.
This saves you the trouble of sorting the copies.
When scanning originals that are separated into sets, scan
the set that has the first page first.
The individual copy settings can be configured for each set
of originals to be scanned separately.
Up to 100 sets of originals can be scanned for one job.
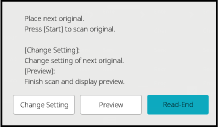
Tap the [Others] key, and tap the [Job Build] key.
A checkmark appears on the icon.Change settings as needed.
Place the original in the document feeder tray of the automatic document feeder, and tap the [Start] key to scan the first original.
Insert the originals all the way into the document feeder tray. Originals can be stacked up to the indicator line..png)
Place the next set of originals and tap the [Start] key.
Repeat this step until all originals have been scanned.Repeat until all pages have been scanned and check the preview image in the preview screen.
Tap the [Read-End] key to start copying.
As necessary, change copy settings for each set of originals.
Perform the steps below before scanning the next set of originals
in step 4 of “Copying in job build
mode".
Tap the [Change Setting] key.
Change copy settings.
Place the next set of originals and tap the [Start] key.
Repeat this step until all originals have been scanned.
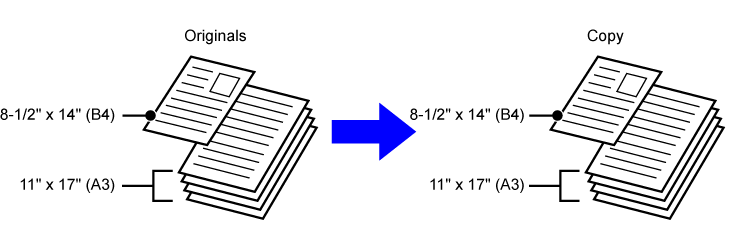
This feature copies originals in different sizes at the same time
even when 8-1/2" x 14" (B4) size originals are mixed with 11" x
17" (A3) size originals.
When scanning the originals, the machine automatically detects
the size of each original and uses paper appropriate for that size.
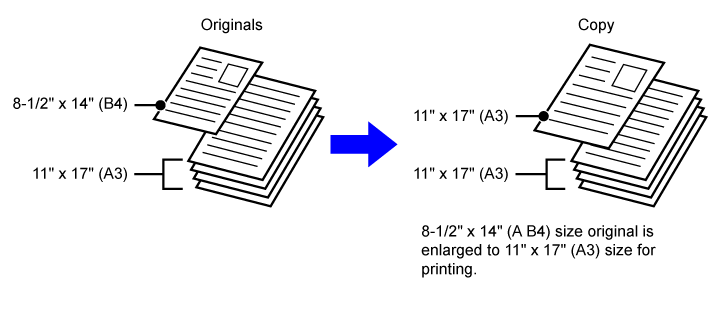
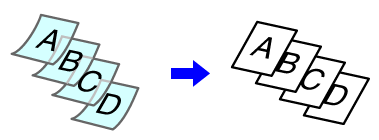
When mixed size original is combined with auto ratio selection,
the ratio is adjusted individually for each original according to
the selected paper size, enabling printing on a uniform paper size.
When
mixed size original is combined with auto ratio selection
(When 11" x 17" (A3) is selected with the auto ratio selection,
8-1/2" x 14" (B4) size original is enlarged to 11" x 17" (A3) size
for printing.)
There are two settings for mixed size originals.
| Same Width |
Use this setting for originals that are in 2 types of different sizes but have sides that are the same length. The originals are inserted in the document feeder tray with the sides that are the same length aligned together on the left. • 11" x 17" and 8-1/2" x 11" • 8-1/2" x 14" and 8-1/2" x 11"R • 8-1/2" x 14" and 5-1/2" x 8-1/2" • 8-1/2" x 13" and 8-1/2" x 11"R • 8-1/2" x 13" and 5-1/2" x 8-1/2" • 8-1/2" x 11"R and 5-1/2" x 8-1/2" • A3 and A4 • B4 and B5 • A4R and A5 |
|---|---|
| Different Width |
Use this setting when the originals are in 2 types of different sizes and do not have sides that are the same length. This setting can only be used for the following combinations of sizes: • 11"x17" and 8-1/2"x14" • 11"x17" and 8-1/2"x13" • 11"x17" and 5-1/2"x8-1/2" • A3 and B4 • A3 and B5 • B4 and A5 • A4 and B5 • B4 and A4R • B4 and A5 • B5 and A4R • B5 and A5
Use this setting when the originals are in 3 types of different sizes and do not have sides that are the same length. This setting can only be used for the following combinations of sizes: • A4R, B4, and A3 • A5, B4, and A3 • A4R, B5, and A3 • A5, B5, and A3 • A4R, A4, and B4 • A5, A4, and B4 • B5, A4R, and A4 • A5, B5, and A4 • B5R, A4R, and B4 • A5, B5R, and B4 • B5R, A4R, and B5 • A5, B5, and B5R |
Tap the [Others] key, and tap the [Mixed Size Original] key.
Tap the [Same Width] key or the [Different Width] key as appropriate for the originals.
After the settings are completed, tap [OK] and [Back] keys in sequence.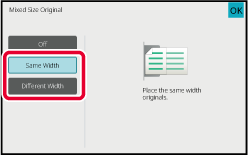
Place the original face up on the document feeder tray with the corners aligned together in far left corner.
Place the original as shown on the Mixed Size Original screen.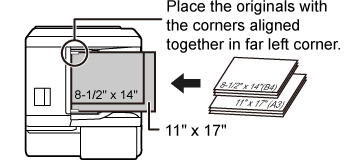
Tap the [Color Start] or [B/W Start] key to start copying.

When you wish to scan thin originals using
the automatic document feeder, you can use this function, which
helps prevent thin originals from misfeeding.
Tap the [Others] key, and tap the [Slow Scan Mode] key.
A checkmark appears on the icon.Place the original in the document feeder tray of the automatic document feeder.
AUTOMATIC DOCUMENT FEEDERTap the [Color Start] or [B/W Start] key to start copying.
When you wish to scan heavy originals using
the automatic document feeder, you can use this function, which
helps prevent heavy originals from misfeeding.

Tap the [Others] key, and tap the [Heavy Paper Scan] key.
A checkmark appears on the icon.Place the original in the document feeder tray of the automatic document feeder.
AUTOMATIC DOCUMENT FEEDERTap the [Color Start] or [B/W Start] key to start copying.
This function adjusts the resolution when
scanning the original, enabling the high-quality output or speed-priority
output according to the application.
Tap the [Others] key, and tap the [Scan Resolution] key.
Select the resolution.
The resolution can be set to both the document feeder and document glass. After the settings are completed, tap [OK] and [Back] keys in sequence.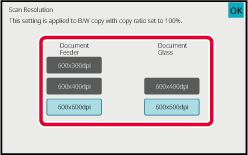
Place the original.
Place the original in the document feeder tray of the automatic document feeder, or on the document glass.Tap the [B/W Start] key to start copying.
Version 06a / bp70c65_usr_06a_us
