This section explains how to enter a destination from
the initial screen of normal mode.
EASY MODE
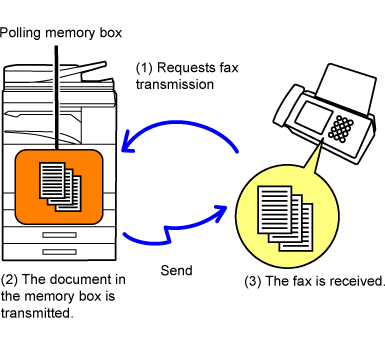
Sending a document that
has been scanned into memory when another machine polls your machine
is called "Polling Memory". Prior to polling, the document that will
be faxed to the other machine must be scanned into a polling memory box.
SCANNING A DOCUMENT INTO POLLING MEMORY
This function can only be used when the other machine is Super
G3 or G3 compatible and has a polling function.
The following explains “Polling Security Setting", a feature
restricting other machines that can use polling memory.
When a machine requests fax transmission, you can only allow
the machine to use polling memory if its programmed sender fax number
matches a fax number stored in your machine as a polling passcode
number. This function is called "Polling Security Setting".
To use this function, first store polling passcode numbers
(the sender fax numbers programmed in the other machines) in settings
mode of the machine, and then enable the polling security setting.
Follow these steps to scan a document into
the memory box for polling transmission (Public Box).
Place the original.
Place the original in the document feeder tray of the automatic document feeder, or on the document glass.Select settings for the original to be scanned and other functions.
Tap the [Others] key, and tap the [Memory Box] key.
Tap the [Polling Memory] tab.

Tap the [Public Box] key from the folder list.
Tap [Change Number of Times] on the action panel.
Tap the [Once] key or [Unlimited] key to specify the number of times.
To repeat transmitting an original, tap the [Unlimited] key. and
and
 .
.Tap the [Start] key to start scanning of the original.
You can check the document stored in the
machine's memory box (public box) for memory polling.
Tap the [Others] key, and tap the [Memory Box] key.
Tap the [Polling Memory] tab.
Tap the [Public Box] key from the folder list.
Tap [Check Image] on the action panel to check the document.
To print the document, tap [Print] on the action panel.Delete a document from the memory box (public
box) when it is no longer required.
Tap the [Others] key, and tap the [Memory Box] key.
Tap the [Polling Memory] tab.
Tap the [Public Box] key from the folder list.
Tap [Empty out Box] on the action panel.
Tap the [Yes] key.
Version 06a / bp70c65_usr_06a_us
