The automatic document feeder
is used to automatically scan both sides of an original.
.png)
After tapping the [Original] key, tap the [Book] or [Tablet] key.
See the figure on the left to check the binding edge of the original and select the key to be tapped.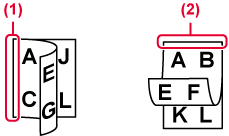
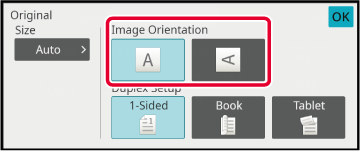
Tap the [Image Orientation] key with the same orientation as the placed original.
If this setting is not correct, a suitable image may not be transmitted. .
.
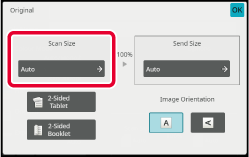
When the original is placed,
its size is automatically detected.
In normal mode, the size of the placed original is indicated
as the "Scan Size", and the size to be transmitted is indicated as
the "Send Size".
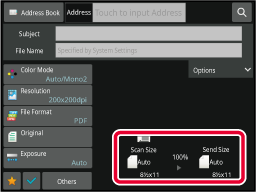
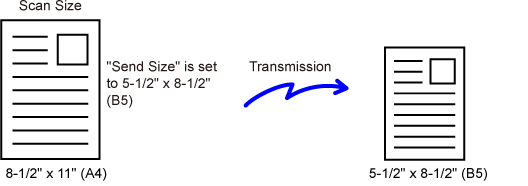
In the above screen, the scan size (the placed original)
is 8-1/2" x 11" (A4) and the send size is auto. For example, if
the scan size is 8-1/2" x 11" (A4) and the send size is 5-1/2" x
8-1/2" (B5), the image will be reduced before transmission.
When the original size is a non-standard
size or is not detected correctly, manually specify the original
size.
In Easy
mode
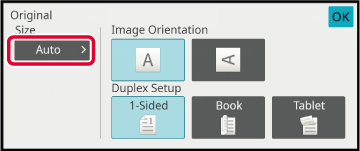
Tap the [Original] key.
Tap the [Auto] key.
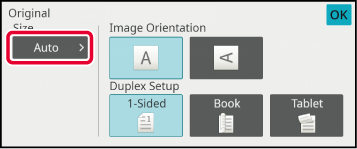
Tap a key of the desired original size.
After the settings are completed, tap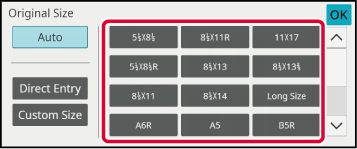
In Normal
mode
Tap the [Detail] key to change to normal mode.
EASY MODEAfter tapping the [Original] key, tap the [Scan Size] key.
Tap the appropriate original size key.
After the settings are completed, tap.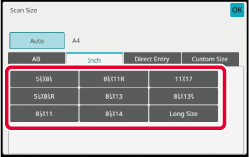
When scanning a non-standard size original
such as a card or postcard, specify the original size using numeric
values after placing the original.
The width can be from 1" to 17" (25 mm to 432 mm), and the
height can be from 1" to 11-5/8" (25 mm to 297 mm).
In Easy
mode
Tap the [Original] key.
After tapping the [Original] key, tap the [Scan Size] key.
Tap the [Direct Entry] key.
Specify the original size.
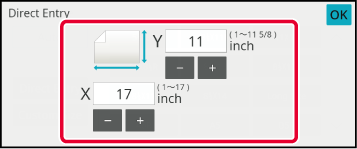
 ) to finely adjust the entered size.
Tap [Execute] twice.
On the base screen, check that the specified size is displayed on the [Original] key.In Normal
mode
Tap the [Detail] key to change to normal mode.
EASY MODETap the [Original] key.
After tapping the "Scan Size" key, tap the [Direct Entry] key.
Specify the original size.
to finely adjust the entered size.Tap the [Execute] key.
After the settings are completed, tap twice.Store the frequently used non-standard original
sizes. This section explains how to store, retrieve, change, and
delete non-standard original sizes.
Storing
original sizes (Modify/Delete)
Tap the [Detail] key to change to normal mode.
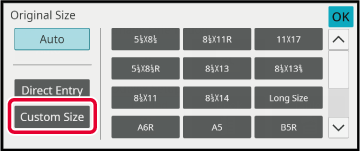
EASY MODETap the [Original] key.
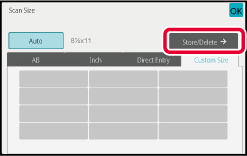
Tap the [Scan Size] key and tap the [Custom Size] tab.
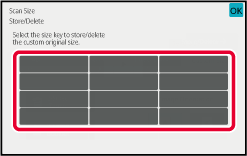
Tap [Store/Delete] key.
Tap a key (
![]() ) for storing a custom original size.
) for storing a custom original size.
 key.
key.
Specify the original size.
Tap the areas displaying width and height sizes respectively, and enter the sizes using the numeric keys.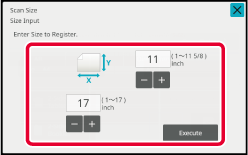 to finely adjust the entered size.
Tap the [Execute] key.
Tap the key, and check that the key of the size
stored on the Scan Size screen is added properly. After you have checked
it, tap
.Retrieving
a stored original size
In
Easy mode
Tap the [Original] key.
Tap the [Auto] key.
Tap the [Custom Size] key.
Tap the key of the original size that you wish to retrieve.
Tap twice.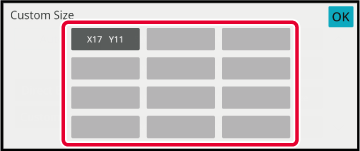
In Normal
mode
Tap the [Detail] key to change to normal mode.
EASY MODETap the [Original] key.
Tap the [Scan Size] key and tap the [Custom Size] tab.
Tap the key of the original size that you wish to retrieve.
After selecting the key of the original size, tap the key.
Check that the specified size is displayed on the scan size screen.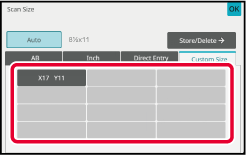
Tap this key to specify the send size as
a paper size. If the specified send size is larger than the scan
size, the image will be enlarged. If the specified send size is
smaller than the scan size, the image will be reduced.
Tap the [Detail] key to change to normal mode.
EASY MODETap the [Original] key.
Tap the [Send Size] key.
Tap the desired send size key.
After the settings are completed, tap.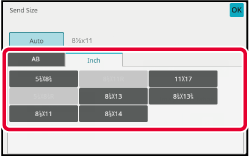
Tap the [Image Orientation] key with the same orientation as the original image.
If this setting is not correct, a suitable image may not be transmitted. After the settings are completed, tap.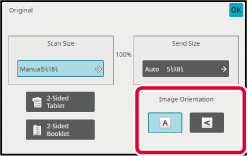
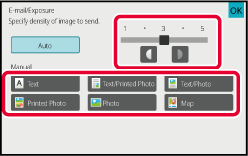
Optimum scanning is ensured by selecting
exposure and original image type based on the original.
| Exposure | Suggestion | |
|---|---|---|
|
Auto |
This setting automatically adjusts the exposure for light and dark parts of the original. |
|
|
Manual |
1-2 |
Select this setting when the original consists of dark text. |
|
3 |
Select this setting for a normal original (neither dark nor light). |
|
|
4-5 |
Select this setting when the original consists of light text. |
|
| Setup Items | Description | |
|---|---|---|
|
Auto |
The original image type is automatically selected to match the original. |
|
|
Manual |
Text/Printed Photo |
This mode provides the best balance for scanning an original which contains both text and printed photographs, such as a magazine or catalogue. |
|
Text/Photo |
This mode provides the best balance for scanning an original which contains both text and photographs, such as a text document with a photo pasted on. |
|
| Text |
Use this mode for regular text documents. |
|
|
Photo |
Use this mode to scan photos. |
|
|
Printed Photo |
This mode is best for scanning printed photographs, such as photos in a magazine or catalogue. |
|
|
Map |
This mode is best for copying maps with light color shading and fine text. |
|
Tap the [Detail] key to change to normal mode.
EASY MODETap the [Exposure] key.
Tap the key assigned to the original type you wish to set based on the original type.
Tap
 to adjust the exposure.
.
Specify the resolution setting.
For normal text originals, 200 x 200 dpi produces an
image that is sufficiently legible.
For photos and illustrations, a high resolution setting (600
x 600 dpi, etc.) will produce a sharp image.
However, a high resolution setting will result in a large
file, and if the file is too large, transmission may not be possible. In
this event, reduce the number of pages scanned or take other measures
to decrease the file size.
CHANGING FORMAT IN SCAN OR DATA ENTRY MODE
CHANGING FORMAT IN INTERNET FAX MODE
SPECIFYING THE SEND SIZE OF THE IMAGE
Tap the [Detail] key to change to normal mode.
EASY MODETap the [Resolution] key.
Tap the key of the desired resolution.
After the settings are completed, tap.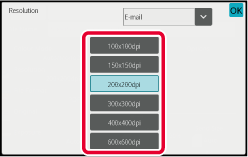
 to switch modes to set the resolution
in each mode.
However, FTP/Desktop and Network Folder are set to the same mode.
to switch modes to set the resolution
in each mode.
However, FTP/Desktop and Network Folder are set to the same mode.Change the file format (file type and compression
mode/compression ratio) for sending a scanned image at the time
of transmission. In addition, if the scanned originals are divided
into separate files, the number of pages per file can be changed.
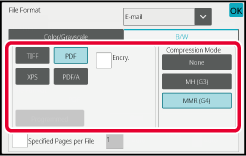
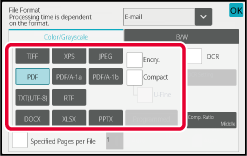
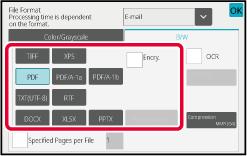
File format
combinations
| [Color/Grayscale] tab | [B/W] tab |
|---|---|
|
PDF*1 |
PDF*1 |
|
PDF*1 |
|
|
PDF*1 |
|
|
Compact PDF/A |
|
|
Encrypt PDF*1 |
Encrypt PDF*1 |
|
Encrypt PDF*1 |
|
|
Encrypt PDF*1 |
|
|
TIFF |
TIFF |
|
JPEG |
TIFF |
|
XPS |
XPS |
|
TXT(UTF-8)*5 |
TXT(UTF-8)*5 |
|
RTF*5 |
RTF*5 |
|
DOCX*5 |
DOCX*5 |
|
XLSX*5 |
XLSX*5 |
|
PPTX*5 |
PPTX*5 |
*1 When PDF (including encrypted and high compression) is selected for the file format, Flate Compression can be used to reduce the file size.
*2 On the BP-50C26/BP-50C31/BP-50C36/BP-50C45/BP-50C55/BP-50C65, this only appears when the Enhanced compression kit is installed.
*3 Only appears on the BP-50C26/BP-50C31/BP-50C36/BP-50C45/BP-50C55/BP-50C65.
*4 Only appears when the Enhanced compression kit is installed and the OCR expansion kit is not installed.
*5 On the BP-50C26/BP-50C31/BP-50C36/BP-50C45/BP-50C55/BP-50C65, this only appears when the OCR expansion kit is installed.
*6 On the BP-50C26/BP-50C31/BP-50C36/BP-50C45/BP-50C55/BP-50C65, this only appears when the OCR expansion kit is not installed. In situations other than the previous described, this item will not be appeared.
*7 On the BP-50C26/BP-50C31/BP-50C36/BP-50C45/BP-50C55/BP-50C65, this only appears when the Enhanced compression kit and OCR expansion kit are installed.
* On the BP-50C26/BP-50C31/BP-50C36/BP-50C45/BP-50C55/BP-50C65, the OCR expansion kit is required.
Flate Compression
After compressing a PDF file by JPEG compression, this function
compresses the file by lossless compression to further reduce the
file size by a small amount. When the data contains significant
solid color, this increases the effectiveness of compression.
When sending a PDF file, Flate Compression enables greater
reduction of the file size than conventional methods.
If the recipient's PDF viewer does not support Flate Compression,
the recipient may not be able to view the PDF file. In this case,
Flate Compression can be disabled.
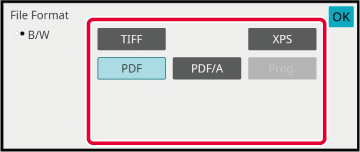
Tap the [File Format] key.
If you are in data input mode, start from step 5.Tap the [Color/Grayscale] or [B/W] key.
Tap the key of the desired file type.
After the settings are completed, tap.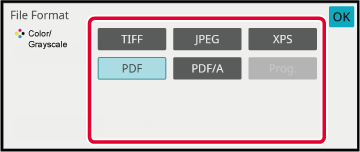
(On the BP-50C26/BP-50C31/BP-50C36/BP-50C45/BP-50C55/BP-50C65,
the OCR expansion kit is required.) To enable OCR, select the [OCR]
checkbox (
 ) and tap [OCR Setting].
).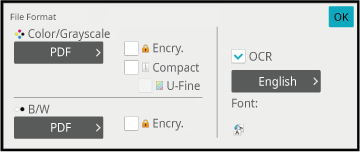
 ), the orientation of the original is
detected and the image is rotated before transmission.), the text string that is read from the
file is included in the file name. If a file name is set, the set
file name will be used for transmission.
), the orientation of the original is
detected and the image is rotated before transmission.), the text string that is read from the
file is included in the file name. If a file name is set, the set
file name will be used for transmission.To select more detailed settings, tap the [Detail] key to switch to normal mode.
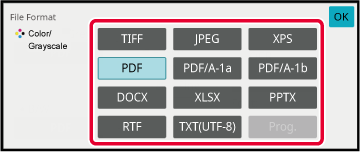
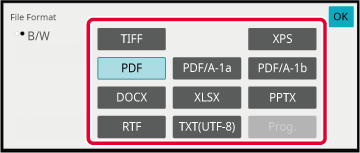
EASY MODETap the [File Format] key.
Tap the [Color/Grayscale] or [B/W] tab and select the format mode for scanning.
Tap the key of the desired file type.
When the OCR function expansion kit is not installed on the BP-50C26/BP-50C31/BP-50C36/BP-50C45/ BP-50C55/BP-50C65, or when [Disabling of OCR] is set in the system settings.
* On the BP-50C26/BP-50C31/BP-50C36/BP-50C45/BP-50C55/BP-50C65, the Enhanced compression kit is required.
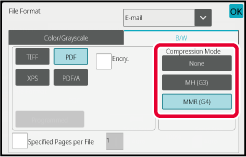
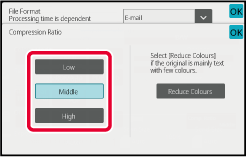
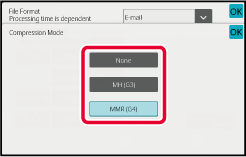
(On the BP-50C26/BP-50C31/BP-50C36/BP-50C45/BP-50C55/BP-50C65, the OCR expansion kit is required.) Tap the [Compression Mode] key or [Compression Ratio] key.
Tap the Compression key or Compression Ratio key.
When the OCR function expansion kit is not installed on the BP-50C26/BP-50C31/BP-50C36/BP-50C45/ BP-50C55/BP-50C65, or when [Disabling of OCR] is set in the system settings.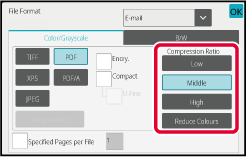
 .
.To change the number of pages per file, set the [Specified Pages per File] checkbox
to , and use numeric keys to specify the
number of pages per file.
, one file is created for each of the
number of pages at the right. When the checkmark is removed, one
file is created for all pages.The format for Internet Fax mode is set
in the system settings.
Internet Fax Settings
Change the color mode used to scan
the original.
In Easy mode
Tap the [B/W Start] or [Color Start]
key when scanning the original.
In Normal mode
| Mode | Scanning method |
|---|---|
|
Auto |
The machine detects whether the original is color or black and white and automatically selects full color or black and white (Mono2 or Grayscale) scanning. |
|
Full Color |
The original is scanned in full color. This mode is best for full color originals such as catalogues. |
|
Mono2 |
Colors in the original are scanned as black or white. This mode is best for text-only originals. |
|
Grayscale |
The colors in the original are scanned in black and white as shades of gray (grayscale). |
Tap the [Detail] key to switch to the normal mode.
EASY MODETap the [Color Mode] key.
Tap the key of the desired color mode for the original.
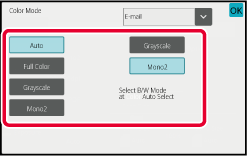 to select a send mode (E-mail, DeskTop/FTP
or Data Entry) to set the color mode for each mode.
to select a send mode (E-mail, DeskTop/FTP
or Data Entry) to set the color mode for each mode.Tap the [Grayscale] or [Mono2] key to set the B/W mode for automatic color selection.
Specify whether Mono2 or grayscale is used when scanning black and white originals..To automatically set scan settings appropriate
for the original, tap the [Auto Set] key in the base screen of
Easy Mode.
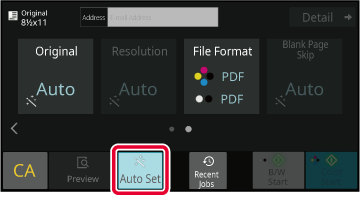
The following functions are set automatically.
Each function setting value/parameter can be changed
in setting mode.
*1 When using BP-70C31/BP-70C36/BP-70C45/BP-70C55/BP-70C65 or when using BP-50C26/BP-50C31/BP-50C36/BP-50C45/BP-50C55/ BP-50C65 with the OCR function expansion kit installed and the OCR function is enabled.
*2 When using the automatic document feeder with BP-70C31/BP-70C36/BP-70C45/BP-70C55/BP-70C65.
*3 When using the automatic document feeder.
Version 06a / bp70c65_usr_06a_us
