LOADING PAPER IN THE TRAY 3/4
A maximum of 500 sheets of paper from 12" × 18" to 7-1/4"
× 10-1/2"R (A3W to B5R) can be loaded into tray 3.
A maximum of 500 sheets of paper from 12" × 18" to 5-1/2" × 8-1/2"R
(A3W wide to A5R) can be loaded into tray 4.
- Other
than plain paper, special media such as transparency film and tab
paper can be loaded into tray 4.
To load tab paper, the dedicated guide must be installed.
If you
loaded paper of a different type or size from the paper previously
loaded, be sure to check the settings in "Settings (administrator)".
An incorrect setting may cause print failure, printing on paper
of an incorrect size, or type or paper misfeeds.
- Tray 4
can only be loaded with Com9, Com10, and Monarch envelopes.
Caution
Do not place heavy objects on the tray or press
down on the tray.
To
check the type and size of paper:
[Tray Settings] in the home screen or in "Settings", select
[Status] → [Machine Identification] → [Paper Input Tray Status].
To set
the type and size of paper:
Set this in [Tray Settings] in the home screen or in "Settings",
select [System Settings] → [Common Settings] → [Paper Settings] → [Paper Tray Settings].
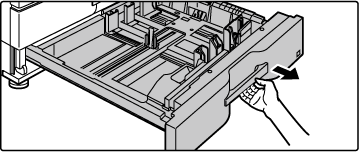
Pull out the paper tray.
Gently pull the tray out until it stops.
To load paper, go to step 3.
To load a different size of paper, go to the next step.
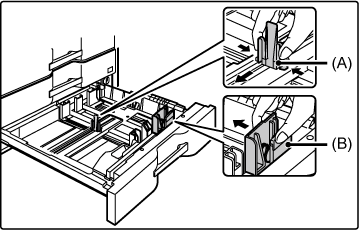
Adjust guide plates A and B by squeezing their lock
levers and sliding them to match the longitudinal and transversal
dimensions of the paper to be loaded.
The guide plates A and B are slidable. Slide each guide plate
while squeezing its lock lever to adjust to the paper size.
A non-standard size of paper can only be loaded
in tray 4. A non-standard size of paper cannot be loaded in tray
3.
Fan the paper.
Fan the paper well before loading it. If the paper is
not fanned, multiple sheets may feed at once and cause a misfeed.
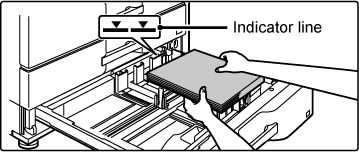
Insert the paper into the tray.
- Load
the paper with the print side facing up. The stack must not be higher
than the indicator line (maximum of 500 sheets).
- Do not
load the paper as shown below.
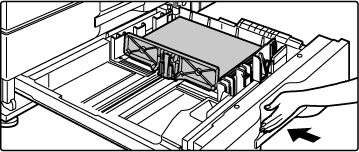
Gently push the paper tray into the machine.
Push the tray firmly all the way into the machine slowly.
Forcefully inserting the paper may cause skewed feeding and paper
misfeeds.
LOADING TAB PAPER INTO TRAY 4
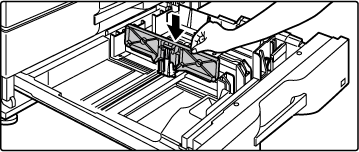
Remove the tab paper guide.
The guide is stored inside tray 4.
Pull out the tray and install the guide.
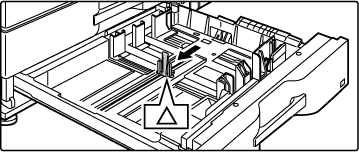
Adjust the guide plates to the triangle mark position.
Install the guide so that it may cover the guide plates.
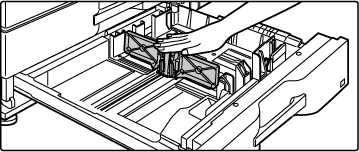
Adjust the guide plates in the tray to match the longitudinal and
transversal dimensions of the paper to be loaded.
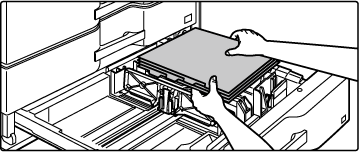
Insert the tab paper into the tray.
Place the tab paper with the print side facing up so
that the tab is to the left.
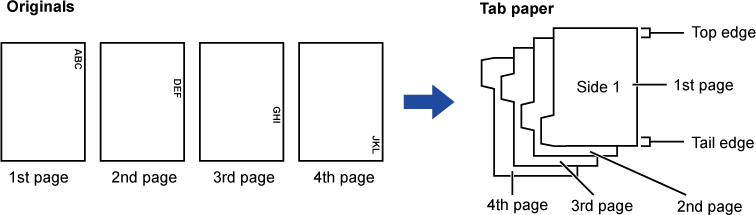
See the following figure and adjust the tab position
of the tab paper.
Gently push the tray into the machine, and set the paper
type to tab paper.
Using "Paper Tray Settings" in the system settings, set the paper
type to tab paper.
To
set the paper type to tab paper:
Set this in [Tray Settings] in the home screen or in "Settings",
select [System Settings] → [Common Settings] → [Paper Settings] → [Paper Tray Settings].
LOADING ENVELOPE IN TRAY 4
Load the paper with the copy and print side
facing up. The diagram shows an example of printing on the front
side.
The maximum number of sheets (50) may not exceed the indicator
line.
Envelopes with triangular flaps cannot be used in tray 4.
Cautions when placing envelopes
Removing curling
Ensure these are flat, containing no air
Ensure the four folded edges are pressed flat
(for items with flaps, three edges)
Align on a flat surface
- Before using envelopes in tray 4, it is recommended
that users print a test page to check the final result.
- If the envelope is not folded tightly, is warped
or bent, it may cause misfeeds.