SHARP

Language

FUNCTIONS FOR SPECIFIC USES

COPYING CAPTIONS ONTO TAB PAPER (TAB COPY)

Load a tab sheet in the bypass tray, and make a copy on a tab.
Prepare originals for captions that match the tab positions.
The image is shifted by the width of the tab.

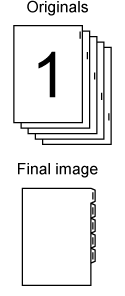
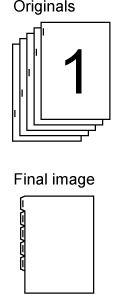
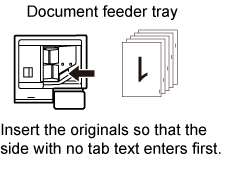
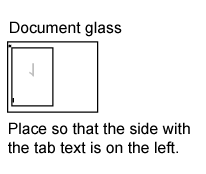
Relation between the originals and the tab paper

Tab copying with a left binding

Originals Placing the originals Loading tab paper

Tab copying with a right binding

Originals Placing the originals Loading tab paper
  • Tab Copy cannot be selected in easy mode.
  • Tab Copy must be specified before scanning the original.

Tap the [Others] key, and tap the [Tab Copy] key.

Tap the [On] key.

Sets an image shift width (tab width).
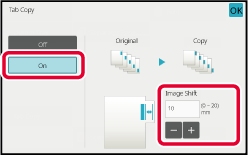
  • Tap the numeric value display indicating the image shift width, and enter a shift width using numeric keys.
  • After the settings are completed, tap [OK] and [Back] keys in sequence.
To cancel the tab copy setting:
Tap the [Off] key.

Load the tab paper.

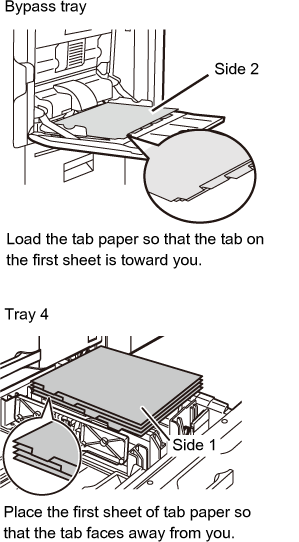
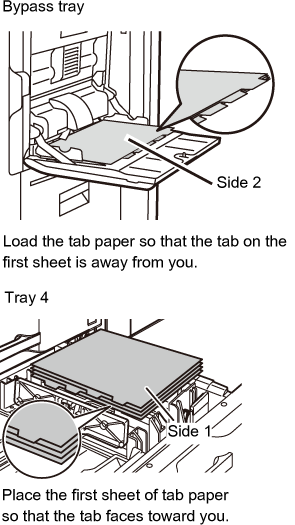
When using the bypass tray
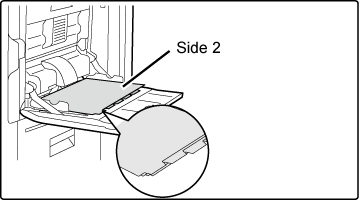
When using the bypass tray, place the paper with the print side down.
Place the paper so that the sides with the tabs enter the machine last.
After loading tab paper into the bypass tray, configure the bypass tray settings as explained in “ MAKING COPIES USING THE BYPASS TRAY".

Tab copying with a left binding
Place the tab paper with the side 2 facing up, and the tab on the first sheet is on the near side.

Tab copying with a right binding
Place the tab paper with the side 2 facing up, and the tab on the first sheet is on the back side.

When using the tray 4
When using the bypass tray, place the paper with the print side up.
Place the paper so that the sides with the tabs enter the machine last.
After loading tab paper into the bypass tray, configure the bypass tray settings as explained in “ LOADING TAB PAPER INTO TRAY 4".

Tab copying with a left binding
Place the tab paper with the side 1 facing up, and the tab on the first sheet is on the near side.

Tab copying with a right binding
Place the tab paper with the side 1 facing up, and the tab on the first sheet is on the back side.
The width of the tab paper can be as wide as A4 width (210 mm) plus 20 mm (or 8-1/2" x 11" paper (8-1/2") plus 5/8").

Place the original and tap the [Preview] key.

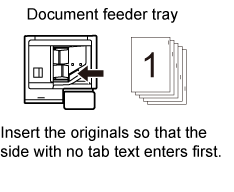
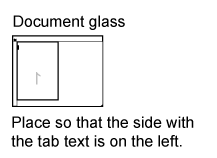
Place the original in the document feeder tray of the automatic document feeder, or on the document glass.
AUTOMATIC DOCUMENT FEEDER
DOCUMENT GLASS
To cancel all settings:
Tap the [CA] key.

Tap the [Start] key to start copying.

MAKING A POSTER-SIZED COPY (MULTI-PAGE ENLARGEMENT)

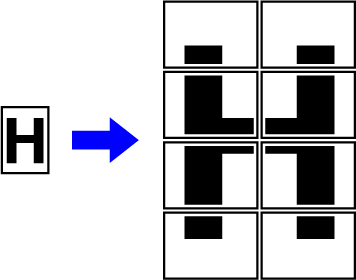
This function separately copies an enlarged original image on multiple sheets.
For example, an A4 (8-1/2" x 11") size original can be enlarged on 8 sheets of A3 (11" x 17") paper.
  • Multi-Page Enlargement cannot be selected in easy mode.
  • You must select Multi-Page Enlargement before scanning the original.
  • Place an original on the document glass.
  • When Multi-Page Enlargement is selected, the image orientation is changed to vertical.
  • Overlap of sections of image
    • There will be a margin around the edges of each copy.
    • Areas for overlapping the copies will be created at the leading and trailing edges of each copy.
  • The paper size, number of sheets required for the enlarged image, and the ratio are automatically selected based on the selected original size and enlargement size. (The paper size and ratio cannot be selected manually.)

Tap the [Others] key, and tap the [Multi-Page Enlargement] key.

Select the [AB] or [Inch] tab to meet the original size for poster-sized copy, and tap the key that meets the original size.

Tapping the key of the original size displays the keys that show the available enlargement size, copy paper size, and number of sheets.

Tap the key of the size you want to enlarge the original to.

The image orientation appears.
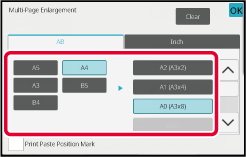
After the settings are completed, tap [OK] key.
When printing the copy image and margin border, set the [Print Paste Position Mark] checkbox to .
  • To cancel Multi-Page Enlargement setting:
  • Tap the [Clear] key.
    Even when the multi-page enlargement setting is cancelled, the automatically selected ratio is retained.
  • To return the ratio to 100%:
  • Tap the [Copy Ratio] key on the base screen to display the ratio menu, and then tap the [100%] key.

Place the original on the document glass based on the orientation displayed on the screen.

After the settings are completed, tap [OK] key.

Tap the [Start] key to start copying.

COPYING WITH MIRROR IMAGE (MIRROR IMAGE)

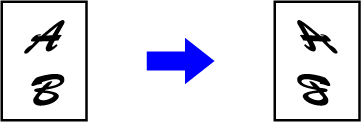
This function makes copies by inverting the original into a mirror image.
  • Mirror Image cannot be selected in easy mode.
  • Specify the Mirror Image before scanning an original.

Tap the [Others] key, and tap the [Mirror Image] key.

A checkmark appears on the icon.
After the settings are completed, tap [OK] key.
To cancel the mirror image setting:
Tap the [Mirror Image] key to uncheck it.

Place the original.

Place the original in the document feeder tray of the automatic document feeder, or on the document glass.
AUTOMATIC DOCUMENT FEEDER
DOCUMENT GLASS

Tap the [Start] key to start copying.

Language

Version 03a / bp70m90_usr_03a_en

↑Top of page