This function prints information
such as the "Date" or "Stamp", which is not shown on
the original, on copies. You can print the following six types of
information.
.png)
When
[Stamp] is combined with other functions:
| Combined function name | Print operation |
|---|---|
|
Margin Shift |
Together with the image, the stamp content is shifted the amount of the margin width. |
|
Tab Copy Centering |
Unlike a copy image that moves, the image will be printed in the position set in the stamp. |
|
Dual Page Copy Book Divide Card Shot |
Stamp items are printed for each copy sheet. |
|
N-Up |
Stamp items are printed for each original page. |
|
Booklet Book Copy |
Stamp items are printed for each page when compiling. |
|
Covers/Inserts |
Use the stamp settings to select whether or not the item is printed on inserted covers and inserts. |
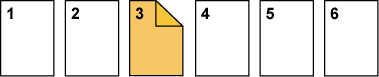
Place the original.
Place the original in the document feeder tray of the automatic document feeder, or on the document glass.Tap the [Others] key, and tap the [Stamp] key.
Tap a tab to be printed, and tap the format.
The format of the [Text] tab can be entered using pre-set text or soft keyboard.Tap a key of the desired print position.
Tap any of [1] to [6] keys.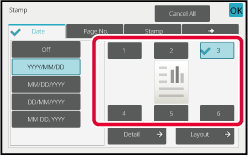
Tap the [Color Start] or [B/W Start] key to start copying.
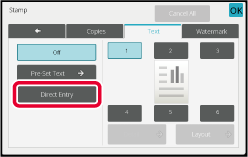
Tap the [Direct Entry] key in the [Text] tab to
display the soft keyboard.
Use the soft keyboard to enter any characters.
Selecting the format from pre-set text
Tapping the [Pre-Set Text] key allows you to select the required
one of the registered formats for printing.
Tapping the [Store/Delete] key allows you to edit, delete, or
store pre-set text.

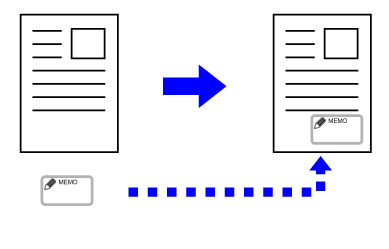
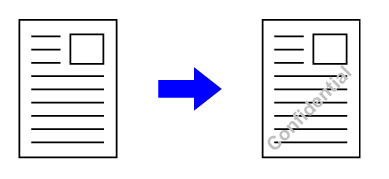
This function adds an image registered in the machine to an original
to make a copy.
Following are two types of custom images.
| Combined function | Custom image operations |
|---|---|
|
Margin Shift |
Shifts in the same way as for an original image. |
|
Erase |
Makes a stamp copy as normal. |
|
Dual Page Copy |
Makes a stamp copy by sheet. |
|
Booklet |
Makes a stamp copy as normal. |
|
Job Build |
Makes a stamp copy as normal. |
|
Tandem Copy |
Based on the tandem copy. |
|
Covers/Inserts |
Based on the custom image setting. |
|
Separator Page |
Printing does not take place on separator pages. |
|
Transparency Inserts |
Makes a stamp copy as normal. |
|
N-Up |
Makes a stamp copy by sheet. |
|
Book Copy |
Makes a stamp copy as normal. |
|
Tab Copy |
Makes a stamp copy as normal regardless of image shift setting. |
|
Card Shot |
Makes a stamp copy by sheet. |
|
Business Card Copy |
Makes Business Card Copy by sheet. |
|
Mirror Image |
Makes a stamp copy as normal without mirror image reverse. |
|
B/W Reverse |
Prints an image as normal without B/W reverse. However, the following condition is set when printed on a dark background. Custom stamp: Printed in white Custom watermark: Printed without being whitened |
|
Full Bleed Copy |
Makes a stamp copy as normal. |
|
Centering |
Makes a stamp copy as normal without centering. |
|
Color Adjustments |
Makes a stamp copy using the registered data. |
|
Stamp |
Makes a stamp copy on the Stamp menu. |
|
Photo Repeat |
Cannot be combined. |
|
Multi-Page Enlargement |
Cannot be combined. |
|
Hidden Pattern Print |
Makes a stamp copy under a pattern print. |
|
Tracking Information Print |
Makes a stamp copy under a tracking information print. |
|
Repeat Layout |
Cannot be combined. |
|
Position Image |
Prints an image at the original position regardless of the Position Image setting. |
|
Book Divide |
Makes a stamp copy by sheet. |
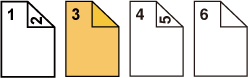
Place the original.
Place the original in the document feeder tray of the automatic document feeder, or on the document glass.Tap the [Others] key, and tap the [Custom Image] key.
Tap the [Custom Stamp] or [Custom Watermark] key.
Tap the [Image] key to select an image.
Select the required thumbnail image(s) from the available selection.Set [Print Page] or [Print Position].
After the settings are completed, tap [OK] and [Back] keys in sequence.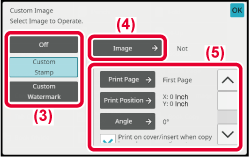
Tap the [Color Start] or [B/W Start] key to start copying.
For settings related to custom stamp and custom water
mark, see the following table.
For
custom stamp
| Print Page |
Specify a page(s) for stamp copy. First Page or All Pages |
|---|---|
| Print Position |
Specify a position for stamp copy. |
| Print Angle |
Specify the corner of the image. 0 degrees, -90 degrees, 90 degrees, or 180 degrees |
For
custom watermark
| Print Color |
Specify the image watermark color. Black, red, green, blue, cyan, magenta or yellow. |
|---|---|
| Print Pattern |
Specify the image watermark print pattern. Transparent: Makes an original image transparent for stamp copy. Overlap: Hides a watermark added to an original image for stamp copy. |
|
Exposure |
Select the exposure of a watermark from nine levels. |
|
Print Page |
Specify a page(s) for stamp copy. First Page or All Pages |
| Print Position |
Specify a position for stamp copy. |
| Print Angle |
Specify the corner of the image. 0 degrees, -90 degrees, 90 degrees, or 180 degrees |
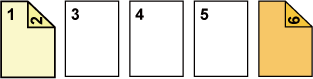
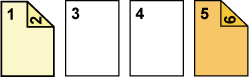
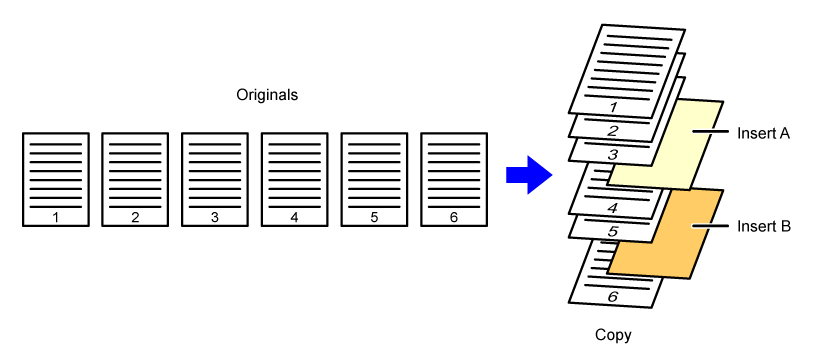
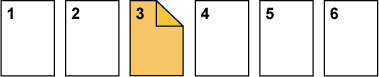
This function inserts a
different type of paper into the pages corresponding to the front
and back covers of a copy job.
It is helpful when you want to change cover paper to make
resources look better.
Configure insertion sheet settings if needed.
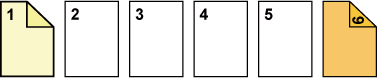
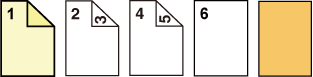
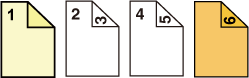
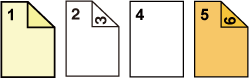
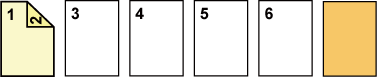
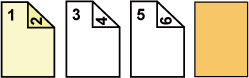
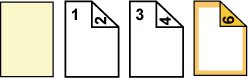
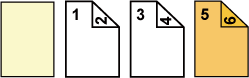
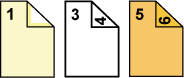
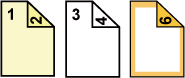
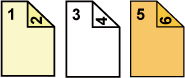
Copying on a front cover and inserting together with a back cover
A different type of paper is inserted as a front cover, and
a back cover is inserted to the last of the copy job.
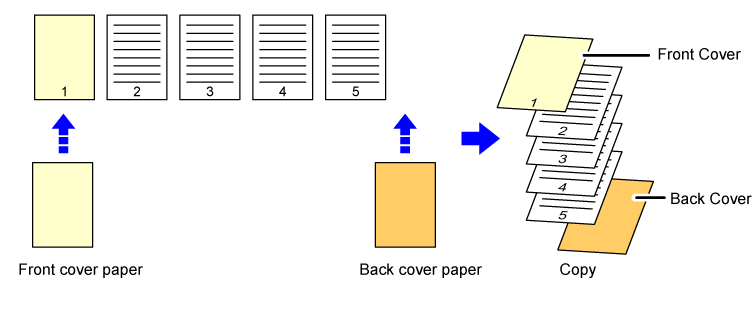
The following shows the copy results when front and
back covers are inserted into six 1-sided original pages or three 2-sided
original pages in the four copy modes below.
1-sided
copying of 1-sided originals
| Setting conditions for each cover | Resulting copies | |
|---|---|---|
| Front Cover | Back Cover | |
|
Not copied |
Not copied |
 Inserts cover sheets at the beginning and end of copies. |
|
1-sided copy |
Not copied |
 Makes a 1-sided copy on the first original page for front cover, and inserts a back cover at the end of copies. |
|
2-sided copy |
Not copied |
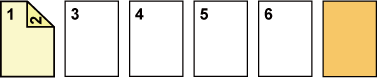 Makes a 2-sided copy on the first and second original pages for front cover, and inserts a back cover at the end of copies. |
|
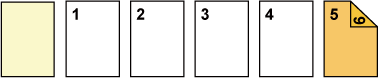
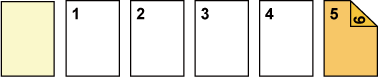
Not copied |
1-sided copy |
 Inserts a front cover at the beginning of copies, and makes a 1-sided copy on the sixth original page for back cover. |
|
Not copied |
2-sided copy |
 Inserts a front cover at the beginning of copies, and makes a 2-sided copy on the fifth and sixth original pages for back cover. |
|
1-sided copy |
1-sided copy |
 Makes a 1-sided copy on the first original page for front cover, and also makes a 1-sided copy on the sixth original page for back cover. |
|
1-sided copy |
2-sided copy |
 Makes a 1-sided copy on the first original page for front cover, and also makes a 2-sided copy on the fifth and sixth original pages for back cover. |
|
2-sided copy |
1-sided copy |
 Makes a 2-sided copy on the first and second original pages for front cover, and also makes a 1-sided copy on the sixth original page for back cover. |
|
2-sided copy |
2-sided copy |
 Makes a 2-sided copy on the first and second original
pages for front cover, and also makes a 2-sided copy on the fifth
and sixth original pages for back cover. |
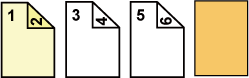
2-sided
copying of 1-sided originals
| Setting conditions for each cover | Resulting copies | |
|---|---|---|
| Front Cover | Back Cover | |
|
Not copied |
Not copied |
 Inserts cover sheets at the beginning and end of copies. |
|
1-sided copy |
Not copied |
 Makes a 1-sided copy on the first original page for front cover, and also makes a 1-sided copy on the sixth original page. Inserts cover sheets at the end of copies. |
|
2-sided copy |
Not copied |
 Makes a 2-sided copy on the first and second original pages for front cover, and inserts a back cover at the end of copies. |
|
Not copied |
1-sided copy |
 Inserts a front cover at the beginning of copies, and makes a 1-sided copy on the sixth original page for back cover. A 1-sided copy is made on the fifth original page. |
|
Not copied |
2-sided copy |
 Inserts a front cover at the beginning of copies, and makes a 2-sided copy on the fifth and sixth original pages for back cover. |
|
1-sided copy |
1-sided copy |
 Makes a 1-sided copy on the first original page for front cover, and also makes a 1-sided copy on the sixth original page for back cover. |
|
1-sided copy |
2-sided copy |
 Makes a 1-sided copy on the first original page for front cover, and also makes a 2-sided copy on the fifth and sixth original pages for back cover. |
|
2-sided copy |
1-sided copy |
 Makes a 2-sided copy on the first and second original pages for front cover, and also makes a 1-sided copy on the sixth original page for back cover. A 1-sided copy is made on the fifth original page. |
|
2-sided copy |
2-sided copy |
 Makes a 2-sided copy on the first and second original pages for front cover, and also makes a 2-sided copy on the fifth and sixth original pages for back cover. |
1-sided
copying of 2-sided originals
| Setting conditions for each cover | Resulting copies | |
|---|---|---|
| Front Cover | Back Cover | |
|
Not copied |
Not copied |
 Inserts cover sheets at the beginning and end of copies. |
|
1-sided copy |
Not copied |
 Makes a 1-sided copy on the first original page for front cover, and inserts a back cover at the end of copies. |
|
2-sided copy |
Not copied |
 Makes a 2-sided copy on the first and second original pages for front cover, and inserts a back cover at the end of copies. |
|
Not copied |
1-sided copy |
 Inserts a front cover at the beginning of copies, and makes a 1-sided copy on the sixth original page for back cover. |
|
Not copied |
2-sided copy |
 Inserts a front cover at the beginning of copies, and makes a 2-sided copy on the fifth and sixth original pages for back cover. |
|
1-sided copy |
1-sided copy |
 Makes a 1-sided copy on the first original page for front cover, and also makes a 1-sided copy on the sixth original page for back cover. |
|
1-sided copy |
2-sided copy |
 Makes a 1-sided copy on the first original page for front cover, and also makes a 2-sided copy on the sixth original page for back cover. |
|
2-sided copy |
1-sided copy |
 Makes a 2-sided copy on the first and second original pages for front cover, and also makes a 1-sided copy on the sixth original page for back cover. |
|
2-sided copy |
2-sided copy |
 Makes a 2-sided copy on the first and second original pages for front cover, and also makes a 2-sided copy on the fifth and sixth original pages for back cover. |
2-sided
copying of 2-sided originals
| Setting conditions for each cover | Resulting copies | |
|---|---|---|
| Front Cover | Back Cover | |
|
Not copied |
Not copied |
 Inserts cover sheets at the beginning and end of copies. |
|
1-sided copy |
Not copied |
 Makes a 1-sided copy on the first original page for front cover, and inserts a back cover at the end of copies. *The second original page is not copied. |
|
2-sided copy |
Not copied |
 Makes a 2-sided copy on the first and second original pages for front cover, and inserts a back cover at the end of copies. |
|
Not copied |
1-sided copy |
 Inserts a front cover at the beginning of copies, and makes a 1-sided copy on the sixth original page for back cover. * The fifth original page is not copied. |
|
Not copied |
2-sided copy |
 Inserts a front cover at the beginning of copies, and makes a 2-sided copy on the fifth and sixth original pages for back cover. |
|
1-sided copy |
1-sided copy |
 Makes a 1-sided copy on the first original page for front cover, and also makes a 1-sided copy on the sixth original page for back cover. The second and the fifth original pages are not copied. |
|
1-sided copy |
2-sided copy |
 Makes a 1-sided copy on the first original page for front cover, and also makes a 2-sided copy on the fifth and sixth original pages for back cover. * The second original page is not copied. |
|
2-sided copy |
1-sided copy |
 Makes a 2-sided copy on the first and second original pages for front cover, and also makes a 1-sided copy on the sixth original page for back cover. * The fifth original page is not copied. |
|
2-sided copy |
2-sided copy |
 Makes a 2-sided copy on the first and second original pages for front cover, and also makes a 2-sided copy on the fifth and sixth original pages for back cover. |
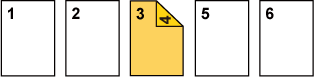
Place the original in the document feeder tray of the automatic document feeder.
AUTOMATIC DOCUMENT FEEDERTap the [Others] key, and then tap the [Covers/Inserts] key.
Tap the [Front Cover] key, and then tap the [On] key.
When inserting a back cover, tap the [Back Cover] tab, and then tap the [On] key.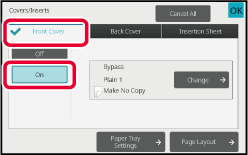
Tap the [Change] key.
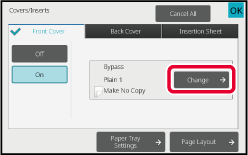
Configure copy setting of a front cover sheet.
When only inserting a cover, tap the [Make No Copy] key.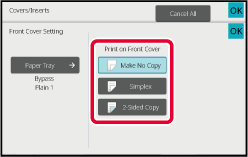
Tap the [Color Start] or [B/W Start] key to start copying.
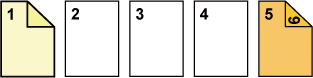
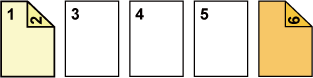
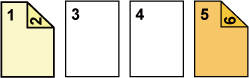
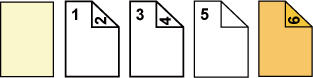
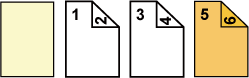
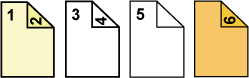
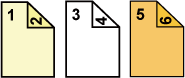
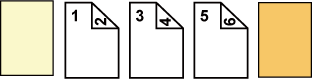
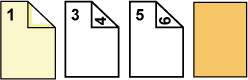
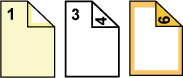
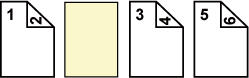
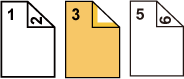
This function inserts a sheet of paper into a specific
page as an insertion sheet.
There are two types of insertion sheets. Insertion positions
can be specified.
Insert covers if needed.
Example:
Inserting sheets after pages 3 and 5
The following examples show the copy results when insertion
sheets are inserted into six 1-sided originals or three 2-sided
originals using two copy modes.
1-sided
original copying
| Insertion sheet setting conditions | Resulting copies | |
|---|---|---|
| Insert an insertion sheet in 1-sided copy mode. | Insert an insertion sheet in 2-sided copy mode. | |
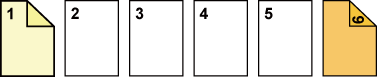
|
Not copied |
 Inserts an insertion sheet between the second and third pages of copies. |
 |
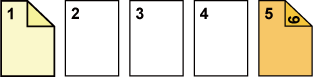
|
1-sided copy |
 Makes a 1-sided copy of the third original page on an insertion sheet. |
 |
|
2-sided copy |
 Makes a 2-sided copy of the third and fourth original pages on an insertion sheet. |
 |
2-sided
original copying
| Insertion sheet setting conditions | Resulting copies | |
|---|---|---|
| Insert an insertion sheet in 1-sided copy mode. | Insert an insertion sheet in 2-sided copy mode. | |
|
Not copied |
 Inserts an insertion sheet between the second and third pages of copies. |
 |
|
1-sided copy |
 Makes a 1-sided copy of the third original page on an insertion sheet. |
 * The fourth original page is not copied. |
|
2-sided copy |
 Makes a 2-sided copy of the third and fourth original pages on an insertion sheet. |
 |
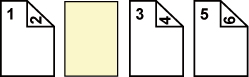
Place the original in the document feeder tray of the automatic document feeder.
AUTOMATIC DOCUMENT FEEDERTap the [Others] key, and then tap the [Covers/Inserts] key.
Tap the [Insertion Sheet] tab.
Tap the [Insertion Type A] key, and tap the insert page display key.
The Insertion Type B to Type H settings are the same as the Insertion Type A settings.Enter the number of the page you want to insert a sheet into using numeric keys, and then tap the [Enter] key.
The total number of insertion sheets is displayed at the side of [Enter] key. Repeat these steps for the number of insertion sheets.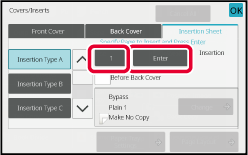
Tap the [Change] key.
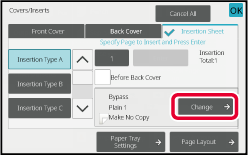
When only inserting insertion sheet A, tap the [Make No Copy] key.
When making a copy on insertion sheet A, tap the [Simplex] or [2-Sided Copy] key.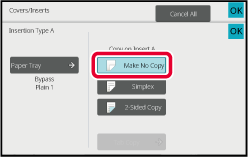
Tap the [Color Start] or [B/W Start] key to start copying.
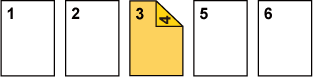
Tap the [Others] key, and then tap the [Covers/Inserts] key.
Tap the [Page Layout] key.
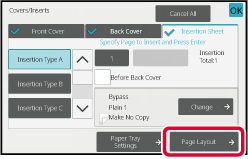
Check the page layout.
To exit this job after checking the page layout, tap the [OK] key.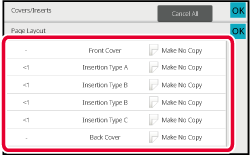
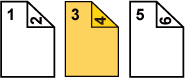
Change cover or insertion sheet settings.
For the cover, you can change the copy mode.When copying on transparency film, the sheets
may stick together due to static electricity.
The transparency inserts function can be used to automatically
insert a sheet of paper between each sheet of transparency film,
making the sheets easy to handle.
It is also possible to copy on insertion sheets.
Place the transparency film face down in the bypass tray, and load transparency film sheets.
After loading the transparency film, configure the bypass tray settings.Place the original.
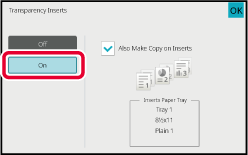
Place the original in the document feeder tray of the automatic document feeder, or on the document glass.Tap the [Others] key, and then tap the [Transparency Inserts] key.
Tap the [On] key.
When making a copy on insertion sheets, tap the [Also Make Copy on Inserts] checkbox to set to .
.
Tap the [Color Start] or [B/W Start] key to start copying.
Version 06a / bp70c65_usr_06a_us
