SHARP

Language

BASIC PRINTING PROCEDURE

The following example explains how to print a document from "WordPad", which is a standard accessory application in Windows.

  • The menu used to execute printing may vary depending on the application.
  • The button that is used to open the printer driver properties window (usually [Property] or [Preferences]) may vary depending on the application.
  • The machine name that normally appears in the [Printer] menu is [BP-xxxxx]. ("xxxxx" is a sequence of characters that varies depending on the machine model.)

Select [Print] from the [File] menu of WordPad.

Select the printer driver for the machine and click the [Preferences] button.

The button that is used to open the printer driver properties window (usually [Property] or [Preferences]) may vary depending on the application.

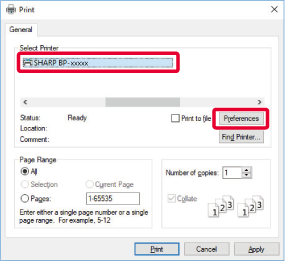
Select print settings.

  1. Click the [Main] tab.
  2. Select the original size.
    • You can register up to seven user-defined sizes in the menu. To store an original size, select [Custom Paper] or one of [User1] to [User7] from the menu, and click the [OK] button.
    • To select settings on other tabs, click the desired tab and then select the settings.
      PRINTER DRIVER SETTINGS SCREEN / REFERRING TO HELP
    • If an original size larger than the largest paper size that the machine supports is set, select the paper size for printing in “Output Size”.
    • If an "Output Size" different from the "Original Size" is selected, the print image will be adjusted to match the selected paper size.
  3. Click the [OK] button.

Click the [Print] button.

Printing begins.

PRINTER DRIVER SETTINGS SCREEN / REFERRING TO HELP

The printer driver settings screen consists of 9 tabs. Click a tab to select the settings on that tab.
You can check information on each of the settings in the Help screen. Click the [Help] button at the bottom right of the screen.

Tabs: Click 
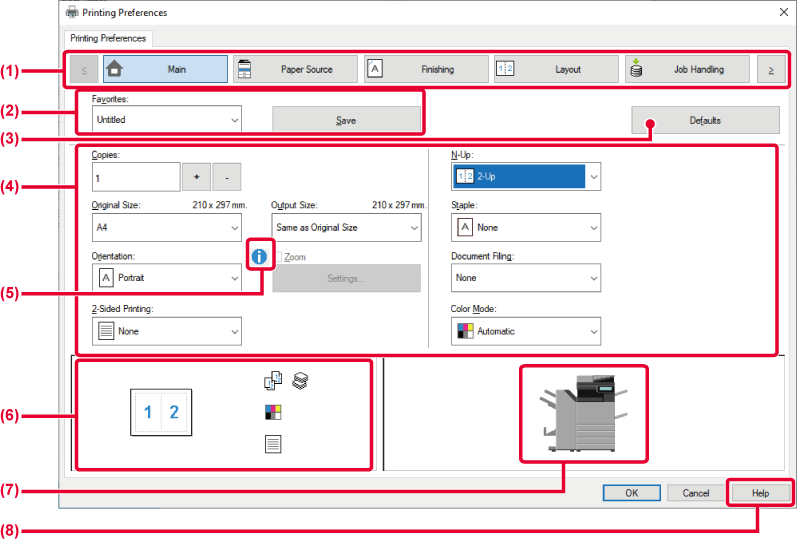
to change the tabs shown.
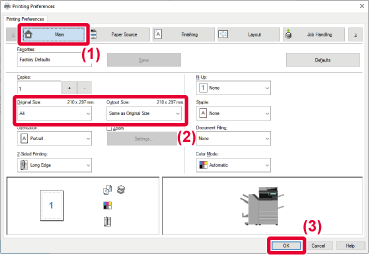
[Main]: Frequently used functions are grouped on this tab. The settings are also on other tabs, and each setting on this tab is linked to the corresponding setting on the other tab.
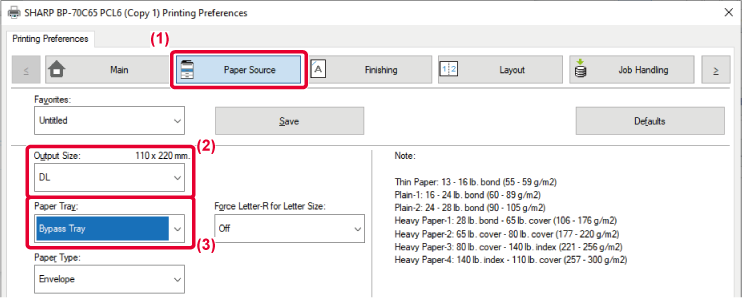
[Paper Source]: Set the size and type of paper used for printing, and the paper tray.
[Finishing]: Select a finishing function such as stapling, punch, or folding, and set the output tray.
[Layout]: Select functions related to the layout such as two-sided printing and booklet.
[Job Handling]: Set Document Filing and user authentication.
[Inserts]: Select insertion functions such as covers, inserts, and tab paper.
[Stamp]: Select the watermark or stamp function.
[Image Quality]: Select various image quality settings.
[Detailed Settings]: Select tandem print and other detailed print settings.

Favorites

Settings configured on each tab at the time of printing can be saved as Favorite.

Defaults

Return the settings on the currently selected tab to their default state.

Setup Items

Displays the settings on each tab.

Information icon( )

Some restrictions exist on the combinations of settings that can be selected in the printer driver properties window. When a restriction exists on a selected setting, an information icon ( ) will appear next to the setting. Click the icon to view an explanation of the restriction.

Print image

This lets you visually check how the current settings affect the print image. Finishing settings and the color mode are indicated by icons.

Machine image

This shows the options that are installed on the machine, and the paper trays and output trays that are used.

[Help] button

Displays the Help window of the printer driver.

  • Help can be displayed for a setting by clicking the setting and pressing the [F1] key.
  • You can click the button in the upper right corner of the settings screen and then click a setting to show Help for that setting in a sub-window.

SELECTING THE PAPER

Before printing, check the paper sizes, paper types, and paper remaining in the machine's trays. To check the most recent tray information, click the [Tray Status] button in the [Paper Source] tab.
The "Output Size" setting and the "Paper Tray" setting are related as follows:

  • When "Paper Tray" is set to [Auto Select]
  • The tray that contains paper of the size and type selected in "Output Size" and "Paper Type" is automatically selected.
  • When "Paper Tray" is set to any setting other than [Auto Select]
  • The specified tray is used for printing regardless of the "Output Size" setting. When you have set "Paper Type" to [Bypass Tray], be sure to select "Paper Type". Check the paper type that is set for the bypass tray of the machine, check that paper of that type is actually loaded into the bypass tray, and then select the appropriate paper type.
  • When "Paper Type" is set to [Auto Select]
  • A tray with plain paper or recycled paper of the size specified in "Output Size" is automatically selected. (The factory default setting is plain paper 1 only.)
  • When "Paper Type" is set to anything other than [Auto Select]
  • A tray with the specified type of paper and the size specified in "Output Size" is used for printing.
Special media such as envelopes can also be placed in the bypass tray.
For the procedure for loading paper in the bypass tray, see “ LOADING PAPER INTO THE BYPASS TRAY".
When [Enable Detected Paper Size in Bypass Tray] (disabled by factory default) or [Enable Selected Paper Type in Bypass Tray] (enabled by factory default), which you can reach by selecting [System Settings] in "Settings (administrator)" → [Printer Settings] → [Condition Settings] → [Bypass Tray Settings] is enabled, printing will not take place if the paper size or paper type specified in the printer driver is different from the paper size or paper type specified in the settings of the bypass tray.

PRINTING ON ENVELOPES

The bypass tray or tray 1 can be used for envelope printing.

  1. Click the [Paper Source] tab.
  2. Select the envelope size from the "Output Size" menu.
  3. When [Output Size] is set to envelope, [Paper Type] is automatically set to [Envelope].
    When "Original Size" is set to envelope on the [Main] tab and "Output Size" is set to [Same as Original Size], "Paper Type" is automatically set to [Envelope].
  4. Select [Bypass Tray] or [Tray 1] in "Paper Tray".
Language

Version 03a / bp70c65_usr_03a_us

↑Top of page