SENDER-RELATED FEATURES
This section explains how to enter a destination from
the initial screen of normal mode.
EASY MODE
ADDING YOUR SENDER INFORMATION TO FAXES (FAX OWN NUMBER SENDING)
Your sender information
(date, time, sender name, sender fax number or destination name,
number of pages) is automatically added to the top of each fax page
you transmit.
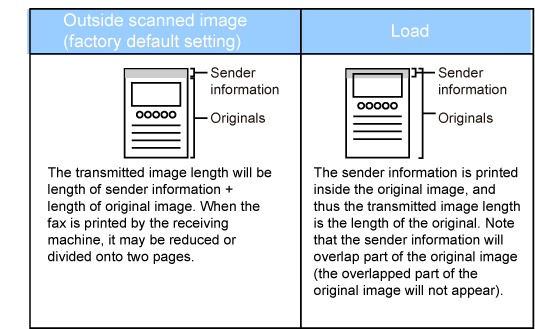
Example
of the sender information printed
- Date, time: The date and time of
transmission.
- Sender name: The sender name programmed in the machine.
- Sender fax number or destination name (one-touch key
name)
- Page numbers: Page number/total pages
If destination name is set to be attached and the
destination is not specified using a one-touch key, this information
is not added to the fax and not printed.
- To set the
date and time:
In "Settings",
select [System Settings] → [Common Settings] → [Device Control] → [Clock Adjust].
- To store
a sender name and sender fax number:
In "Settings (administrator)", select [System Settings]
→ [Image Send Settings] → [Common Settings] → [Own Name and Destination Set] → [Own
Number and Name Set] → [Sender Data Registration].
When you use the Own Number Setting, always configure this information.
- To add the
number of pages to be transmitted:
In "Settings", select [System Settings] → [Image Send Settings]
→ [Fax Settings] → [Send Settings] → [Printing Page Number at Receiver].
Page numbers appear in the format "page number/total pages". Only
the page number is printed when "Manual Transmission" or "Quick On Line Sending"
is used.
- To select
a sender fax number or destination:
In "Settings", select [System Settings] → [Image Send Settings]
→ [Fax Settings] → [Send Settings] → [Sender Destination Name Switch].
TEMPORARILY CHANGING THE SENDER INFORMATION (OWN NAME SELECT)
You can temporarily change sender information
to be used in the own number sending by selecting from data stored separately.
The function is released when the transmission
with the changed sender information ends.
- To
store the sender information to be used for Own Name Select function:
In "Settings
(administrator)", select [System Settings] → [Image Send Settings] → [Common Settings]
→ [Own Name and Destination Set] → [Own Number and Name Set] → [Registration of Own
Name Select].
- Sender Name
Enter
the sender name. A maximum of 20 characters can be entered for the
sender name.
After
entering a sender name, tap the [Store] key.
The lowest
unused registration number from 01 to 18 will be automatically assigned
to the sender name. This number cannot be changed.
- Sender Name
List
Displays
a list of stored sender names.
When you
select a sender name, it is deleted.
Place the original.
Place the original in the document feeder tray of the
automatic document feeder, or on the document glass.
AUTOMATIC DOCUMENT FEEDER
DOCUMENT GLASSEnter the destination fax number.
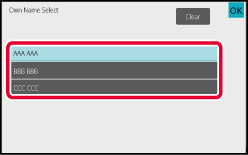
Tap the [Others] key, and tap the [Own Name Select] key.
Tap the sender information key to specify the sender
information.
After the settings are completed, tap the

and [Back] keys in sequence.
To
cancel the sender information setting:
Tap the [Clear] key.
Tap the [Start] key to start scanning of the original.
- If you inserted
the original pages in the document feeder tray, all pages are scanned.
- A beep will sound to
indicate that scanning and transmission have ended.
- When you place the original
on the document glass, scan each page one at a time.
- When scanning finishes,
place the next original and tap the [Start] key. Repeat until
all pages have been scanned and then tap the [Read-End] key.
- A beep
will sound to indicate that transmission has ended.
You can tap the [Preview] key to check a preview
of the image before sending a fax.
For more information, see "
CHECKING THE IMAGE TO BE TRANSMITTED". However, settings
for this function cannot be changed in the preview screen.
.png)