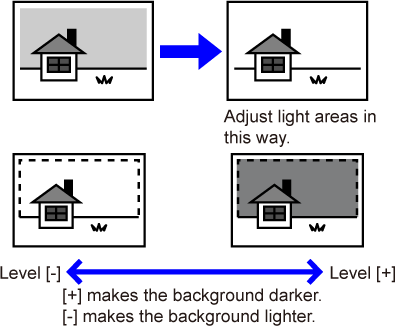
You can adjust the background
by making light areas of the original darker or lighter.
Place the original.
Place the original in the document feeder tray of the automatic document feeder, or on the document glass.Tap the mode display to switch to the initial screen of each mode.
CHANGING MODESSpecify the destination.
RETRIEVING A DESTINATION FROM AN ADDRESS BOOKTap the [Others] key, and tap the [Background Adjustment] key.
Tap
 or slide the slider to adjust the range
to be suppressed.
or slide the slider to adjust the range
to be suppressed.
 and [Back] key in sequence.
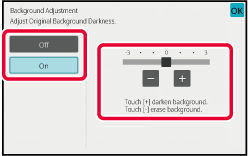
Tap the [Start] key to start scanning of the original.
.png)
Place the original.
Place the original in the document feeder tray of the automatic document feeder, or on the document glass.Tap the mode display to switch to the initial screen of each mode.
CHANGING MODESSpecify the destination.
RETRIEVING A DESTINATION FROM AN ADDRESS BOOKTap the [Others] key, and tap the [Contrast] key.
Tap
or slide the slider to adjust the contrast
level.
and [Back] keys in sequence.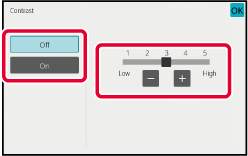
Tap the [Start] key to start scanning of the original.
.png)
Place the original.
Place the original in the document feeder tray of the automatic document feeder, or on the document glass.Tap the mode display to switch to the initial screen of each mode.
CHANGING MODESSpecify the destination.
RETRIEVING A DESTINATION FROM AN ADDRESS BOOKTap the [Others] key, and tap the [Sharpness] key.
Tap
or slide the slider to adjust the sharpness.
and [Back] keys in sequence.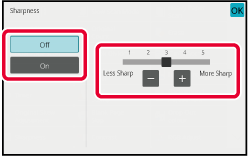
Tap the [Start] key to start scanning of the original.
.png)
Place the original.
Place the original in the document feeder tray of the automatic document feeder, or on the document glass.Tap the mode display to switch to the initial screen of each mode.
CHANGING MODESSpecify the destination.
RETRIEVING A DESTINATION FROM AN ADDRESS BOOKTap the [Others] key, and then tap the [Drop Out Color] key.
A checkmark appears on the icon.Tap the [Start] key to start scanning of the original.
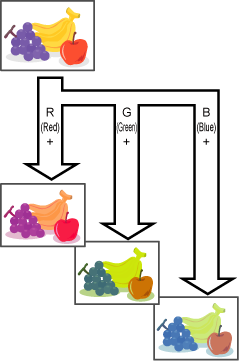
This function heightens or lightens any
one of the three color components R (red), G (green), and B
(blue).
Place the original.
Place the original in the document feeder tray of the automatic document feeder, or on the document glass.Tap the mode display to switch to the initial screen of each mode.
CHANGING MODESSpecify the destination.
RETRIEVING A DESTINATION FROM AN ADDRESS BOOKTap the [Others] key, and tap the [RGB Adjust] key.
Tap
of the color you want to adjust
or slide the slider to adjust the coloring.
and [Back] keys in sequence.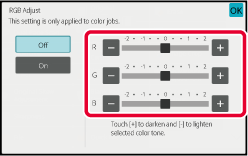
Tap the [Start] key to start scanning of the original.
Version 06a / bp70c65_usr_06a_us
