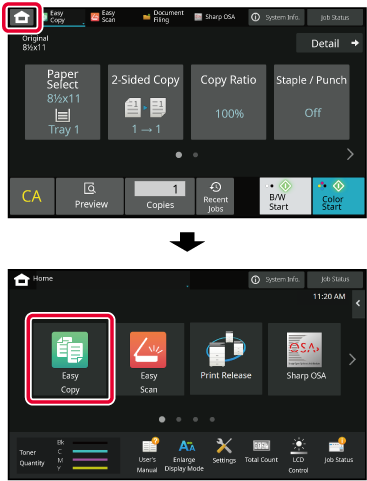
Tapping the [Home Screen] key displays the home screen
on the touch panel. The home screen displays the keys for selecting
modes or functions.
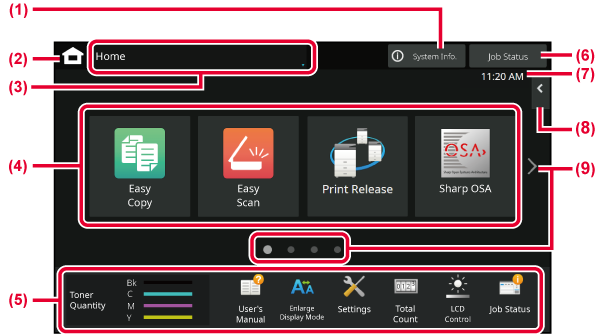
Tap this area to
display the System Information screen.
Switch to the home
screen.
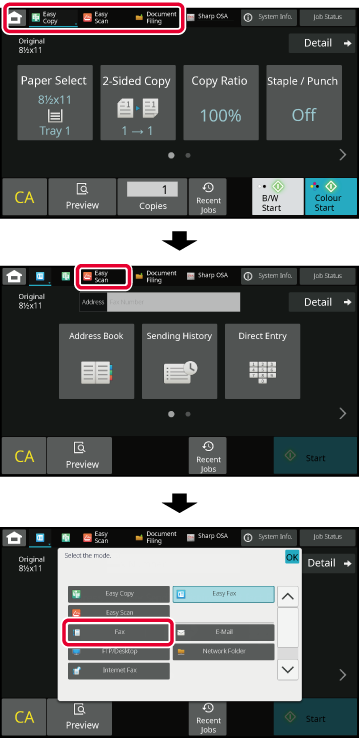
The mode selection
screen is displayed.
Select shortcut keys
for modes or functions.
Use these keys to
select functions that make the machine easier to use.
Displays the job
in progress or waiting with text or icon.
STOPPING/DELETING A JOB, PRIORITY PROCESSING AND CHECKING THE STATUS
Displays the time.
Select functions
that can be utilized in respective modes.
Tap the tab, and the list of function keys is displayed.
Switch the pages
for displaying shortcut keys.
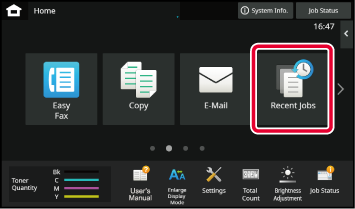
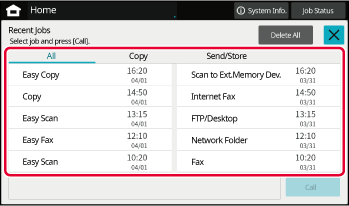
Tap this key to display the contents of the most recently
used jobs in a list.
Tap an item in the list to set the contents in the list.
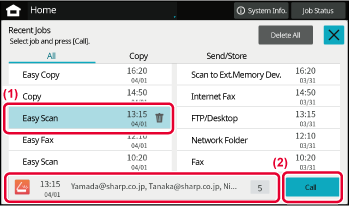
(1) Tap an item in the list and the details of the selected job will appear at the bottom of the touch panel.
(2) Tap the [Call] key to set the contents of this job.
| Icon | Machine status | Icon | Machine status |
|---|---|---|---|
 |
Printer data is being processed. |
 |
A USB device is installed. |
 |
Printer data is being printed. |
 |
The field support system is enabled. |
 |
Send data exists. |
 |
Single-byte alphanumeric character entry |
 |
Forward error data exists. |
 |
A data security kit is installed. |
 |
Received data exists. |
 |
Connecting to the access point (Level 4) |
 |
Received confidential fax data exists. |
 |
Connecting to the access point (Level 3) |
 |
Received data is held. |
 |
Connecting to the access point (Level 2) |
 |
Received preview data exists. |
 |
Connecting to the access point (Level 1) |
 |
OSA communication is in progress. |
 |
Not connected to the access point |
 |
Enlarge display mode is enabled. |
 |
Bad connection of the wireless LAN device in the machine* |
 |
Eco mode is enabled. |
 |
Waiting for the access point |
 |
A maintenance notification is issued. |
 |
A LAN cable is not connected. |
 |
Remote operation is in progress. |
 |
Bluetooth connection in progress |
 |
Extended FSS function is enabled. |
* Contact your dealer or nearest authorised service representative.
Changing mode from the Home screen
Changing
mode from the mode display
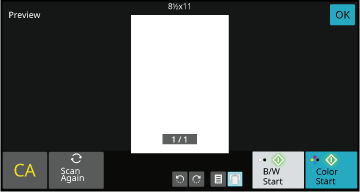
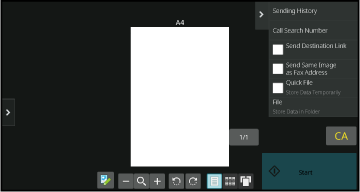
In the preview screen, you can view output
images or images stored in the machine using the touch panel.
[Easy mode]
|
 |
This changes the mode to edit mode. Pages of the original can be changed, rotated, or deleted. |
  |
This rotates the preview image of whole page in the arrow's direction. The printing result is not rotated. |
|---|---|---|---|
|
 |
This reduces the image. |
  |
This displays preview images of respective pages. |
|
 |
This displays the scroll bar for enlargement/reduction operations. Moving the slider to the left reduces the image, and moving the slider to the right enlarges the image. |
 |
This displays thumbnails of preview images. |
|
 |
This enlarges the image. |
 |
This displays pages in a 3D view. |
* Can also be used in Easy mode.
In the preview screen, tap
 to switch to edit mode.
Tap the page you want to delete, and tap
 .
.
 .
.
 . To redo the deletion, tap
 .
.
Tap the [Edit End] key.
In the preview screen, tap
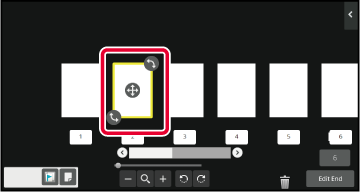
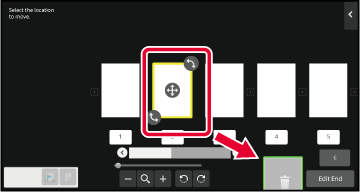
to switch to edit mode.
Tap the page you want to move, and drag to move the
page.

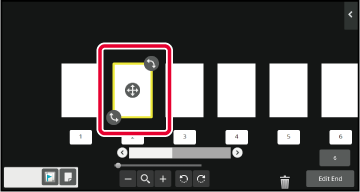
 of the destination.
Tap the [Edit End] key.
In the preview screen, tap
to switch to edit mode.
Tap the page you want to rotate, and drag
 or
or
 to rotate the page.

Tap the [Edit End] key.
When N-Up or 2-Sided is specified, you can move a page
marked with
 to the first page.
In the preview screen, tap
to switch to edit mode.
Tap the page you want to set chapter inserts.
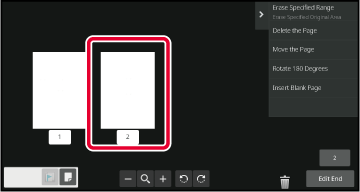
Tap
 .
.
is displayed on the page. displayed on the page, or select the
page and tap [Cancel Chapter Inserts of Selected Page.] on the action panel.Tap the [Edit End] key.
In the preview screen, tap
to switch to edit mode.
Tap
![]() , and tap
for the location into which you want
to insert a blank page.
, and tap
for the location into which you want
to insert a blank page.
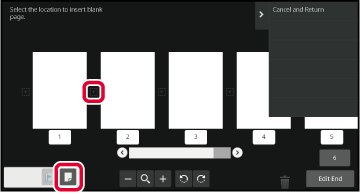
Tap the [Edit End] key.
In the preview screen, tap
to switch to edit mode.
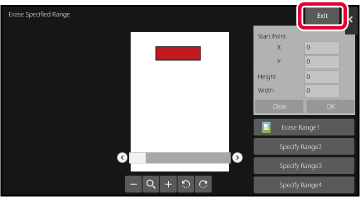
Tap [Erase Specified Range] on the action panel.
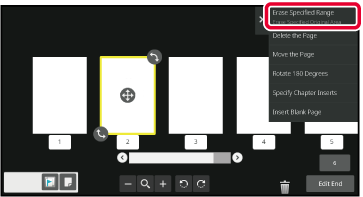
Follow the on-screen instructions to specify the erase range.
Specify the erase range and then tap the [OK] key.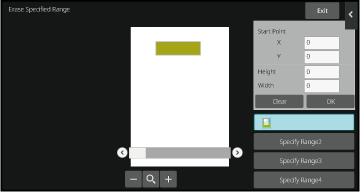
On the action panel, select [Apply This Erase Position to All Pages.] or [Apply This Erase Position to This Page.].
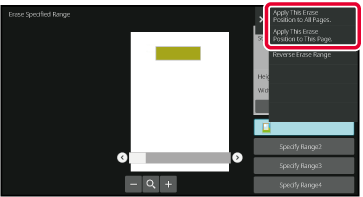
As necessary, repeat the steps to specify the erase range and the pages to which it is applied.
Tap the [Exit] key.
Tapping the tab on the left of the screen allows you
to change the settings.
You cannot tap the keys for functions whose settings cannot
be changed.
Version 06a / bp70c65_usr_06a_us
