Tips
How to Install a Printer Driver [Use IPP port] (Tips No.00837)
We recommend downloading and using the latest printer driver from the website instead of using the printer driver in the CD-ROM bundled in the MFP product package.
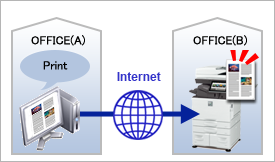
What is an IPP port?
IPP (Internet Printing Protocol) allows you to print data on the MFP in a remote location via the Internet.
Since it goes through the Internet, it is necessary to make consideration to security. SSL is used to encrypt and send print data, preventing data theft and tampering by third parties.
Procedure
Information required for installation
- ● The name (host name) or IP address of the MFP in a remote location (the MFP must support IPP)
- ● Proxy server address and port number (not required if you do not go through a proxy server)
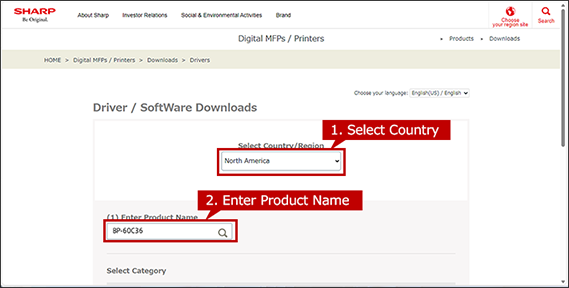
1. Select a Printer Driver to Install.
Enter the Product Name and Country/Region on the Driver/Software Downloads page
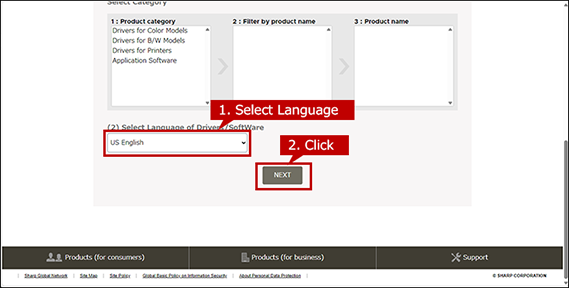
Next, select your language of Drivers/Software and click [NEXT].
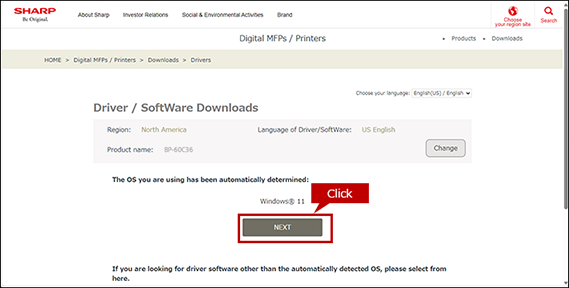
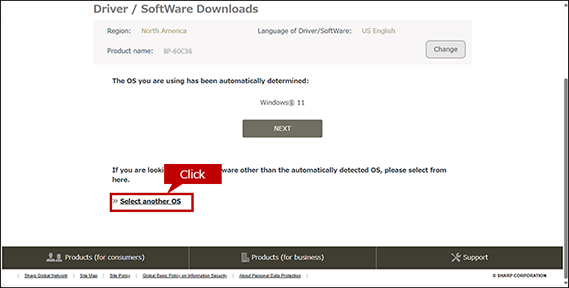
2. Select Operation System
The OS of your computer will be automatically determined, so click [NEXT].
*If you want to select another OS, click [Select another OS].
The automatically detected OS for server may differ from the actual OS.
If the detected OS is different from the actual OS, click [Select another OS] and select the OS of your PC from the list box.
When the OS cannot be detected automatically.
When a list box appears, select the OS of your PC from the list box.
How to find the OS information of your PC.
To check the OS information of your PC, refer to "What is my OS ? How do I know the bit of my PC ?"
When multiple printer drivers are listed on the download webpage.
Select the driver to fit your environment.
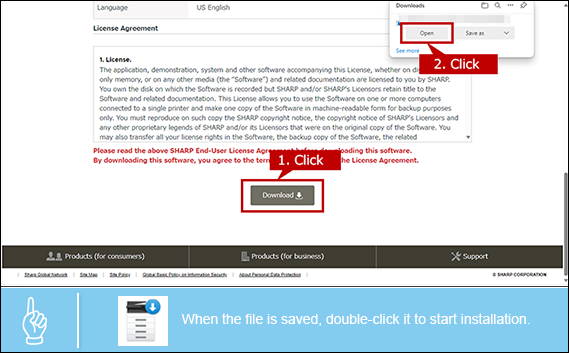
3. Download and Install a Printer Driver.
Click the [Download] button and click the [Open] button on the opened window. If you saved the file, double-click it.
Depending on your PC environment, sometime the file is automatically saved without opening a window.
An Installation requires an administrator privileges.
- - Right-click the stored file and click [Run as an administrator] on the displayed menu to execute the installation.
- - Enter the admin password if necessary.
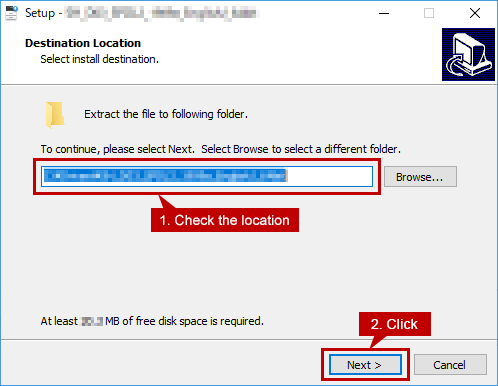
4. Specify Where to Save the File.
Check where to save the file then click the [Next] button.
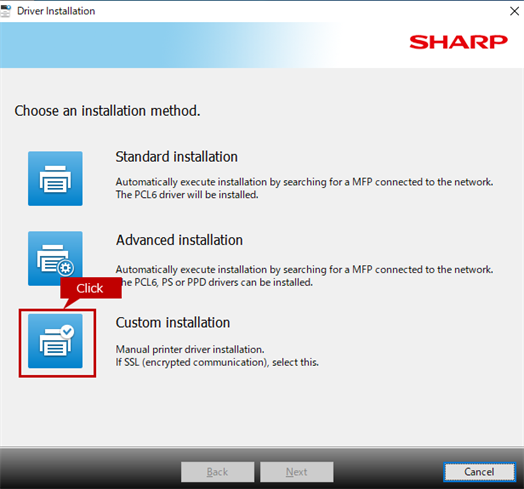
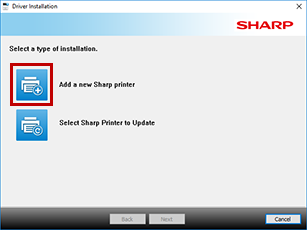
5. Select Installation Method.
Click the [Custom installation] icon.
When "Select a type of installation." screen appears.
This screen appears when a MFP using the same printer driver is registered or a previous version of the printer driver has already been installed.
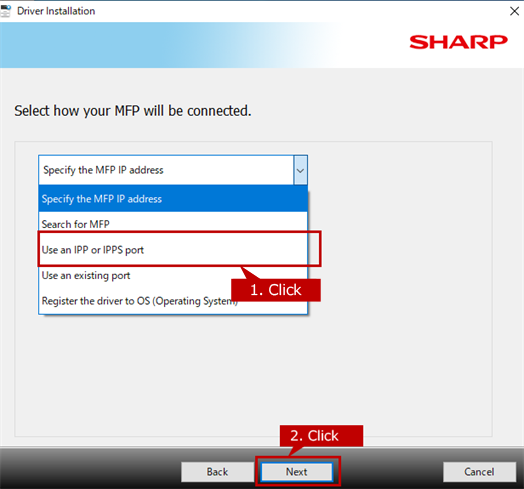
6. Select the Connection Method.
Click [Use an IPP or IPPS port], and then click the [Next] button.
7. Set a Proxy Server.
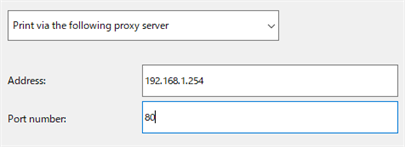
Select either [Print without going through the proxy server] or [Print via the following proxy server] and click the [Next] button.
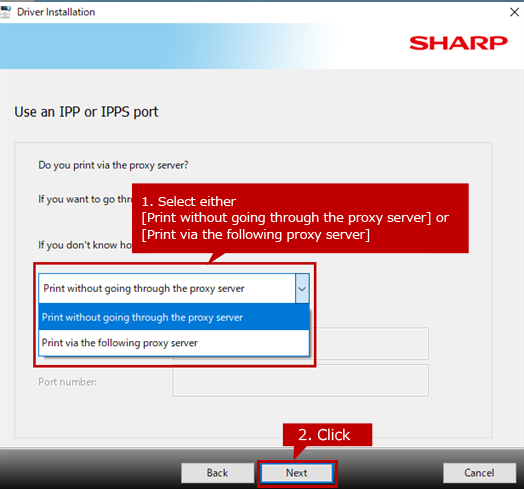
About proxy server
- ● You can check the proxy server address and port number in the Internet connection settings in your browser. If there is no input in the settings, select [Print via the following proxy server].
- ● If you do not know the proxy server information, please contact your network administrator.
8. Enter the URL of the MFP.
Enter the URL of the MFP in the remote location and click the [Next] button.
◆ When SSL is supported.
https: // MFP name (host name) or IP address: port number / ipp
- Example 1) https://mfp-grobal.sharp.com/ipp
- Example 2) https://192.168.20.100:443/ipp
* Normally, ": port number" is omitted. However, if you have changed the port number on your MFP, set the changed number.
◆ When SSL is not supported
https: // MFP name (host name) or IP address: port number / ipp
- Example 1) http://mfp-grobal.sharp.com:631/ipp
- Example 2) http://192.168.20.100:631/ipp
* Normally, set the port number to "631". However, if you have changed the port number on your MFP, set the changed number.

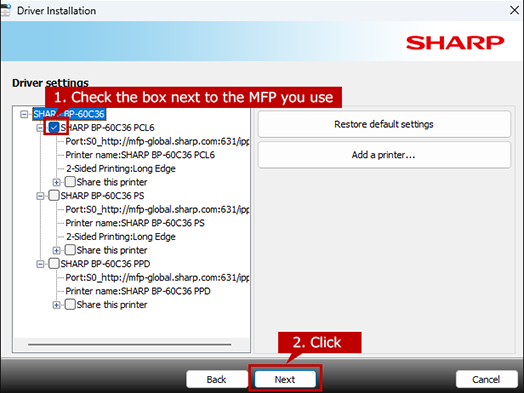
9. Select the Printer Driver to Install.
Select the printer driver to install and click the [Next] button.
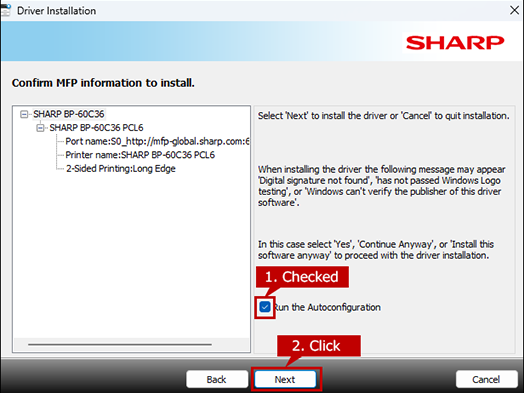
10. Check the MFP to Be Installed and Start Copying Files.
Check the displayed contents and click the [Next] button to start copying the files.
* At this time, do not uncheck "Runt the Autoconfiguration".
If a security warning window appears
There is no problem with the printer driver, so select the button to continue the installation.
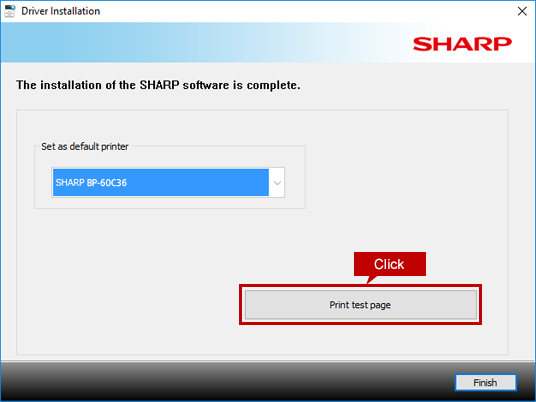
11. Print Test Page and Check Whether the Printer Driver is Successfully Installed.
Once the completion screen for the installation appears, click the [Print test page] button and check whether the test page is printed.
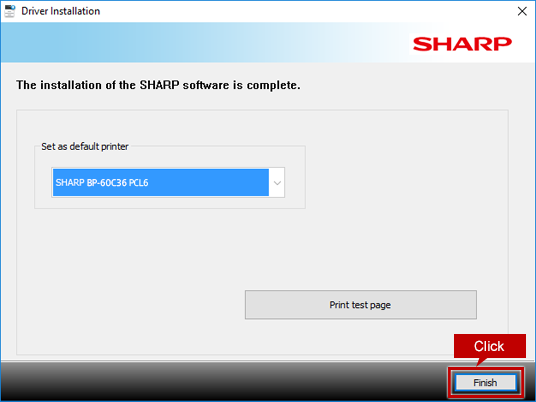
12. Select the Printer Driver Set as the Default Driver.
Select the default printer driver.
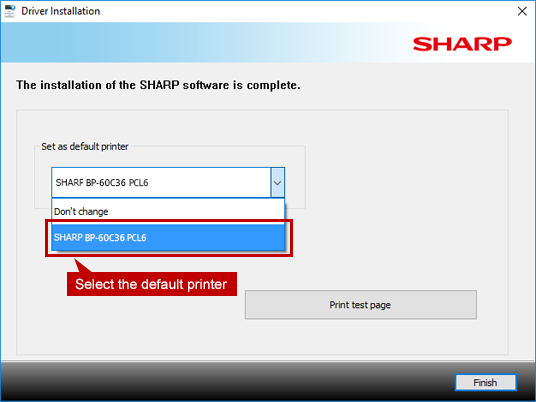
What is the default printer?
- - Set the printer usually used as the [default printer].
- - Select [Don't change] when you do not want to change the current [default printer].
- - The printer can be changed to another printer when printing.
13. Finish the Driver Installation.
Click the [Finish] button.
When a message appears to prompt the user to restart the PC.
Click the [Yes] button to restart your PC.
Related Questions
 Network setting
How to confirm and change the IP address of the MFP & How to confirm the network connection between MFP and PC.
- Reference : How to check IP address of MFP
Setting after installation
How to set paper trays and/or finishers on the printer driver.
* The above setting is automatically finished in normal cases.
- Reference : What settings do I need after installing a printer driver ?
Print test pages
If the driver is working properly, the test pages print successfully.
* The test page is usually printed during in printer driver's installation.
- Reference : How to print test page to check whether the printer can print data
How to install network connection
This is the most standard installation when connecting a MFP and PC on the network.
- Reference : How to Install a Printer Driver [Recommended Standard Installation]
Installation method when using PS or PPD driver
This is used to print data with PostScript.
- Reference : How to Install a Printer Driver [Use PS or PPD Drivers]