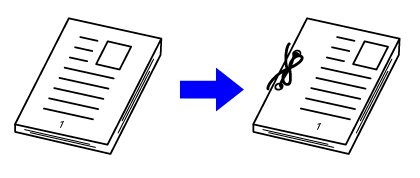
This function shifts the
copy image right, left or down to adjust the margin.
This is convenient when you wish to bind the copies with a
string or in a binder.
Shifting
the image to the right so the copies can be bound at the left edge
| Not using the Margin Shift | Using the Margin Shift |
|---|---|
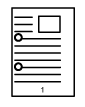 |
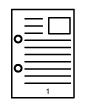 |
|
The punch holes cut off part of the image. |
The image is moved to allow space for the holes so the image is not cut off. |
Margin Shift
Place the original.
Place the original in the document feeder tray of the automatic document feeder, or on the document glass.Tap the [Others] key, and tap the [Margin Shift] key.
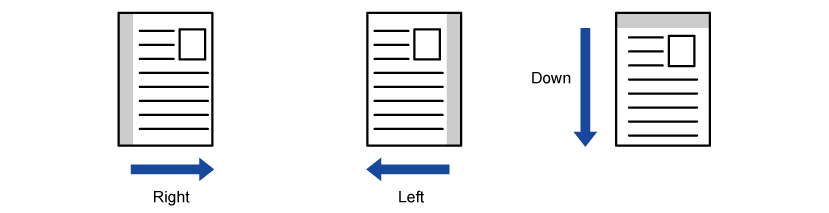
Tap the image shift direction.
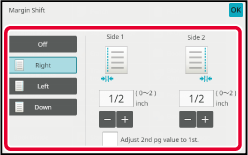
Sets a margin shift width.
Tap the numeric value display indicating the margin shift area on the front side or reverse side, and enter the area using the numeric keys. ,
,
 goes out and you can set sides 1 and
2 separately.
goes out and you can set sides 1 and
2 separately.Tap the [Color Start] or [B/W Start] key to start copying.
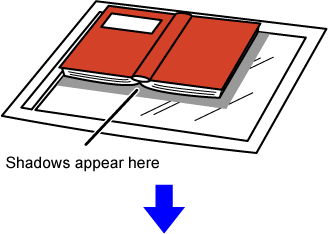
The erase function is used to erase shadows
around the edges of copies that occur when copying thick originals
or books.
When
a thick book is copied
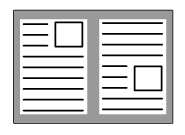
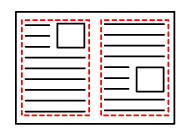
| Not using the Erase | Using the Erase |
|---|---|
 |
 |
| Shadows appear on the copy |
Shadows do not appear on the copy |
Erase modes (Outer Frame Erase, Center Erase, Edge + Center Erase,
Side Erase)

Place the original.
Place the original in the document feeder tray of the automatic document feeder, or on the document glass.Tap the [Others] key, and tap the [Erase] key.
Tap the checkbox of the edge that you wish to erase, and specify the erase position.
Check that the tapped checkbox is set to .
If the [Outer Frame] key is tapped, the [Up], [Down],
[Left], and [Right] checkboxes are set to
..
.
If the [Outer Frame] key is tapped, the [Up], [Down],
[Left], and [Right] checkboxes are set to
..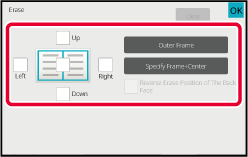 , the edge in the position opposite to
the erased edge on the front side will be erased., the edge in the same position as on
the front side will be erased.
, the edge in the position opposite to
the erased edge on the front side will be erased., the edge in the same position as on
the front side will be erased.Specify the erase width.
Tap the numeric value display indicating the erase width area on the front side or reverse side, and enter the area using the numeric keys. .
.Tap the [Color Start] or [B/W Start] key to start copying.
This feature lets you copy an entire original
to paper larger than the original size with no image cut-off at
the edges.

Tap the [Others] key, and tap the [Full Bleed Copy] key.
"Select larger paper size than output image size of original." is displayed on the page.Place the original.
AUTOMATIC DOCUMENT FEEDERSelect paper larger than the output image
SELECTING THE PAPER TRAY FOR COPYINGTap the [Color Start] or [B/W Start] key to start copying.
This function centers the copied image
on the paper.
This lets you place the image in the center of the paper
when the original size is smaller than the paper size or when the image
is reduced.
| Not using the centering function | Using the centering function |
|---|---|
 |
 |
Tap the [Others] key, and tap the [Centering] key.
A checkmark appears on the icon.Tap the [Color Start] or [B/W Start] key to start copying.
This function moves the
scanned original to a specified position to make a copy.
You can make a copy in any desired position as you can fine
adjust the position.
We recommend that you specify the top as the starting side
of the original.
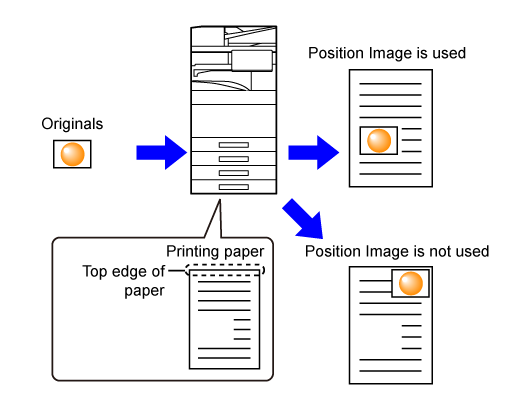
Copy the original that you want to use for Move Copy.
Copying is performed without using move copy.Measure the movement amount with the top as the starting side of the output copy.
Tap the [Others] key, and tap the [Position Image] key.
Sets a movement distance.
Tap the area indicating the movement distance on the front or reverse side, and enter the distance using numeric keys.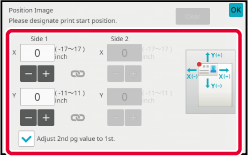 .,
goes out and you can set sides 1 and
2 separately.
.,
goes out and you can set sides 1 and
2 separately.Place the original.
Place the original in the document feeder tray of the automatic document feeder, or on the document glass.Tap the [Color Start] or [B/W Start] key to start copying.
Version 06a / bp70c65_usr_06a_us
