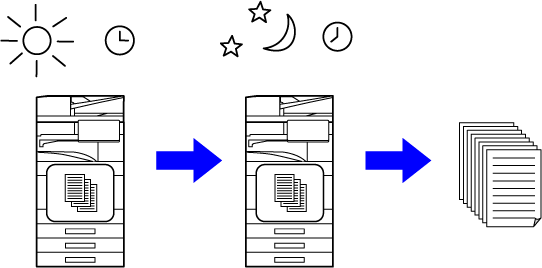
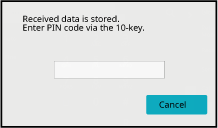
Enable this setting to have
faxes received and stored in memory without being printed. To print
the faxes, a PIN Code must be entered. When this function is used,
a PIN Code entry screen appears in the touch panel when a fax is received.
To enable the hold setting for received
data print:In "Settings (administrator)", select [System Settings] →
[Image Send Settings] → [Common Settings] → [Condition Settings] → [Hold Setting for
Received Data Print].
These settings can only be configured when there is no
received data in the machine memory (excluding data in a confidential
or relay broadcast memory box).
Disable Switching of Display OrderIn "Settings (administrator)", select [System Settings] →
[Image Send Settings] → [Common Settings] → [Condition Settings] → [Disable Switching
of Display Order].
Disables to change the order of display (search number order, ascending,
descending).
Once set, the display sequence is not changed. The display order
will remain fixed at the order that is in effect when this setting
is enabled.
Important points when using this function
If the received fax data is not printed or deleted,
the fax memory will run low, and the machine will not be able to
receive any faxes. When using this function, you should print the
received data as soon as possible without leaving it in the fax memory.
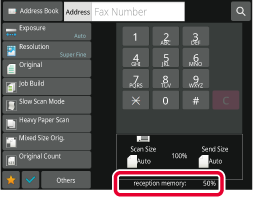
You can view the remaining fax memory capacity on the fax
mode base screen.
When little space remains in the fax memory, "Manual receive
is disabled. Due to out of memory." appears on the touch panel.
- The received faxes will be stored
in memory regardless of whether they are received automatically
or manually.
- When the received data is transferred to
other machine, data stored in memory is also transferred. At that
time, the same PIN Code entry screen will appear as for printing.
Forwarding will not take place unless the PIN Code is entered.
When the previously programmed 4-digit PIN Code is entered
using the numeric keys, printing begins.
When the [Cancel] key is tapped, the PIN Code entry screen
closes. It will reappear when you tap
 or change modes. The data in memory key
will blink in the touch panel.
or change modes. The data in memory key
will blink in the touch panel.
- To
display the received data list screen after entering the PIN Code:
In "Settings
(administrator)", select [System Settings] → [Image Send Settings] → [Common Settings]
→ [Condition Settings] → [Preview Setting] → [Received Data Image Check Setting].
- To transfer
received data to another machine:
In "Settings
(administrator)", select [System Settings] → [Image Send Settings] → [Inbound Routing
(Forwarding/Storing) Settings].
You can start printing the
received data at a specified time.
For stress-free printing, you should avoid printing large
numbers of pages at peak times during the day, and when you do not
urgently need to print.
For example, if it is set to print data received during the
day at 20:00, the received data will not be printed immediately, and
printing will begin automatically at 20:00.
- The printed data is automatically
deleted from memory.
- If the power is turned off at the specified
time, printing will start at the timing when the power is turned
on.
- This function can be used when "Settings
(administrator)" - [System Settings] → [Image Send Settings] → [Common Settings] →
[Condition Settings] → [Preview Setting] → [Received Data Image Check Setting] is
enabled.
If Hold Setting for Received Data Print is enabled,
this function is not available.
- To
print received data at the specified time:
In "Settings",
select [System Settings] → [Image Send Settings] → [Common Settings] → [Condition
Settings]
→ [Time Specified Output of Received Data].
When “Change Password” or “Hold Setting for Received Data print”
is  , the password entry field is grayed out.
- To disable
the hold setting for received data print:
In "Settings
(administrator)", disable this function using [System Settings] → [Image Send Settings]
→ [Common Settings] → [Condition Settings] → [Hold Setting for Received Data Print].
Check the image of received data on the
touch panel before printing.
This function can be used when "Settings (administrator)"
- [System Settings] → [Image Send Settings] → [Common Settings] → [Condition Settings]
→ [Preview Setting]
→ [Received Data Image Check Setting] is enabled*.
* The factory default setting is
disabled.
Important
points when using this functionIf the received fax data is not printed or deleted, the fax
memory will run low, and the machine will not be able to receive any
faxes. When using this function, you should print the received data
as soon as possible without leaving it in the fax memory.
You can view the remaining fax memory capacity on the fax
mode base screen.
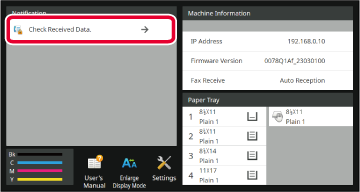
When data is received,

is shown at the top of the screen.
Depending on the size of the received data, part
of the check image on the touch panel may not appear.
The received data list can be also shown in the job status screen
that appears when you tap the job status display.
The received data can be forwarded, deleted, or saved from the received
data list.
FORWARDING RECEIVED DATA MANUALLYSAVING RECEIVED DATA
In the System Information, tap the [Check Received Data.].
The received data is listed.
You can also display the received data list by
tapping the job status display and tapping [Check Received Data] on the action
panel of Job Status screen.
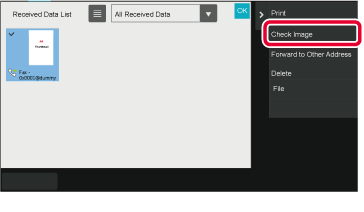
Tap the key of the received data you wish to check,
and tap [Check Image] on the action panel.
Displays the received data image.
- Tap
 to show a list of received data. The
list view or thumbnails view can be changed depending on the setting mode.
to show a list of received data. The
list view or thumbnails view can be changed depending on the setting mode.
- To delete a received image, tap [Delete]
on the action panel.
- To transfer the selected received image,
tap [Forward to Other Address] on the action panel.
FORWARDING RECEIVED DATA MANUALLY
- To save the selected received image, tap
[File] on the action panel.
SAVING RECEIVED DATA
- To store the sender fax number as a number
for "Allow/Reject Number Setting", tap [Register as Junk Fax] on the action panel
and, in the
confirmation message screen, tap the [OK] key.
Specify a sender fax number as a number for "Allow/Reject Number Setting" by selecting,
in "Settings (administrator)", select [System Settings] → [Image Send Settings]
→ [Fax Settings] → [Receive Settings] → [Allow/Reject Number Setting].
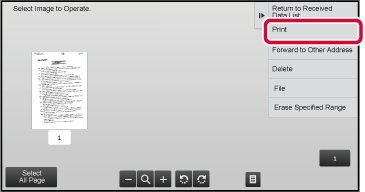
Tap the image you wish to print, and tap the [Print]
on the action panel.
The machine starts printing the image.
- [Select All Page]: Selects
all displayed images.
- [Release All Page]: Cancels
all images that have been selected by "Select All Page".
-
 /
/
 : Use these keys to enlarge or reduce
an image.
: Use these keys to enlarge or reduce
an image.
-
 /
/
 : Rotates image counterclockwise or clockwise.
- A preview image is an image for the
touch panel. It will differ from the actual print result.
- Tap [Erase Specified Range] on the action panel to
delete unwanted area of the image. Specify the image area you wish
to delete in the Erase Specified Range screen.
- To forward the selected image, tap [Forward to Other Address]
on the action panel.
FORWARDING RECEIVED DATA MANUALLY
- To save the selected received image, tap
[File] on the action panel.
SAVING RECEIVED DATA