SHARP

Language

FORWARDING RECEIVED DATA

This section explains how to enter a destination from the initial screen of easy mode.
EASY MODE

FORWARDING RECEIVED FAXES (FAX DATA FORWARD)

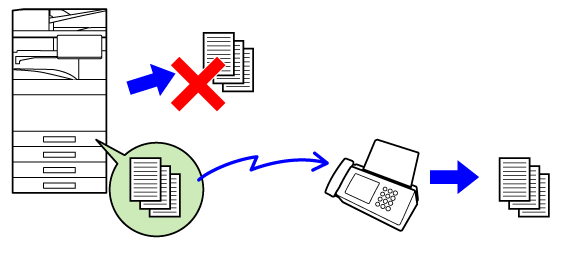
When the machine cannot print because it is out of paper or out of toner, received faxes can be forwarded to another previously stored fax machine. Store a recipient by selecting [ Send Setting] in Setting mode.
If the machine has received data, the information indicator blinks in white.
This function is convenient in an office or work area that has two or more telephone lines and another fax machine is connected to a different line than the machine.

  • If some pages of a fax that is being forwarded were successfully printed, only those pages that were not printed will be forwarded.
  • A forwarded fax becomes a fax transmission job. If transmission does not take place because the transmission was canceled or an error occurred, the fax will be held in memory until it can be printed.
  • All faxes received are forwarded. Note, however, that faxes received and stored in an F-code confidential memory box cannot be forwarded.
  • If a PIN Code entry screen appears after tapping the [OK] key, "Hold Setting for Received Data Print" has been enabled. Enter the PIN Code using the numeric keys to begin forwarding.
  • PRINTING A PIN CODE-PROTECTED FAX (Hold setting for received data print)

Make sure that the information indicator is blinking in white, and tap the [Settings] key in the home screen.

Tap the [System Settings] → [Image Send Settings] → [Fax Data Receive/Forward (Manual)] key.

Tap the [Execute] key in [Forward Received Data] to begin forwarding.

If a PIN Code entry screen appears, the "Hold Setting for Received Data Print" has been enabled. Enter the PIN Code using the numeric keys to begin forwarding.
PRINTING A PIN CODE-PROTECTED FAX (Hold setting for received data print)

FORWARDING RECEIVED DATA TO PRESET DESTINATIONS (INBOUND ROUTING SETTINGS)

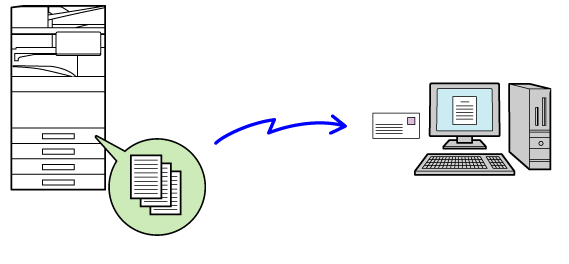
You can have received faxes automatically forwarded to a fax address, Internet fax address, e-mail address, file server address, desktop address, or network folder address. Received data can be forwarded to the specified destinations without being printed.

Configure all forwarding settings for received faxes in setting mode (Web version). For the procedure for accessing the setting mode (Web version), see Quick Start Manual.
The following explanation assumes that the setting mode (Web version) has been accessed with administrator rights.

Whether or not to forward data for each forwarding table can be quickly set.
In "Settings (administrator)" - [System Settings] → [Image Send Settings] → [Inbound Routing (Forwarding/Storing) Settings] → [Administration Settings] → [Inbound Routing], tap [Enable]/[Disable] for each forwarding table that appears.
  • This function cannot be used for faxes received by confidential reception.
  • When faxes forwarded using this function are printed at the forwarding destination, the date and time of reception cannot be printed on the faxes. ("Receiving Date & Time Print" is disabled.)
  • The received data is not forwarded to a hyperlink destination that is registered in the specified address.
  • A direct SMTP address cannot be specified as a forwarding destination.

In "Settings (Web version)", click [System Settings] → [Image Send Settings] → [Inbound Routing (Forwarding/Storing) Settings] → [Administration Settings].

In "Inbound Routing", select [Enable] and click the [Submit] button.

Users without administrator rights can be prohibited from storing, editing, and deleting forwarding tables in this screen, and from specifying which table is used. To do so, set the checkboxes for the following items to .
  • Disable Registration of Forward Table
  • Disable Change/Delete of Forward Table
  • Disabling of Forward Condition Change Specify in [Print Style Setting] whether or not to have the machine to print the faxes to forward when inbound routing is enabled. After the settings are completed, be sure to click the [Submit] button.
  • [Always Print]: Always prints received data before forwarding the data.
  • [Print at Error]: Prints received data only when an error prevents forwarding.
  • [Save Only at Error]: Saves received data only when an error prevents forwarding. For the saved data, the error address can be confirmed and the data can be resent. From the [Scan] or [Fax] tab in the job status screen, tap [Check Error Box] on the action panel.

Click [Sender Address Registration] in the [Inbound Routing (Forwarding/Storing) Settings] menu in the "Settings (Web version)".

Enter the sender address or fax number in "Internet Fax Address" or "Fax Number" as appropriate, and click the [Add to List] button.

The entered address will be added to the "Address to be Entered" list. Enter the address directly (maximum of 1500 characters) or select the address from a global address book by clicking the [Global Address Search] button. To store multiple sender addresses or fax numbers, repeat these steps.
  • If you wish to have only faxes from specified addresses forwarded, store the desired sender addresses. Send addresses stored here can be selected from a list when you store a forwarding table.
  • A maximum of 500 sender numbers/addresses can be stored.
  • To delete an entered address, select the address in "Address to be Entered" and click the [Delete] button.

When you have finished adding addresses, click the [Submit] button.

Click [Inbound Routing Settings] in the [Inbound Routing (Forwarding/Storing) Settings] in the "Settings (Web version)" menu and click the [Add] button.

Enter a "Table Name".

Select the sender whose faxes will be forwarded.

  • To forward all received data, select [Forward All Received Data].
  • To forward only data received from specific senders, select [Forward received data from specified senders only.]. To forward all data except data from specific senders, select [Forward all received data except that from specified senders.]. Then, select the appropriate senders from the list and click the [Add] button.
When selecting senders from the "Sender Address Setting" list, you can use the [Shift] key or the [Ctrl] key on your keyboard to select multiple senders.

Select the forwarding conditions.

  • To always forward received data, select [Always Forward].
  • To specify a day and time on which received data will be forwarded, select [Forward received data only on specified days.] and select the checkbox ( ) of the desired day of the week. To specify a time, select the [Set Forwarding Time] checkbox ( ) and specify the time.
Up to three forwarding day and time settings can be set for one forwarding table, and a forwarding destination can be set for each set time. To configure these settings, use the [Forward Condition] tabs to access each setting.

Select the file format.

The format can be set separately for each forwarding address (for each of forwarding addresses 1, 2, and 3 in the table).
  • Images forwarded in TIFF format may not be displayed correctly in some recipient environments. In this event, change the file format to PDF.
  • If the Internet fax address is selected as a recipient, data is forwarded in TIFF regardless of the specified format.
  • If a fax number is selected as a recipient, the file format is ignored.

Select the recipient from the address book.

You can specify multiple registered addresses or telephone numbers from the address book of the machine.
Up to 1,000 recipients can be registered for Recipients 1, 2, and 3 in total.
When you select the recipients from the address book, up to 1,000 recipients can be registered for e-mail and up to 400 recipients can be registered for network folder, FTP/Desktop, Internet fax, and fax.
A direct SMTP address cannot be specified as a forwarding destination.

Enter a recipient directly and specify the recipient.

  • Specify this information if necessary.
  • Enter an e-mail address, an Internet fax address, a direct SMTP address, or a fax number directly and tap the [Add] key.
  • When you specify an e-mail address or a fax number, you can use the global address search.
  • When you specify a fax number, also specify the international correspondence mode.
  • When enter the recipients directly, up to 100 recipients can be registered for e-mail address, network folder, FTP/Desktop, Internet fax, and fax.

Click [Submit].

Click [Inbound Routing Settings] in the [Inbound Routing (Forwarding/Storing) Settings] in "Settings (Web version)".

From the forwarding table, select [Forward to All Forward Destinations] or [Forward based on Forward Condition].

From the forwarding table, select [Always Forward] or [Forward received data only on specified days.].

The forwarding permission settings that appear here are linked to the forwarding conditions set in step 10.
If you wish to use different forwarding conditions than those set in step 10, set the forwarding permission settings.
  • To use the inbound routing function, enable the forwarding tables that you wish to use from among the stored tables.
  • To delete a forwarding table, click the checkbox next to the table name so that it is selected ( ) and click [Delete].

Click [Submit].

SAVING RECEIVED FAXES TO THE MACHINE'S STORAGE (INBOUND ROUTING)

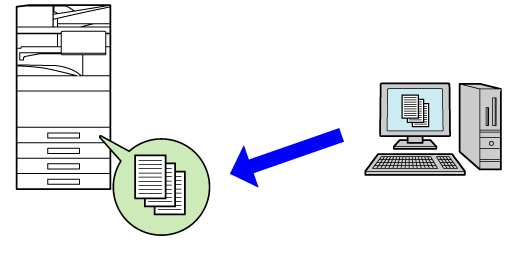
Received faxes can be saved to the machine's storage. Saved faxes can be viewed on a computer.
Set PDF, TIFF (multi) or TIFF (single) for the saved Internet faxes.
You can also receive notification of the storage result or storage folder by E-mail.
Received faxes are saved in the following directory:
\\MFP\faxreceive

  • Up to 500 files can be stored in one folder as received data.
  • The "faxreceive" folder contains files of "Settings for Local Drive Storing of Received Data".
  • The folder is automatically created.
  • The file name for received data can be set in "File Name Setting" in "Settings for Local Drive Storing of Received Data" in "Inbound Routing (Storage) Settings".

How to save received faxes to the storage

In "Settings (administrator)", click [System Settings] → [Network Settings] → [Public Folder / NAS Setting]. (Administrator rights required.)

Select [Allowed] in "faxreceive:Use of Storage" and click the [Submit] button.

Settings for saving received faxes to the storage

In "Settings (administrator)", click [System Settings] → [Image Send Settings] → [Inbound Routing (Forwarding/Storing) Settings] → [Inbound Routing (Storage) Settings] (administrator rights are required).

  • Data that can be saved are received faxes and received Internet faxes. Confidential reception and polling reception faxes cannot be saved.
  • Depending on the setting, received faxes that cannot be saved because of the file number limit or other reason are either printed or saved in the inbound routing error box.

FORWARDING RECEIVED DATA MANUALLY

Received faxes can be forwarded manually after receipt.
This function is available when [System Settings] → [Image Send Settings] → [Common Settings] → [Condition Settings] → [Preview Setting] → [Received Data Image Check Setting] is enabled * in "Settings (administrator)".

* The factory default setting is disabled.

When data is received, is shown at the top of the screen.

In the System Information, tap the [Check Received Data.].

The received data is listed.
You can also display the received data list by tapping the job status display and tapping [Check Received Data] on the action panel of Job Status screen.

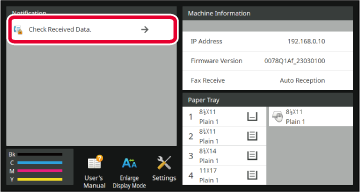
Tap the key of the received data you wish to forward, and tap [Forward to Other Address].

  • Tap to show a list of received data. The list view or thumbnails view can be changed depending on the setting mode.
  • Multiple sets of received data can be selected.
  • When you select a single received data only, you can tap [Check Image] on the action panel and check the image on the preview screen.
  • To store the sender fax number as a number for "Allow/Reject Number Setting", tap [Register as Junk Fax] on the action panel and, in the confirmation message screen, tap the [Store] key.
  • Specify a sender fax number as a number for "Allow/Reject Number Setting" by selecting, in "Settings (administrator)", select [System Settings] → [Image Send Settings] → [Fax Settings] → [Receive Settings] → [Allow/Reject Number Setting].

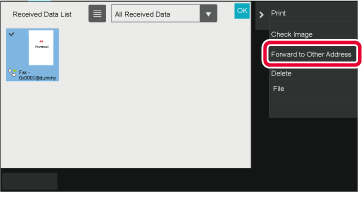
Select the destination from the Address Book screen, and tap the [Start] key.

Language

Version 03a / bp70c65_usr_03a_us

↑Top of page