SHARP

Language

SCANNING ORIGINALS

ERASING PERIPHERAL SHADOWS ON THE IMAGE (ERASE)

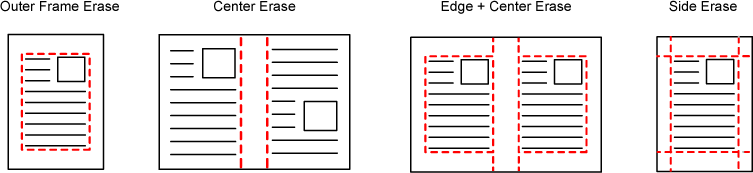
When scanning thick originals or books, erase any peripheral shadows that may be produced on the image.

Scanning a thick book

When a bound document is scanned, shadows appear in the peripheral areas and around the binding portion of the scanned image.

Not using the erase function Using the erase function

Shadows appear in the image.

No shadows appear.

Erase modes

  • This function erases the parts of the image where shadows tend to form, but does not detect shadows and erase only the shadows.
  • If a ratio setting is used in combination with an erase setting, the erase width will change according to the selected ratio.
  • For example, if you set an erase width of 1/2" (10 mm) and reduce the image to 70% before scanning it, the erase width will be reduced to 3/8" (7 mm).
  • When the erase setting is selected, the image orientation will be forcibly portrait.
To change the default erase width setting:
In "Settings (administrator)", select [System Settings] → [Image Send Settings] → [Common Settings] → [Condition Settings] → [Erase Width Adjustment].
The width can be set from 0" to 1" (0 mm to 20 mm). The factory default setting is 1/2" (10 mm). The setting changed here will apply to [System Settings] → [Copy Settings] → [Condition Settings] → [Erase Width Adjustment] in "Settings".

Place the original.

Place the original in the document feeder tray of the automatic document feeder, or on the document glass.
When in fax mode, then after completing this procedure, proceed to Step 3.
AUTOMATIC DOCUMENT FEEDER
DOCUMENT GLASS

Tap the mode display to switch to the initial screen of each mode.

CHANGING MODES

Specify the destination.

RETRIEVING A DESTINATION FROM AN ADDRESS BOOK
VIEWING A LIST OF THE SELECTED DESTINATIONS
USING A SEARCH NUMBER TO RETRIEVE A DESTINATION
ENTERING AN ADDRESS MANUALLY
SPECIFYING A NETWORK FOLDER
RETRIEVING A DESTINATION FROM A GLOBAL ADDRESS BOOK
RETRIEVING A DESTINATION FROM A MOBILE ADDRESS BOOK
USING A TRANSMISSION LOG TO RESEND
When in fax mode, enter the destination number.
ENTERING A DESTINATION NUMBER USING THE NUMERIC KEYS
RETRIEVING A DESTINATION FROM AN ADDRESS BOOK
USING A SEARCH NUMBER TO RETRIEVE A DESTINATION
RETRIEVING A DESTINATION FROM A GLOBAL ADDRESS BOOK
RETRIEVING A DESTINATION FROM A MOBILE ADDRESS BOOK
USING A TRANSMISSION LOG TO RESEND

Tap the [Others] key, and tap the [Erase] key.

Tap the checkbox of the edge that you wish to erase, and specify the erase position.

Check that the tapped checkbox is set to .
If the [Outer Frame] key is tapped, the [Up], [Down], [Left],and [Right] checkboxes are set to .
If the [Specify Frame+Center] key is tapped, all the checkboxes are set to .
Specify the erase edge on the reverse side when erasing edges of one to three sides of Up, Down, Left, and Right on the front side to scan a 2-sided original.
  • If the [Reverse Erase Position of The Back Face] checkbox is set to 
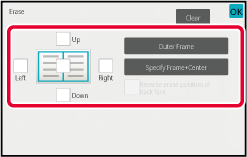
, the edge in the position opposite to the erased edge on the front side will be erased.
  • If the [Reverse Erase Position of The Back Face] checkbox is set to , the edge in the same position as on the front side will be erased.
  • [Reverse Erase Position of The Back Face] is not possible when "Settings (administrator)" - [System Settings] → [Common Settings] → [Device Control] → [Condition Settings] or [Enable/Disable Settings] → [Disabling of Document Feeder] is enabled.

Specify the erase width.

After the settings are completed, tap and [Back] keys in sequence.
  • Tap the numeric value display indicating the margin shift area on the front side or reverse side, and enter the area using the numeric keys.
  • To quickly set the area, first specify a value close to the desired value by the numeric keys, then adjust it with .
To cancel the erase setting:
Tap the [Clear] key.

Tap the [Start] key to start scanning of the original.

  • If you inserted the original pages in the document feeder tray, all pages are scanned.
  • A beep will sound to indicate that scanning and transmission have ended.
  • When you place the original on the document glass, scan each page one at a time.
  • When scanning finishes, place the next original and tap the [Start] key.
    Repeat until all pages have been scanned and then tap the [Read-End] key.
    A beep will sound to indicate that transmission has ended.
    You can tap the [Preview] key to check a preview of the image before sending an image. For more information, see “ CHECKING THE IMAGE TO BE TRANSMITTED" (When in fax mode, “ CHECKING THE IMAGE TO BE TRANSMITTED").

    SCANNING A THIN ORIGINAL (SLOW SCAN MODE)

    Use this function when you wish to scan thin originals using the automatic document feeder. This function helps prevent thin originals from misfeeding.

  • When slow scan mode is selected, 2-sided scanning is not possible.
  • Slow scan mode is not possible when "Settings (administrator)" - [System Settings] → [Common Settings] → [Device Control] → [Condition Settings] or [Enable/Disable Settings] → [Disabling of Document Feeder] is enabled.
  • Place the original in the document feeder tray of the automatic document feeder.

    When in fax mode, then after completing this procedure, proceed to Step 3.
    Adjust the original guides slowly.
    AUTOMATIC DOCUMENT FEEDER
    If the originals are inserted with too much force, they may crumple and misfeed.

    Tap the mode display to switch to the initial screen of each mode.

    CHANGING MODES

    Specify the destination.

    RETRIEVING A DESTINATION FROM AN ADDRESS BOOK
    VIEWING A LIST OF THE SELECTED DESTINATIONS
    USING A SEARCH NUMBER TO RETRIEVE A DESTINATION
    ENTERING AN ADDRESS MANUALLY
    SPECIFYING A NETWORK FOLDER
    RETRIEVING A DESTINATION FROM A GLOBAL ADDRESS BOOK
    RETRIEVING A DESTINATION FROM A MOBILE ADDRESS BOOK
    USING A TRANSMISSION LOG TO RESEND
    When in fax mode, enter the destination number.
    ENTERING A DESTINATION NUMBER USING THE NUMERIC KEYS
    RETRIEVING A DESTINATION FROM AN ADDRESS BOOK
    USING A SEARCH NUMBER TO RETRIEVE A DESTINATION
    RETRIEVING A DESTINATION FROM A GLOBAL ADDRESS BOOK
    RETRIEVING A DESTINATION FROM A MOBILE ADDRESS BOOK
    USING A TRANSMISSION LOG TO RESEND

    Tap the [Others] key, and tap the [Slow Scan Mode] key.

    A checkmark appears on the icon.
    After the settings are completed, tap the [Back] key.
    To cancel the slow scan Mode setting
    Tap the [Slow Scan Mode] key to uncheck it.

    Tap the [Start] key to start scanning of the original.

    A beep will sound to indicate that scanning and transmission have ended.
    Tap the [Preview] key to check the preview of an image before sending a fax. For more information, see “ CHECKING THE IMAGE TO BE TRANSMITTED" (When in fax mode, “ CHECKING THE IMAGE TO BE TRANSMITTED"). However, settings for this function cannot be changed in the preview screen.

    SCANNING A HEAVY ORIGINAL (HEAVY PAPER SCAN)

    Use this function when you wish to scan heavy originals using the automatic document feeder. This function helps prevent heavy originals from misfeeding.

  • This function cannot be used for BP-50C26/BP-50C31/BP-50C36/BP-50C45/BP-50C55/BP-50C65.
  • Heavy paper scan is not possible when "Settings (administrator)" - [System Settings] → [Common Settings] → [Device Control] → [Condition Settings] or [Enable/Disable Settings] → [Disabling of Document Feeder] is enabled.
  • Place the original in the document feeder tray of the automatic document feeder.

    When in fax mode, then after completing this procedure, proceed to Step 3.
    Adjust the original guides slowly.
    AUTOMATIC DOCUMENT FEEDER
    If the originals are inserted with too much force, they may crumple and misfeed.

    Tap the mode display to switch to the initial screen of each mode.

    CHANGING MODES

    Specify the destination.

    RETRIEVING A DESTINATION FROM AN ADDRESS BOOK
    VIEWING A LIST OF THE SELECTED DESTINATIONS
    USING A SEARCH NUMBER TO RETRIEVE A DESTINATION
    ENTERING AN ADDRESS MANUALLY
    SPECIFYING A NETWORK FOLDER
    RETRIEVING A DESTINATION FROM A GLOBAL ADDRESS BOOK
    RETRIEVING A DESTINATION FROM A MOBILE ADDRESS BOOK
    USING A TRANSMISSION LOG TO RESEND
    When in fax mode, enter the destination number.
    ENTERING A DESTINATION NUMBER USING THE NUMERIC KEYS
    RETRIEVING A DESTINATION FROM AN ADDRESS BOOK
    USING A SEARCH NUMBER TO RETRIEVE A DESTINATION
    RETRIEVING A DESTINATION FROM A GLOBAL ADDRESS BOOK
    RETRIEVING A DESTINATION FROM A MOBILE ADDRESS BOOK
    USING A TRANSMISSION LOG TO RESEND

    Tap the [Others] key, and tap the [Heavy Paper Scan] key.

    A checkmark appears on the icon.
    After the settings are completed, tap the [Back] key.
    To cancel the Heavy Paper Scan setting
    Tap the [Heavy Paper Scan] key to uncheck it.

    Tap the [Start] key to start scanning of the original.

    A beep will sound to indicate that scanning and transmission have ended.
    Tap the [Preview] key to check the preview of an image before sending a fax. For more information, see “ CHECKING THE IMAGE TO BE TRANSMITTED" (When in fax mode, “ CHECKING THE IMAGE TO BE TRANSMITTED"). However, settings for this function cannot be changed in the preview screen.

    ELIMINATING BLANK PAGES FROM A TRANSMISSION (BLANK PAGE SKIP)

    If the scanned original contains blank pages, this function skips them to send only non-blank pages.
    The machine detects blank pages, enabling you to skip useless blank sheets without checking an original.

    • If an original of which one side is blank is scanned, blank pages are skipped for 2-sided sending.
    • In a broadcast transmission to destinations including fax and Internet fax destinations, this function is applied to scan mode destinations only.
    • Depending on the original, some pages that are not blank may be detected as blank pages and thus not being sent, and some pages that are blank may not be detected as blank and thus sent.
    • This function cannot be used in Internet fax mode.
    • If the [Send Same Image as Fax Address] key is tapped, this function is canceled if a fax address is specified for the destination.
    To display the blank page skip confirmation message:
    Select [System Settings] → [Common Settings] → [Device Control] → [Condition Settings] → [Display Blank Page Skip Confirmation Message].

    Place the original.

    Place the original in the document feeder tray of the automatic document feeder, or on the document glass.
    AUTOMATIC DOCUMENT FEEDER
    DOCUMENT GLASS

    Tap the mode display to switch to the initial screen of each mode.

    CHANGING MODES

    Specify the destination.

    RETRIEVING A DESTINATION FROM AN ADDRESS BOOK
    VIEWING A LIST OF THE SELECTED DESTINATIONS
    USING A SEARCH NUMBER TO RETRIEVE A DESTINATION
    ENTERING AN ADDRESS MANUALLY
    SPECIFYING A NETWORK FOLDER
    RETRIEVING A DESTINATION FROM A GLOBAL ADDRESS BOOK
    RETRIEVING A DESTINATION FROM A MOBILE ADDRESS BOOK
    USING A TRANSMISSION LOG TO RESEND

    Tap the [Others] key, and tap the [Blank Page Skip] key.

    Tap the [Skip Blank Page] or [Skip Blank and Back Shadow] key.

    After the settings are completed, tap and [Back] keys in sequence.
    To cancel the Blank Page Skip setting:
    Tap the [Off] key.

    Tap the [Start] key to start scanning of the original.

    A beep will sound to indicate that scanning has ended.
    Tap the [Preview] key to check the preview of an image before sending a fax. For more information, see “ CHECKING THE IMAGE TO BE TRANSMITTED".

    When scanning ends, check the number of original sheets and the number of sheets to be sent and tap the [OK] key to start transmission.

  • When Job Build mode is used, the confirmation message will appear after the [Start] key is tapped.
  • On the confirmation screen, the number of scanned original sheets appears in (A), the number of scanned sides in (B), and the number of sheets to be sent excluding blank pages in (C). For example, if five original sheets that include two blank pages are scanned by duplex scanning, (A) will show "5", (B) will show "10", and (C) will show "8".
  • If this step is not performed within one minute after the above confirmation screen appears, the scanned image and settings will be cleared and the base screen will reappear.
    Scanning will not be completed automatically and the image will not be reserved for transmission.

    CHECKING THE NUMBER OF SCANNED ORIGINAL SHEETS BEFORE TRANSMISSION (ORIGINAL COUNT)

    Count the number of scanned original sheets and display the count before transmission.
    Checking the number of scanned original sheets before transmission helps prevent transmission mistakes.

    • The count result is displayed with the number of scanned original sheets, not the number of scanned original pages. For example, when a 2-sided original is transmitted, the number "1" will appear to indicate that one original sheet is transmitted, not "2" to indicate the front-side page and the reverse side page.
    • When a broadcast transmission is performed, if the original count function is selected in any of the modes, the function will operate for all destinations.
    • The setting should be enabled separately for each mode.

    Place originals in the automatic document feeder.

    When in fax mode, then after completing this procedure, proceed to Step 3.
    AUTOMATIC DOCUMENT FEEDER

    Tap the mode display to switch to the initial screen of each mode.

    CHANGING MODES

    Specify the destination.

    RETRIEVING A DESTINATION FROM AN ADDRESS BOOK
    VIEWING A LIST OF THE SELECTED DESTINATIONS
    USING A SEARCH NUMBER TO RETRIEVE A DESTINATION
    ENTERING AN ADDRESS MANUALLY
    SPECIFYING A NETWORK FOLDER
    RETRIEVING A DESTINATION FROM A GLOBAL ADDRESS BOOK
    RETRIEVING A DESTINATION FROM A MOBILE ADDRESS BOOK
    USING A TRANSMISSION LOG TO RESEND
    When in fax mode, enter the destination number.
    ENTERING A DESTINATION NUMBER USING THE NUMERIC KEYS
    RETRIEVING A DESTINATION FROM AN ADDRESS BOOK
    USING A SEARCH NUMBER TO RETRIEVE A DESTINATION
    RETRIEVING A DESTINATION FROM A GLOBAL ADDRESS BOOK
    RETRIEVING A DESTINATION FROM A MOBILE ADDRESS BOOK
    USING A TRANSMISSION LOG TO RESEND

    Tap the [Others] key, and tap the [Original Count] key.

    A checkmark appears on the icon.
    After the settings are completed, tap the [Back] key.
    To cancel the original count setting:
    Tap the [Original Count] key to uncheck it.

    Tap the [Start] key to start scanning of the original.

    A beep will sound to indicate that scanning has ended.
    Tap the [Preview] key to check the preview of an image before sending a fax. For more information, see “ CHECKING THE IMAGE TO BE TRANSMITTED" (When in fax mode, “ CHECKING THE IMAGE TO BE TRANSMITTED"). However, settings for this function cannot be changed in the preview screen.

    Check the number of original sheets.

    The number that is displayed is the number of scanned original sheets, not the number of scanned original pages. For example, when 2-sided copying is performed using one original, the number "1" will appear to indicate that one original sheet was scanned, not "2" to indicate the front-side page and the reverse side page.

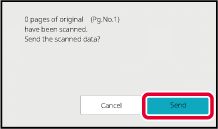
    Tap the [Send] key to start transmission.

    If this function is combined with [Job Build], the count result is displayed after the [Read-End] key has been tapped.
    If this step is not performed within one minute after the above confirmation screen appears, the scanned image and settings will be cleared and the base screen will reappear. Scanning will not be completed automatically and the image will not be reserved for transmission.
    If the displayed number of original sheets is different from the actual number of sheets:
    Tap the [Cancel] key and then tap the [OK] key in the message screen to clear all scanned data. Scan settings and destination settings will not be cleared. Insert the original sheets in the document feeder tray again and tap the [Start] key to re-scan.
    Language

    Version 03a / bp70c65_usr_03a_us

    ↑Top of page