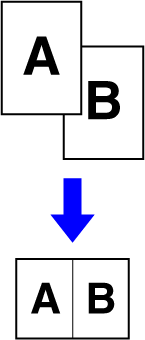
This function copies multiple
original pages onto a single sheet of paper in a uniform layout.
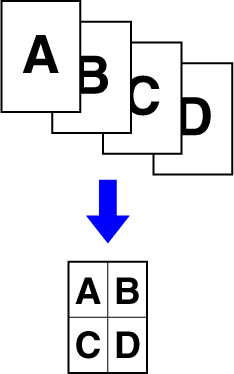
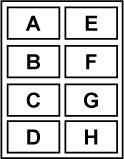
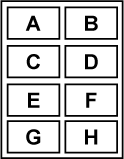
Select 2-Up to copy two original pages onto one sheet, 4-Up
to copy four original pages onto one sheet, or 8-Up to copy eight
original pages onto one sheet.
This function is convenient when you wish to present multiple
pages in a compact format, or show a view of all pages in a document.
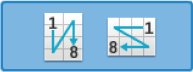
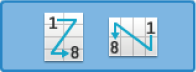
| 2-Up copying | 4-Up copying |
|---|---|
 |
 |
Place the original.
Place the original in the document feeder tray of the automatic document feeder, or on the document glass.Tap the [N-Up] key.
COPY MODETap the number of originals you want to copy collectively, and select the layout key.
If needed, the images will be rotated.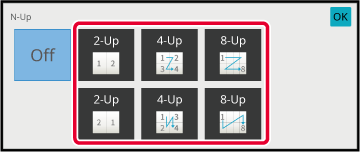
To select more detailed settings, tap the [Detail] key to switch to normal mode.
EASY MODETap the [Others] key, and tap the [N-Up] key.
Tap [Border], and select the border.
A line can be inserted between pages arranged on a sheet.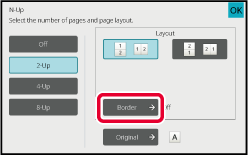
Tap the [Color Start] or [B/W Start] key to start copying.
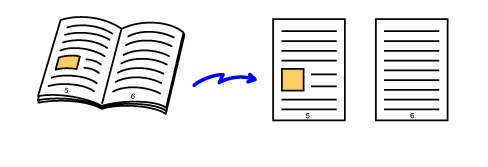
This function
copies the left and right half of an original successively. This
function is useful when making copies of the facing pages of a book
or other bound document.
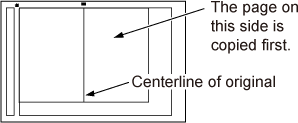
Copying
the facing pages of a book or bound document
Books and bound documents are copied into 2 separate pages.
Tap the [Detail] key to change to normal mode.
EASY MODETap the [Others] key, and tap the [Dual Page Copy] key.
A checkmark appears on the icon.Place the original on the document glass.
DOCUMENT GLASS_book(dspf).png)
Tap the [Color Start] or [B/W Start] key to start copying.
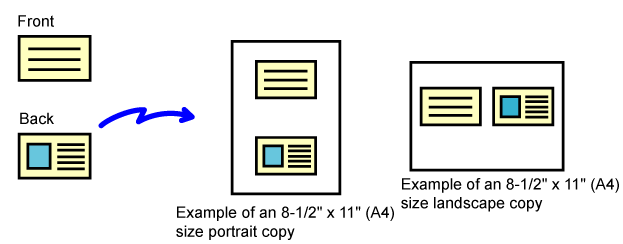
This function copies the
front and reverse sides of a card on one sheet, not on separate
sheets.
This function is convenient for making copies for identification
purposes and helps save paper.
For example, both sides of a card can be copied to a single
sheet in A4 portrait or landscape.
Select the paper to be used for card shot.
Set a paper by referring to the " SELECTING THE PAPER TRAY FOR COPYING".Tap the [Detail] key to change to normal mode.
EASY MODETap the [Others] key, and tap the [Card Shot] key.
Tap the [On] key, and specify the original size as required.
After the settings are completed, tap [OK] and [Back] keys in sequence.
 .
. , the original is enlarged or reduced
with the ratio appropriate to the original size.
, the original is enlarged or reduced
with the ratio appropriate to the original size.Place a card face down on the document glass, and tap the [Color Start] or [B/W Start] key.
DOCUMENT GLASS_card(dspf).png)
Place a card face up on the document glass, and tap the [Color Start] or [B/W Start] key to scan the reverse side.
Tap the [Read-End] key to start copying.
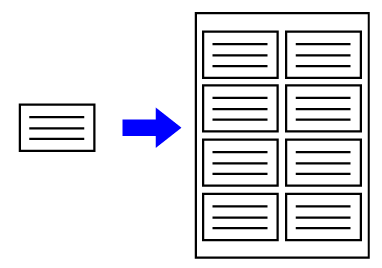
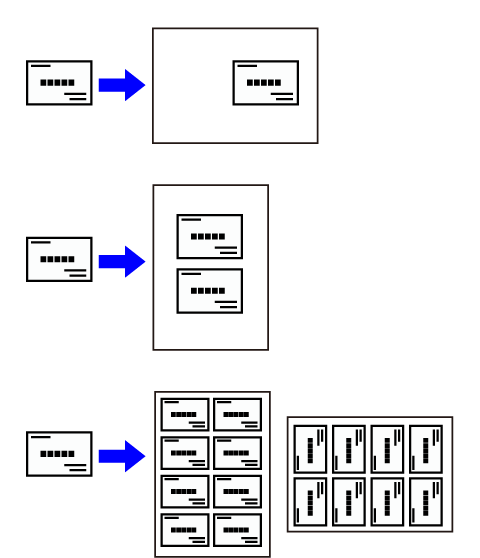
This function copies multiple same original images on one sheet.
You can set any of the following three types of repeat copy.
| Repeat method | Description |
|---|---|
|
Auto Repeat |
The maximum repeat count to copy images on a sheet is calculated automatically according to the original size, paper size, and copy ratio being selected from the base screen. |
|
Fixed Repeat |
When you select a repeat count, original size, and paper size to copy images on a sheet, the copy ratio is calculated automatically and the original is copied. |
|
Photo Repeat |
This function repeatedly copies on 8-1/2" x 11" (A4) or 11" x 17" (A3) papers without changing the copy ratio of the photo size original. You can select any of the following five types of original size: * Reduction will be 95%. |
Place the original.
Place the original in the document feeder tray of the automatic document feeder, or on the document glass.Tap the [Detail] key to change to normal mode.
EASY MODETap the [Others] key, and then tap the [Repeat Layout] key.
Tap the [Auto Repeat] key.
Check the repeat faces which have been calculated automatically.
Change the original size, paper size, or copy ratio by tapping the respective [Original], [Paper Select], or [Copy Ratio] key when necessary.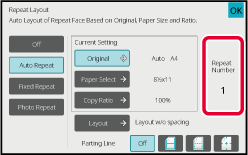
Tap the [Layout] key.
Tap the [Layout w/o spacing] key or the [Layout evenly spaced] key, and then tap the [OK] key.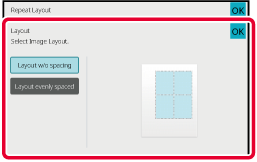
Specify the repeat partition line.
After the settings are completed, tap [OK] key.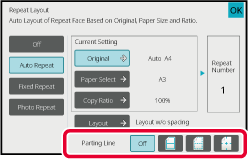
Tap the [Color Start] or [B/W Start] key to start copying.
Perform steps 1 to 3 in Copy by automatically calculating the repeat count (Auto Repeat).
Tap the [Fixed Repeat] key.
Tap the [Original] and [Paper Select] keys to select an original size and a paper size, respectively.
SELECTING THE ORIENTATION AND SIZE OF THE ORIGINALTap [No. of Faces] to set a repeat count.
After the settings are completed, tap [OK] key.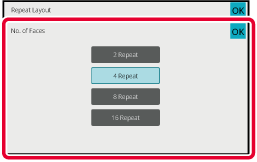
Tap the [Layout] key.
Tap the [Layout w/o spacing] key or the [Layout evenly spaced] key, and then tap the [OK] key.Specify the repeat partition line.
After the settings are completed, tap [OK] key.Tap the [Color Start] or [B/W Start] key to start copying.
Perform steps 1 to 3 in Copy by automatically calculating the repeat count (Auto Repeat).
Tap the [Photo Repeat] key.
Place the original on the document glass.
Tap the [Original] key and select an original size.
When you tap the original size key, the original direction is indicated in the "How To Set". Place the original to meet the displayed orientation.Tap the [Paper Select] key and select a paper size.
After the settings are completed, tap [OK] and [Back] keys in sequence. The automatic calculation result is shown as the copy ratio.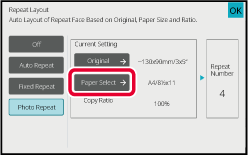
Tap the [Color Start] or [B/W Start] key to start copying.
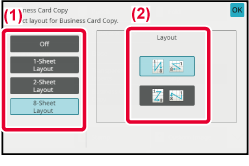
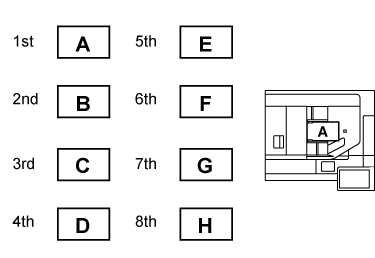
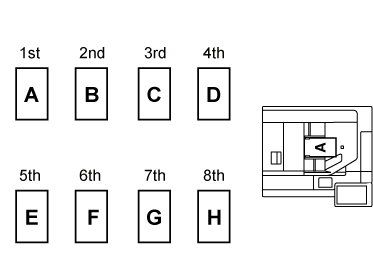
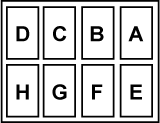
Business Card Copy can be
used to copy up to 8 business cards on one sheet of paper.
This function can be used when you want to create the list
of business cards, and when you want to file business cards.
1-Sheet Layout, 2-Sheet Layout, 8-Sheet Layout
Tap the [Detail] key to change to normal mode.
EASY MODEPlace a business card, and select the paper to be used to copy the card.
Refer to "SELECTING THE PAPER TRAY FOR COPYING" to select the paper._card.png)
Tap the [Others] key, and then tap the [Business Card Copy] key.
Specify settings for Business Card Copy.
Tap the [Start] key to start copying.
| Originals (Original orientation) | Settings | Results |
|---|---|---|
 |
 |
 |
 |
 |
|
 |
|
 |
|
|
 |
Version 06a / bp70c65_usr_06a_us
