Reduce two original pages
to the equal size and sent them as a single page. This function
is convenient when you have a large number of original pages and
wish to reduce the number of pages sent.
For the standard size (8-1/2" x 11" (A4) or 5-1/2" x 8-1/2"
(B5 or A5)), original pages are scanned from both the single pass
feeder and document glass.
.png)
Place the original.
Place the original in the document feeder tray of the automatic document feeder, or on the document glass.Tap the mode display to switch to the initial screen of Internet Fax mode.
CHANGING MODESSpecify the destination.
RETRIEVING A DESTINATION FROM AN ADDRESS BOOKTap the [Others] key, and tap the [N-Up] key.
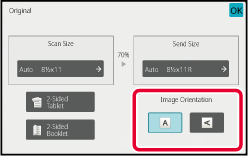
A checkmark appears on the icon.Tap the [Original] key.
Tap the [Image Orientation] key with the same orientation as the original image.
If this setting is not correct, a suitable image may not be transmitted. .
.
Tap the [Start] key to start scanning of the original.
Scan originals of different
sizes at the same time; for example, when 8-1/2" x 14" (B4) size
originals are mixed together with 11" x 17" (A3) size originals.
When scanning the originals, the machine automatically detects
the size of each original.
.png)
This function can only be used with the combinations
of original sizes as shown below.
Place the original in the document feeder tray of the automatic document feeder.
Insert the originals with the corners aligned together in the far left corner of the document feeder tray.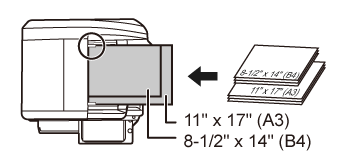
Tap the mode display to switch to the initial screen of each mode.
CHANGING MODESSpecify the destination.
RETRIEVING A DESTINATION FROM AN ADDRESS BOOKTap the [Mixed Size Original] key. Otherwise, tap the [Others] key, and tap the [Mixed Size Original] key.
A checkmark appears on the icon.Tap the [Start] key to start scanning of the original.
A beep will sound to indicate that scanning and transmission have ended.Send the front and reverse
sides of a card as a single page, without the need to send each
side separately.
.png)
Place a card face down on the document glass.
When in fax mode, then after completing this procedure, proceed to Step 3.Tap the mode display to switch to the initial screen of each mode.
CHANGING MODESSpecify the destination.
RETRIEVING A DESTINATION FROM AN ADDRESS BOOKTap the [Others] key, and tap the [Card Shot] key.
Tap the [On] key, and specify the original size as required.
After the settings are completed, tap and [Back] keys in sequence.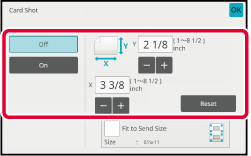
Tap the [Start] key, and scan the front side.
Place a card face up on the document glass, and tap the [Start] key to scan the reverse side.
Tap the [Read-End] key.
This function automatically crops and scans
multiple cards, receipts, or other small originals placed on the
document glass to individual files.

Place the multiple originals that you want to scan on the document glass.
DOCUMENT GLASSKeep the auto document feeder open, not closed.
If you scan the originals with the auto document feeder closed, it will not be possible to detect the outlines of the originals and scanning will fail. Always use this function with the auto document feeder open. If a light source such as an electric light shines onto the originals during scanning, cropping may not be successful. Adjust the angle of the automatic document feeder so that the light source does not affect the image.Caution
Do not look directly at the light during scanning.Tap the mode display and change to the base screen of the desired mode.
CHANGING MODESSpecify the destination.
RETRIEVING A DESTINATION FROM AN ADDRESS BOOKTap the [Others] key, and tap the [Multicrop] key.
A checkmark appears on the icon. When you have completed the setting, tap the [Back] key.Tap the [Start] key to start scanning the originals.
When scanning is completed, place the next originals and tap the [Start] key.You can scan a business card, extract the name and telephone
number from the text string read by OCR, and create and send a vCard
or other file.
For the information that can be extracted and output
from a scanned business card, refer to the table below.
| Item | Description |
|---|---|
|
Name |
The name is extracted. |
|
Kana |
When the language is set to Japanese, you can convert the name to kana. |
|
Pinyin |
When the language is set to Chinese, you can convert the name to pinyin. |
|
Postal code |
The postal code is extracted. |
|
Address |
The address is extracted. |
|
Company/group name |
The company/organization name is extracted. |
|
Department |
The department is extracted. |
|
Job title |
The position is extracted. |
|
Telephone number |
The telephone number is extracted. Up to five. |
|
Fax number |
The fax number is extracted. Up to five. |
|
URL |
The URL is extracted. Up to five. |
|
E-mail address |
The E-mail address is extracted. |
|
Other |
Other is used if none of the above apply. |
Place the multiple business cards that you want to scan in the document feeder tray of the automatic document feeder or on the document glass.
With the BP-70C31/BP-70C36/BP-70C45/BP-70C55/BP-70C65, you can scan business cards by setting them in the automatic document feeder.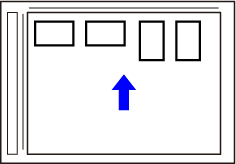
(When using the document glass) Keep the auto document feeder open, not closed.
If you scan the business cards with the auto document feeder closed, it will not be possible to detect the outlines of the business cards and scanning will fail. Always use this function with the auto document feeder open. If a light source such as an electric light shines onto the originals during scanning, cropping may not be successful. Adjust the angle of the automatic document feeder so that the light source does not affect the image.Caution
Do not look directly at the light during scanning.Tap the mode display and change to the base screen of the desired mode.
CHANGING MODESSpecify the destination.
RETRIEVING A DESTINATION FROM AN ADDRESS BOOKTap the [Others] key, and tap the [Business Card Scan] key.
Tap the [On] key, and change settings as needed.
When you have completed the settings, tap the key and then the [Back] key.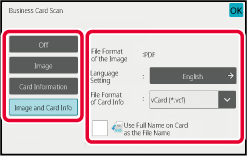
Tap the [Start] key to start scanning the originals.
When scanning is completed, place the next group of originals and tap the [Start] key.The user can assign any file name to a file.
When [Use Full Name on Card as the File Name] is enabled, the name on a scanned business
card can be assigned as the file name.
If you do not set a file name, the machine will assign an
automatically generated file name.
File
name rules
File names are assigned as follows in each setting.
| Setting | File | File name | Description |
|---|---|---|---|
|
User entry |
vCard |
User_0001.vcf User_0002.vcf |
The name entered by the user ("User" in this case) is inserted at the beginning of the file name. |
|
CSV |
User.csv |
||
|
Scanned image |
User_0001.jpg User_0002.jpg |
||
|
File name auto extraction |
vCard |
AAAAAA_0001.vcf AAAAAA_0002.vcf BBBBBB_0001.vcf Untitled_0001.vcf Untitled _0002.vcf |
Example: The names read from business cards are "AAAAAA", "BBBBB" When there are cards with the same first and last name such as "AAAAAA", the number at the end is a serial number. If the name could not be read, the file name is "Untitled". If there are multiple untitled files, the number at the end is a serial number. |
|
CSV |
AAAAAA_0001.csv |
||
|
Scanned image |
AAAAAA_0001.jpg AAAAAA_0002.jpg BBBBBB_0001.jpg Untitled _0001.jpg Untitled _0002.jpg |
||
|
Automatic generation |
vCard |
MXxxxx_yyyyyy_zzzzzz_0001.vcf MXxxxx_yyyyyy_zzzzzz_0002.vcf |
"xxxx" is the model name,"yyyyyy" is the scan date, and "zzzzzz" is the scan time. |
|
CSV |
MXxxxx_yyyyyy_zzzzzz_0001.csv |
||
|
Scanned image |
MXxxxx_yyyyyy_zzzzzz_0001.jpg MXxxxx_yyyyyy_zzzzzz_0002.jpg |
This function automatically scans photographs
placed on the document glass to individual files.
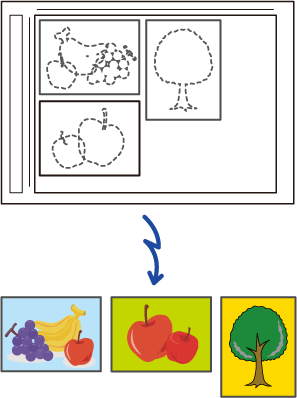
Place the multiple originals that you want to scan on the document glass.
DOCUMENT GLASSClose the automatic document feeder.
The scanning method is different from multi-crop. Close the automatic document feeder.Tap the mode display and change to the home screen of the desired mode.
CHANGING MODESSpecify the destination.
RETRIEVING A DESTINATION FROM AN ADDRESS BOOKTap the [Others] key, and tap the [Image Crop] key.
A checkmark appears on the icon. After the settings are completed, tap the [Back] key.Tap the [Start] key to start scanning the originals.
When scanning is completed, place the next group of originals and tap the [Start] key.This function lets you separate
an original consisting of numerous pages into sets, scan each set
using the automatic document feeder, and transmit the pages in a
single transmission. You can also send a fax by placing originals
in both the automatic document feeder and on the document glass.
Use this function when there are more original pages than
can be placed at once in the automatic document feeder.
When scanning originals that are separated into sets, scan
the set that has the first page first.
The settings that you select for the first set can be used
for all remaining sets.
.png)
Place originals in the automatic document feeder.
Insert the originals all the way into the document feeder tray. Originals can be stacked up to the indicator line. When in fax mode, then after completing this procedure, proceed to Step 3.
AUTOMATIC DOCUMENT FEEDER.png)
Tap the mode display to switch to the initial screen of each mode.
CHANGING MODESSpecify the destination.
RETRIEVING A DESTINATION FROM AN ADDRESS BOOKTap the [Job Build] key.
A checkmark appears on the icon.Change settings as needed.
Tap the [Start] key to scan the first original page.
Place the next set of originals and tap the [Start] key.
Repeat until all originals have been scanned.Tap the [Read-End] key.
Version 06a / bp70c65_usr_06a_us
