The following procedure
is used to log in using a user number received from the administrator
of the machine.
When starting the machine, the login screen appears.
When controlled by user number
If "A Warning when Login Fails" is enabled in the system settings,
the operation panel will be locked for five minutes if an incorrect
user number is entered three times in a row.
Contact the machine administrator to check the user number
assigned for you.
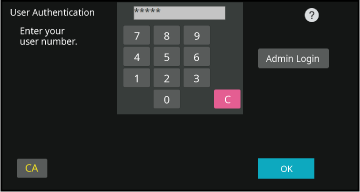
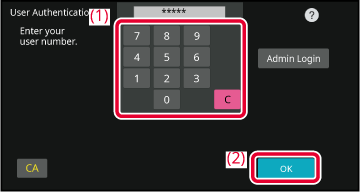
Enter your user number (5 to 8 digits) using the numeric
keys.
Each entered digit will be displayed as "

".
Tap the [OK] key.
If the entered user number is authenticated, the number
of remaining pages that the user can copy or scan is displayed.
When a limitation is set for the number of pages that
a user can use, the use count for the user that has logged in is displayed.
- To
limit the number of pages that a user can use:
In "Settings (administrator)", select [User
Control] → [Access Control Settings] → [Pages Limit Group].
- To hide
the number of pages that can be used after login:
In "Settings (administrator)", disable
[System Settings] → [Authentication Settings] → [Default Settings]
→ [Display Usage Status after Login].
- To change
the message display time:
In "Settings" (administrator)", select
[System Settings] → [Common Settings] → [Operation Settings] → [Condition
Settings] → [Message Time Setting].
When the user number is an 8-digit number, this
step is not necessary. Login takes place automatically after the
user number is entered.
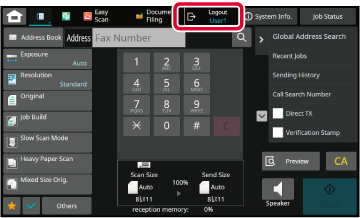
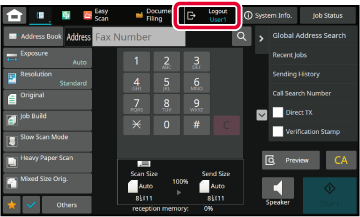
When you have finished using the machine and are ready
to log out, tap [Logout].
This method enables users
to log in using a login name and password received from the administrator
of the machine or the administrator of the LDAP server.
When starting the machine, the login screen appears.
When
controlled by login name and password
- Different items may appear in the
screen when LDAP authentication is used.
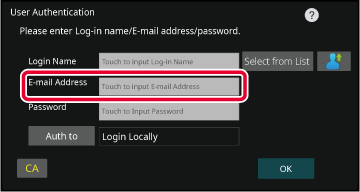
- When LDAP authentication is used, the [E-mail Address]
key may appear, depending on the authentication method. Tap the
[E-mail Address] text box and enter your e-mail address.
- If "A Warning when Login Fails" is enabled in the system
settings, the operation panel will be locked for five minutes if
an incorrect login name or password is entered three times in a
row.
Contact the machine administrator to check the login name/password
assigned to you.
- To
set [A Warning when Login Fails]:
In "Settings (administrator)", select [System
Settings] → [Authentication Settings] → [A Warning when Login Fails].
- To store
a user name:
In "Settings (administrator)", select [User
Control] → [User Settings] → [User List].
Also register detailed information such as the login name, user
number, and password. Ask the administrator of the machine for the
information that you need to use the machine.
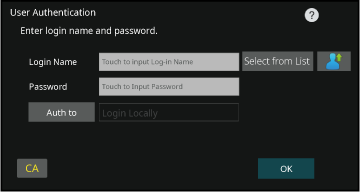
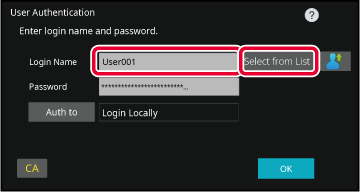
Enter the login name.
Entering using the soft keyboardIf user name registration has not been performed in setting mode,
a user only using LDAP authentication should tap the [Login Name]
text box and enter the login name using the soft keyboard.
Selecting from a list Tap the [Select from List] key and select a user name from the
User List screen.
LDAP authentication can be used when the administrator
of the server provides LDAP service on the LAN (local area network).
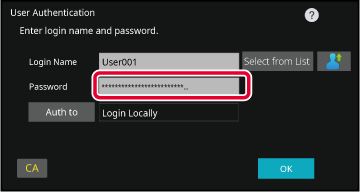
Enter the password.
Enter the from the soft keyboard.
If you are logging in to an LDAP server, enter the password that
is stored with your LDAP server login name.
Each entered character will be displayed as “
". After entering the , tap the [OK]
key.
When authentication is by LDAP server and you have different
passwords stored in "User List" and in the LDAP server, use the
password stored in the LDAP server.
To
have the user name and password registered:
In "Settings (administrator)", select [User Control]
→ [User Settings] → [User List].
When registering the LDAP server, change the information
for [Auth to] as required.
- When selecting
from the User List screen:
The LDAP server you are connecting to has
been registered upon user registration, and so the target server
to which authentication should be directed appears when the login
name is selected.Go to step 3.
- When entering
from the soft keyboard:
Tap [Auth to] and select the LDAP server
to log in.
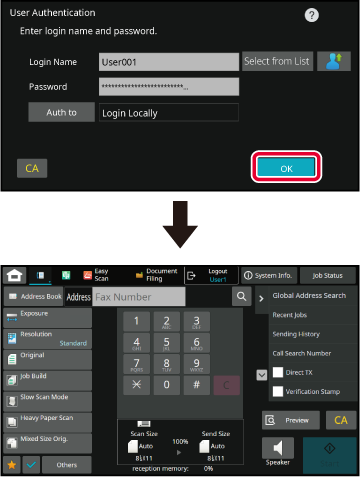
Tap the [OK] key.
If the entered login name and password are authenticated, the
number of remaining pages that the user can copy or scan is displayed.
When a limitation is set for the number of pages
that a user can use, the use count for the user that has logged
in is displayed.
- To
limit the number of pages that a user can use:
In "Settings (administrator)", select [User
Control] → [Access Control Settings] → [Pages Limit Group].
- To hide
the number of pages that can be used after login:
In "Settings (administrator)", disable
[System Settings] → [Authentication Settings] → [Default Settings]
→ [Display Usage Status after Login].
- To change
the message display time:
In "Settings" (administrator)", select
[System Settings] → [Common Settings] → [Operation Settings] → [Condition
Settings] → [Message Time Setting].
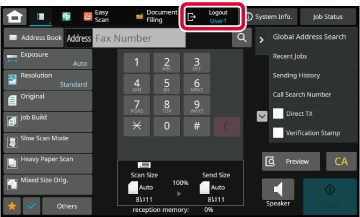
When you have finished using the machine and are ready
to log out,
tap [Logout].
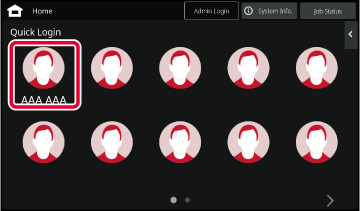
When operating the machine, this enables
easy authentication by tapping a preconfigured icon.
- Up to 20 users can be registered.
- Only the machine supports quick authentication.
Web page authentication and authentication from a printer driver
cannot be used. To use web page authentication and authentication
from a printer driver, enter to authenticate.
- Quick authentication cannot use IC card
authentication or device account mode.
- If [A Warning when Login Fails] is enabled in the system
settings, the operation panel will be locked for five minutes if
an incorrect password is entered three times in a row. Contact the
machine administrator to check the password assigned to you.
To
use quick authentication
In "Settings (administrator)", enable
[System Settings] → [Authentication Settings] → [Default Settings]
→ [Enable Quick Login].
For the authentication server settings, set "Login Locally", and
for the authentication method settings, set "Login Name/Password".
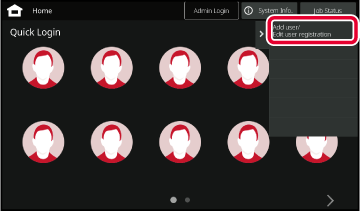
Register users with quick authentication
When registering users with quick authentication, the
User Administration Settings and Web page settings used when registering
normal users cannot be used. Registration is carried out on the
quick authentication login screen.
Tap [Add user/Edit user registration] on the action panel.
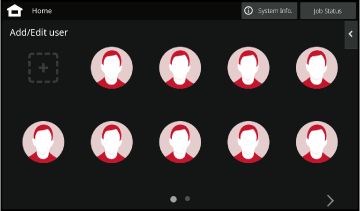
Tap the position you wish to register.
This switches to the user registration screen.
When tapping an icon that is already registered, this switches
to the user information edit screen.
Details to edit are the same as the settings details
in registering a new user screen. See step 3 when editing.
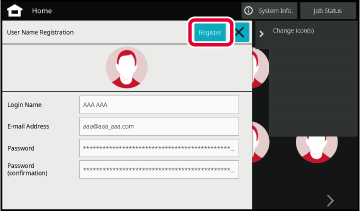
Enter user information, and tap the [Register] key.
Specify the user icon, Login Name, E-mail Address, Password,
and Password (confirmation). Tap the items to register, and enter necessary details.
- Tap "Change icon(s)"
on the action panel, and the icon selection screen appears. Select
the desired icon to configure.
- Login Name is displayed
together with the icon. Ensure this is entered.
- When editing user information,
the Password cannot be changed. "Password" and "Password (confirmation)"
will not be displayed on the edit screen.
To
delete a registered user
Tap [Add user/Edit user registration] on the action panel, then tap the icon
of the user to delete. Tap [Delete] on the action panel, and
then tap the [Delete] key in the displayed confirmation message.
User
editing and deleting from User Administration Settings and Web page
In "Settings (administrator)", select [User Control]
→ [User Settings] → [User List].
Authenticating the machine using quick authentication
Tap the icon.
If a password is not set, then login will close at this
time.
If setting a Password, enter the Password.
Enter the Password from the soft keyboard.
Entered text is displayed with "*". After entering the Password,
tap the [OK] key.
When you have finished using the machine and are ready
to log out, tap [Logout].