Tap the [Easy Scan] key on the Home screen.
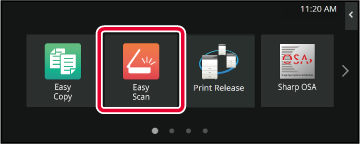
Tap [Scan to USB/Local Drive].
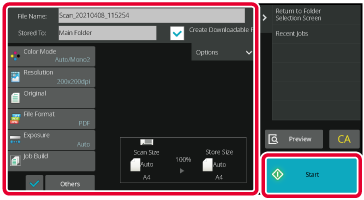
Place the original.
Place the original in the document feeder tray of the automatic document feeder, or on the document glass.Tap [Scan to Local Drive].
To select settings, tap the key of each desired setting.
IMAGE SEND SEQUENCETap the [Color Start] or [B/W Start] key to start scanning.
A beep will sound to indicate that scanning and file store have ended.Tap the [File retrieve] key on the Home screen.
Tap [Scan to Local Drive] on the action panel.
Place the original.
Place the original in the document feeder tray of the automatic document feeder, or on the document glass.Check the file name and save location, and tap keys for any settings you want to select.
 ), the [File Format] key is grayed
out and cannot be used. You will not be able to download scan data
in the specified format from the Web page.
), the [File Format] key is grayed
out and cannot be used. You will not be able to download scan data
in the specified format from the Web page.Tap the [Start] key to start scanning.
A beep will sound to indicate that scanning and file store have ended.
Tap the [Easy Scan] key on the Home screen.
Tap [Scan to USB/Local Drive].
Place the original.
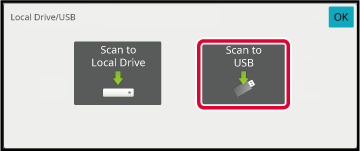
Place the original in the document feeder tray of the automatic document feeder, or on the document glass.Tap [Scan to USB].
To select settings, tap the key of each desired setting.
IMAGE SEND SEQUENCETap the [Color Start] or [B/W Start] key to start scanning.
A beep will sound to indicate that scanning and file store have ended.Tap the [File retrieve] key on the Home screen.
Tap [Scan to External Memory Device] on the action panel.
Place the original.
Place the original in the document feeder tray of the automatic document feeder, or on the document glass.Check the file name and save location, and tap keys for any settings you want to select.
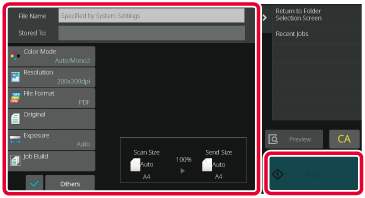
Tap the [Start] key to start scanning.
A beep will sound to indicate that scanning and file store have ended.Connect the USB memory device to the machine.
.png)
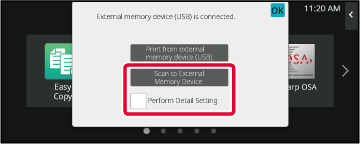
When a screen for selecting the action appears, tap [Scan to External Memory Device].
To select detailed settings in normal mode, select the [Perform Detail Setting] checkbox .
.
Tap the [Color Start] key or [B/W Start] key.
To check a preview of a document, tap the [Preview] key..png)
After scanning all originals, tap the [Read-End] key.
.png)
Check the [Sending data has been completed.] message, and remove the USB memory device from the machine.
.png)
Version 06a / bp70c65_usr_06a_us
