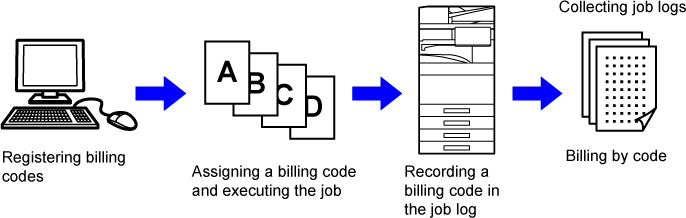
A billing code, which is
added to a recorded job log when a printing or sending job has been
executed, is used to perform billing processing.
Billing codes are classified into two types: main code and
sub code. A billing code is recorded in the job log when it is entered
and a print or send job is executed.
Summing up the amounts by Billing Code based on the job logs
will facilitate the subsequent operations, for instance, when making
combined billings.
| Type | Description |
|---|---|
|
Main Code |
Used to categorize the results of the executed print and send jobs to enable efficient management. For example, you can assign a code by customer and collect cost information by customer from job logs. Code example: Issue of company A |
|
Sub Code |
Available when the main code alone is not sufficient to enable management of billing codes. For example, you can assign monthly cost information to a sub code and collect the total monthly cost information of all customers when the customer name is assigned to the main code. Code example: Issue of October, 2020 |
|
Default Code |
Automatically assigned when the main code or sub code has not been specified. |
To enable use of the billing code, select "Settings
(administrator)" → [User Control] → [Billing Code Setting] → [Administration Settings],
then
set [Use Billing Code] to [Enable].
In "Settings (administrator)", select [System Settings] →
[System Control] → [Job Log] → [Job Log Operation], and click [Save]
button to download the job logs. Then sum up the data by classifying
and arranging the stored job logs.
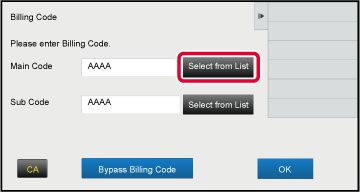
If the use of billing code is enabled in
"Settings (administrator)", the billing code entry window is displayed
at the time of mode transition (at the time of printing/sending
in document filing mode).
Enter the main code or sub code as required.
 . This eliminates the need to enter billing
codes at each mode transition.
. This eliminates the need to enter billing
codes at each mode transition.To change the specified billing code to another one,
tap [Switch Billing Code.] on the action panel.
When the billing code entry window is displayed, select a
new billing code.
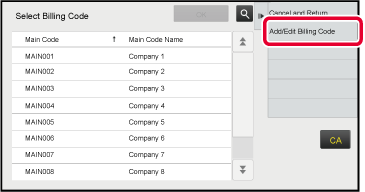
Select the desired billing code from the list of registered
billing codes.
You need to register billing codes in advance.
REGISTERING A NEW BILLING CODE
When the billing code entry window is displayed, tap the [Select from List] key of the main code.
Tap and select the main code from the list.
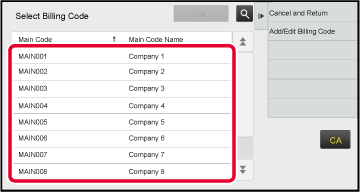
 . When the search window is displayed,
enter the main code and main code name, then tap the [Search Start] key.
The search result list is displayed.
. When the search window is displayed,
enter the main code and main code name, then tap the [Search Start] key.
The search result list is displayed.Tap the [Execute] key.
Returns the screen to the billing code entry window. .
.Tap the [Select from List] key of the sub code.
The sub code list is displayed. Perform the procedure shown in steps 2 and 3, then specify the sub code.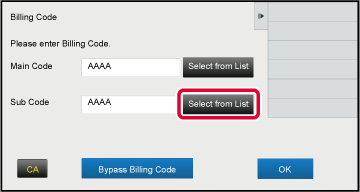
Tap the [OK] key.
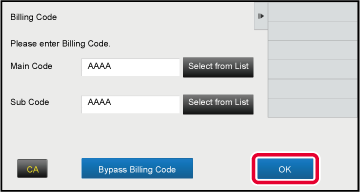
When the billing code entry window is displayed, tap the box in [Main Code], then enter the main code.
Specify the code using up to 32 single-byte characters.
Tap the box of [Sub Code], then enter the sub code.
Specify the code using up to 32 single-byte characters.
Tap the [OK] key.
Register a new billing code.
A billing code can be registered not only from the billing
code entry window but also from "Settings".
The registered billing codes can only be shared in the
specified group at the time of user authentication.
If the shared range is not specified, the registered billing
codes are shared by all users.
When the billing code entry window is displayed, tap [Select from List] of the main code.
To register a new sub code, tap the [Select from List] key of the sub code.Tap [Add/Edit Billing Code] on the action panel.
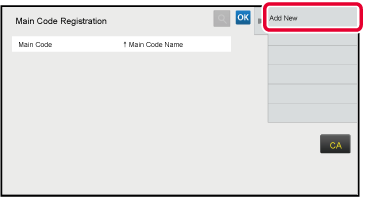
Tap [Add New] on the action panel.
 .
.Tap the box of [Main Code], then type in the main code.
Specify the code using up to 32 single-byte characters.
Tap the box of [Main Code Name], then type in the main code name.
Specify the code name using up to 32 double- or single-byte characters.If necessary, select the share range of billing code.
Public to All: Registers the billing code as a public code for all users who use the machine.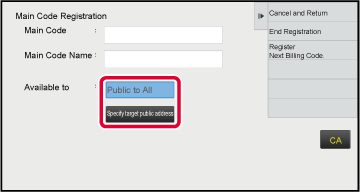
Tap and select a group as a public destination
Up to eight groups can be specified. After the settings are completed, tap.
To continuously register other billing codes, tap [Register Next Billing Code.].
Execute steps 4 to 7 to register the main code.Tap [End Registration] on the action panel.
This finalizes the registration and returns the screen to the previous window. Tap to finish the registration procedure.You can change or delete the registered
billing code.
The billing code can also be edited or deleted from "Settings".
When the billing code entry window is displayed, tap the [Select from List] key of the main code.
To register a new sub code, tap the [Select from List] key of the sub code.Tap [Add/Edit Billing Code] on the action panel.
Tap and select the main code to be edited, then tap [Edit] on the action panel.
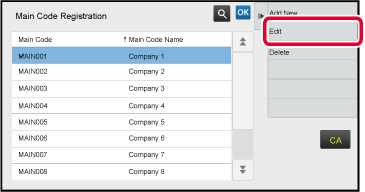 .
.Edit the main code as required.
For information on how to correct the code, refer to steps 4 to 7 in “ REGISTERING A NEW BILLING CODE".Tap [End Registration] on the action panel.
This finalizes the registration and returns the screen to the previous window. Tap to finish the registration procedure.When the billing code entry window is displayed, tap the [Select from List] key of the main code.
To delete a sub code, tap the [Select from List] key of the sub code.Tap [Add/Edit Billing Code] on the action panel.
Tap and select the main code to be deleted, then tap [Delete] on the action panel.
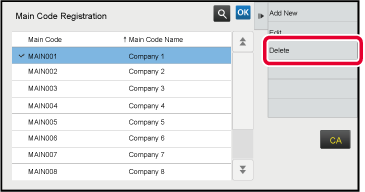 .
.When the confirmation message appears, tap the [Delete] key.
Version 06a / bp70c65_usr_06a_us
